Once alarms or alarm groups have been converted into triages, they can be managed via the Alarm Triage dashboard.
1 Alarm Triage Dashboard overview
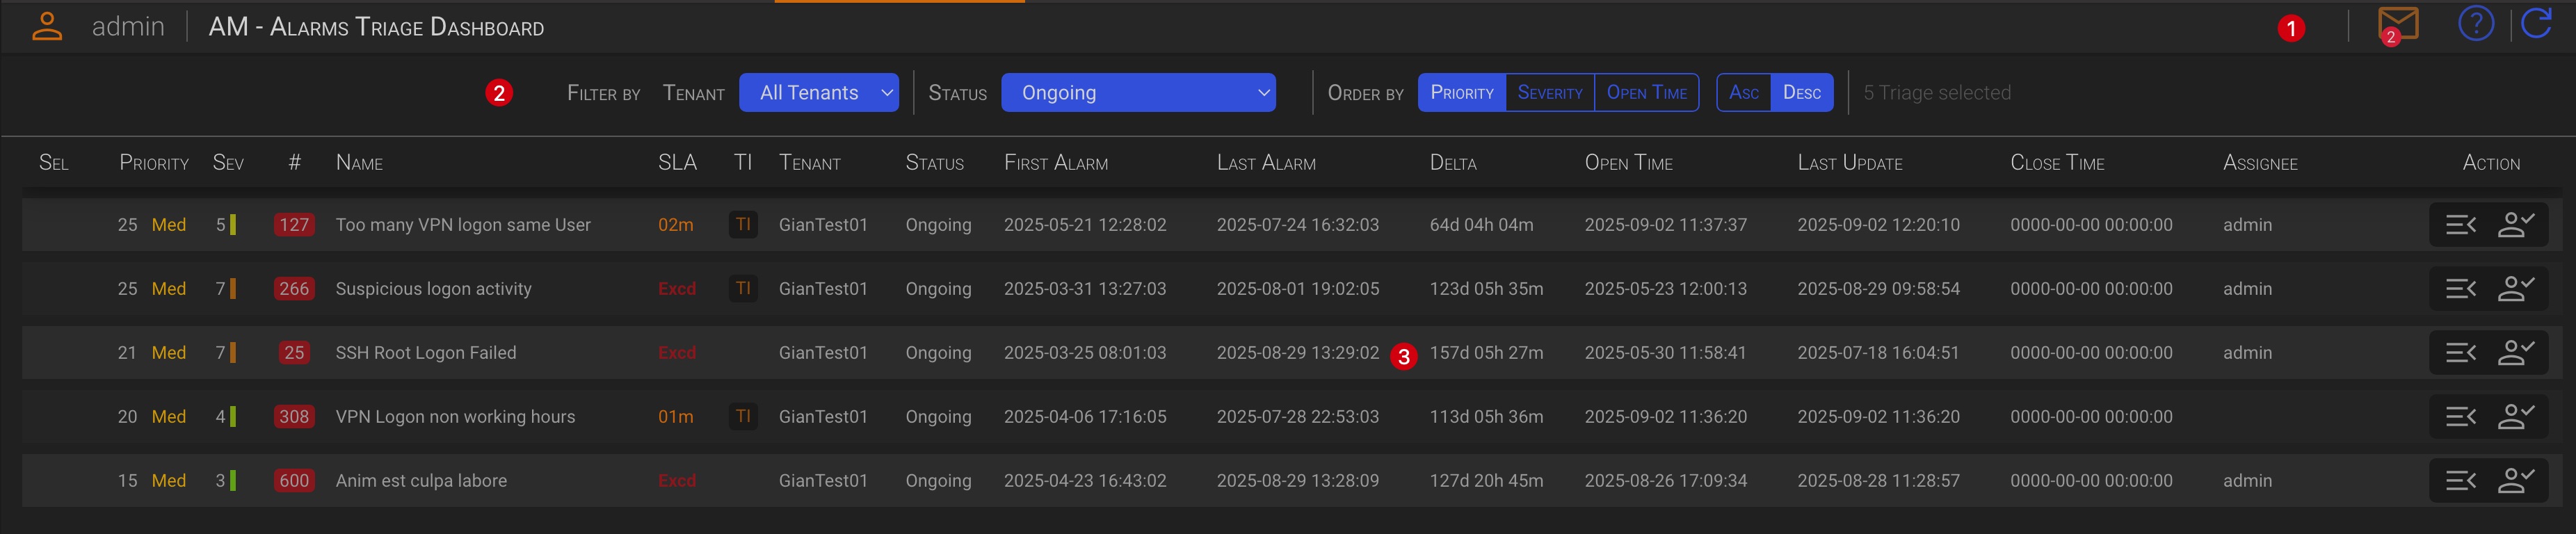
The Triage Dashboard is split into three main areas:
1.1 The Header section (1)
The only function available on the header is the messages handling.
- Messages By clicking the envelope icon, you can read messages sent to your account by backend processes, such as SLA expiration or other operational messages.
Tip
Click the envelope icon to toggle messages display.
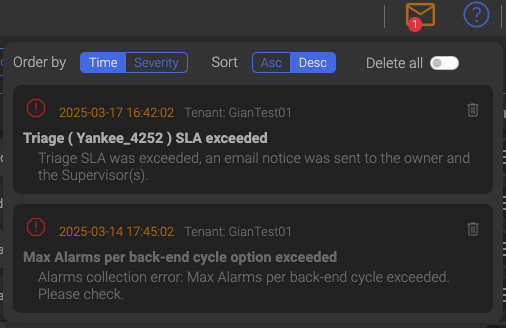
Messages actions
- Order by creation time or message severity (ascending or descending)
- Delete single messages
- Delete all messages
The number on the envelope icon represent the number of unread messages, when red, and the number of read messages when grey.
TIP
The backend processes automatically remove already read messages that are older than one day and unread messages that are older than three days, since the information contained in messages is closely related to the time of their creation.
1.2 The Filters section (2)
In the Filter section, you can select which triage you want to see and the order in which they are displayed.

1.2.1 General Filters (1)
- Tenant You can choose which Tenant’s alarms you want to see.
1.2.2 Status Filter (2)
The Status Filter section shows the additional date range selection option for all Triage Statuses except Ongoing. Only triages with an open time within the specified date range will be displayed for these statuses.

You can switch the following Triage views
-
All Statuses Regardless of their status, the list of triages with open time within the selected date range will be displayed.
-
Ongoing Only open triages will be displayed. Triages that have been promoted to incidents will not be shown even if the related incident has not yet been closed.
-
Closed as False Positive Only closed as False Positive triages with close time within the selected date range will be displayed.
-
Closed as Incident Only closed as Incident triages with close time within the selected date range will be displayed.
1.2.3 Order by (2)
Here you can select how to order the current Triage view.
- Priority Triages will be ordered by Priority
- Severity Triages will be ordered by Severity
- Event Time Triages will be ordered by Event Time
1.2.4 Selected Triage (4)
Here you can see how many triages are matching your selection criteria.
1.3 The Triage section (3)
The Triage section contains the list of the triages matching your selection.

| Column | Description |
|---|---|
| Sel | This contains a check mark if the triage has been selected for multiple triage operations. |
| Priority | The triage priority is equal to the highest priority assigned to the alarms within the triage. |
| Sev | The triage severity is equal to the highest severity assigned to the alarms within the triage. |
| # | Number of alarms within the triage |
| SLA | The remaining time before the SLA expire. Target if the SLA was met or Excd if the SLA was exceeded |
| TI | This indicates whether one or more alarms within the triage matched a Treat Intelligence list. |
| Tenant | The reference Tenant |
| Status | The current Triage status |
| First Alarm | The first alarm date time, in chronological order, within the triage |
| Last Alarm | The date time of the last alarm added to the triage |
| Delta | The elapsed time between the first and the last alarms within the triage |
| Open Time | The triage open time |
| Last Update | This is the last date and time that the triage was updated by either the backend or a user action. |
| Close time | This is the date and time that the triage was closed. |
| Assignee | This is the name of the user who took over or claimed the triage. |
| Action | This contains the available triage action. (see the Triage dashboard actions chapter below) |
TIP
The system automatically adds new alarms to a triage when it detects a match with the key of an open triage.
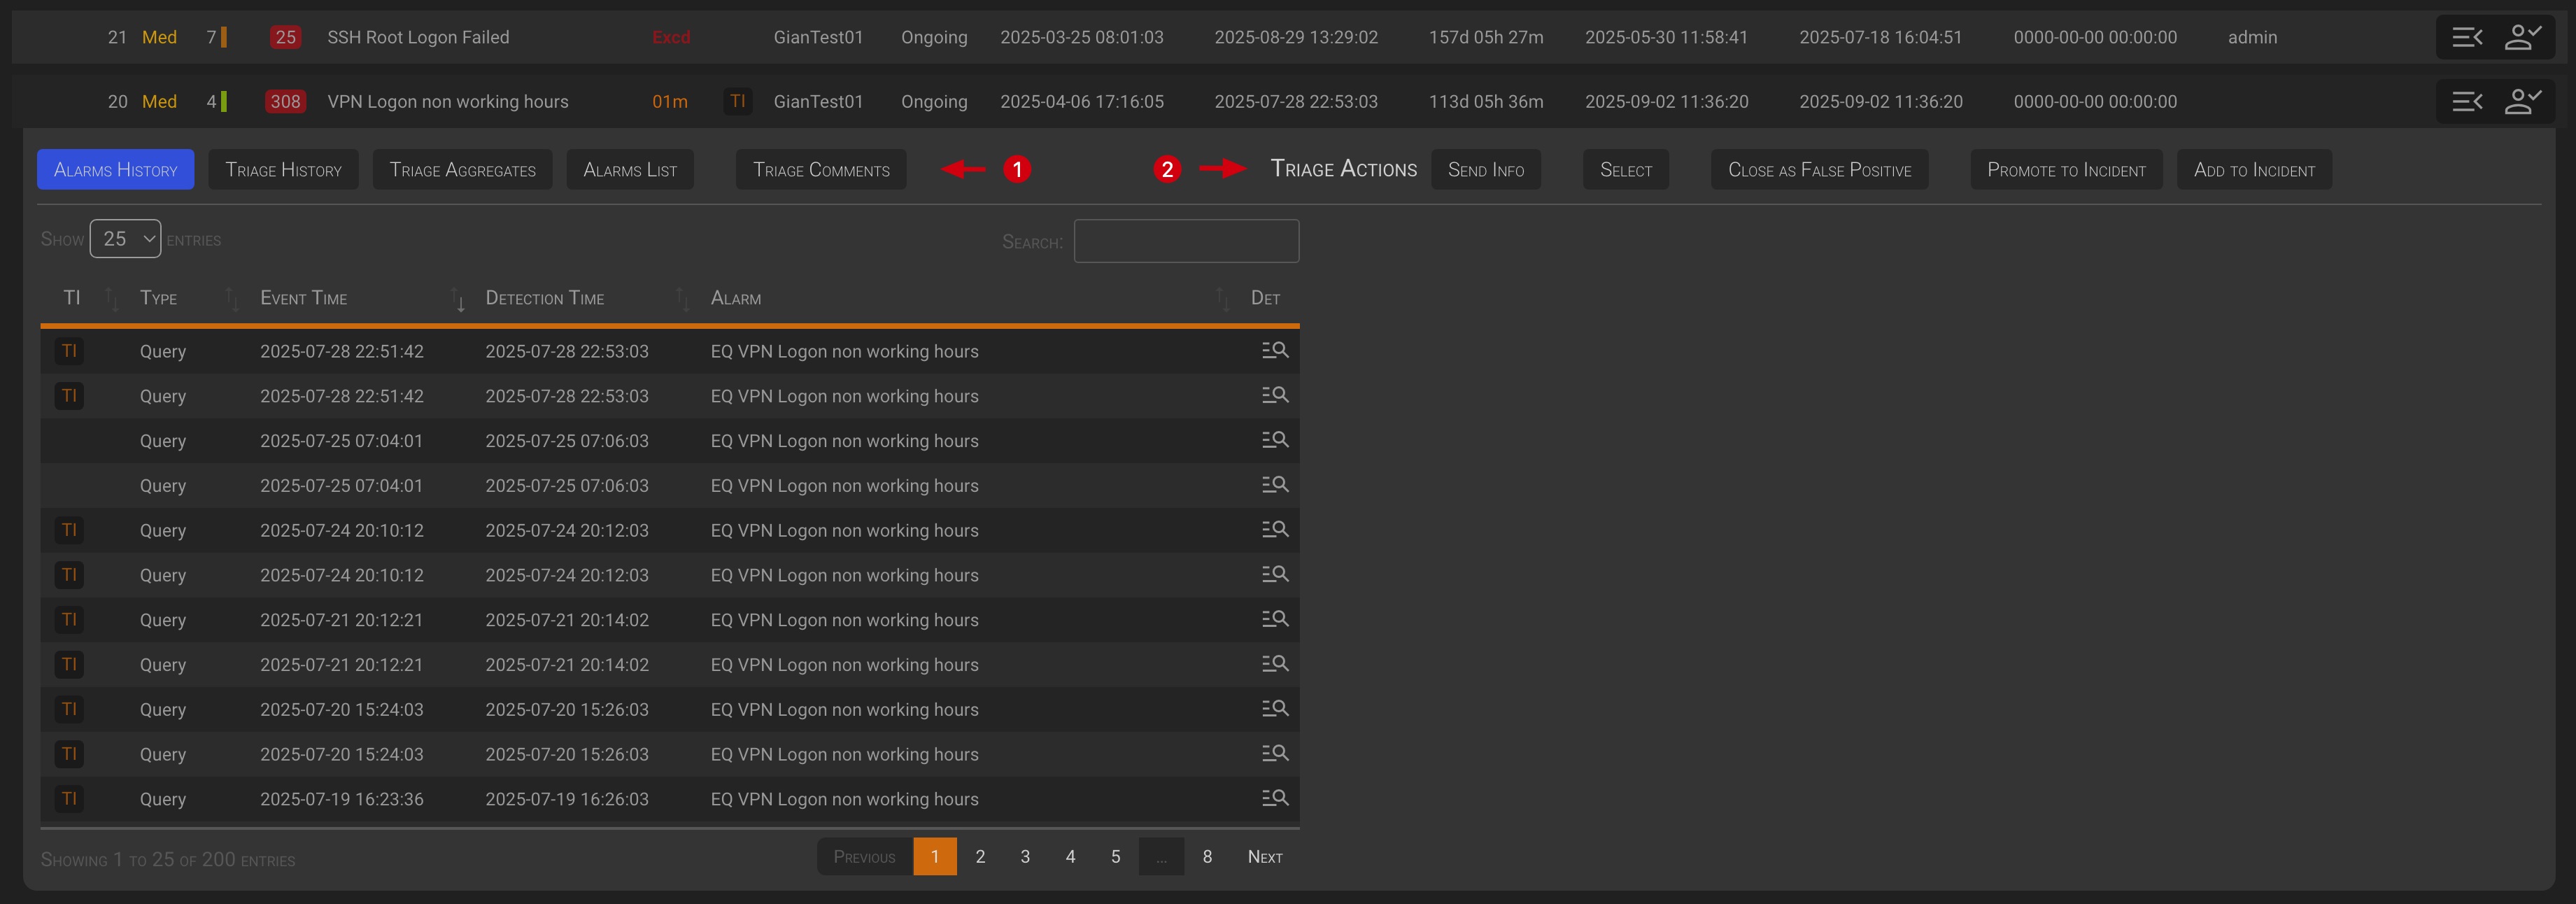
2 Triage dashboard actions
There are two actions that can be taken against a triage:
- Take Over
- Manage
2.1 Take Over
Clicking on the Takeover button ![]() allows you to take over a triage, or claim one that was already taken over by another operator.
Depending on whether the triage has already been assigned, the action button will change to allow you to take the appropriate action: Take Over
allows you to take over a triage, or claim one that was already taken over by another operator.
Depending on whether the triage has already been assigned, the action button will change to allow you to take the appropriate action: Take Over 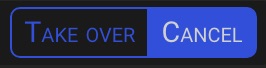 or Claim
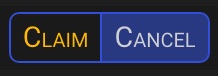
TIP
If you are not the owner of the triage, you can only browse its details. You will not be able to perform any of the actions available in the Triage Detail panel.
NOTE
Take Over and Claim actions will be logged in the triage history as well as all other actions.
2.2 Manage
Clicking on the Open Details button ![]() allows you to investigate and manage the triage.
allows you to investigate and manage the triage.
The triage management panel header is split in two sections:
- The triage analysis
- The triage management actions
Let’s take a closer look to the functions of each section.
2.2.1 Triage Analysis
Triage management panel will open with the triage’s alarm history tab open by default.
2.2.1.1 Alarm History
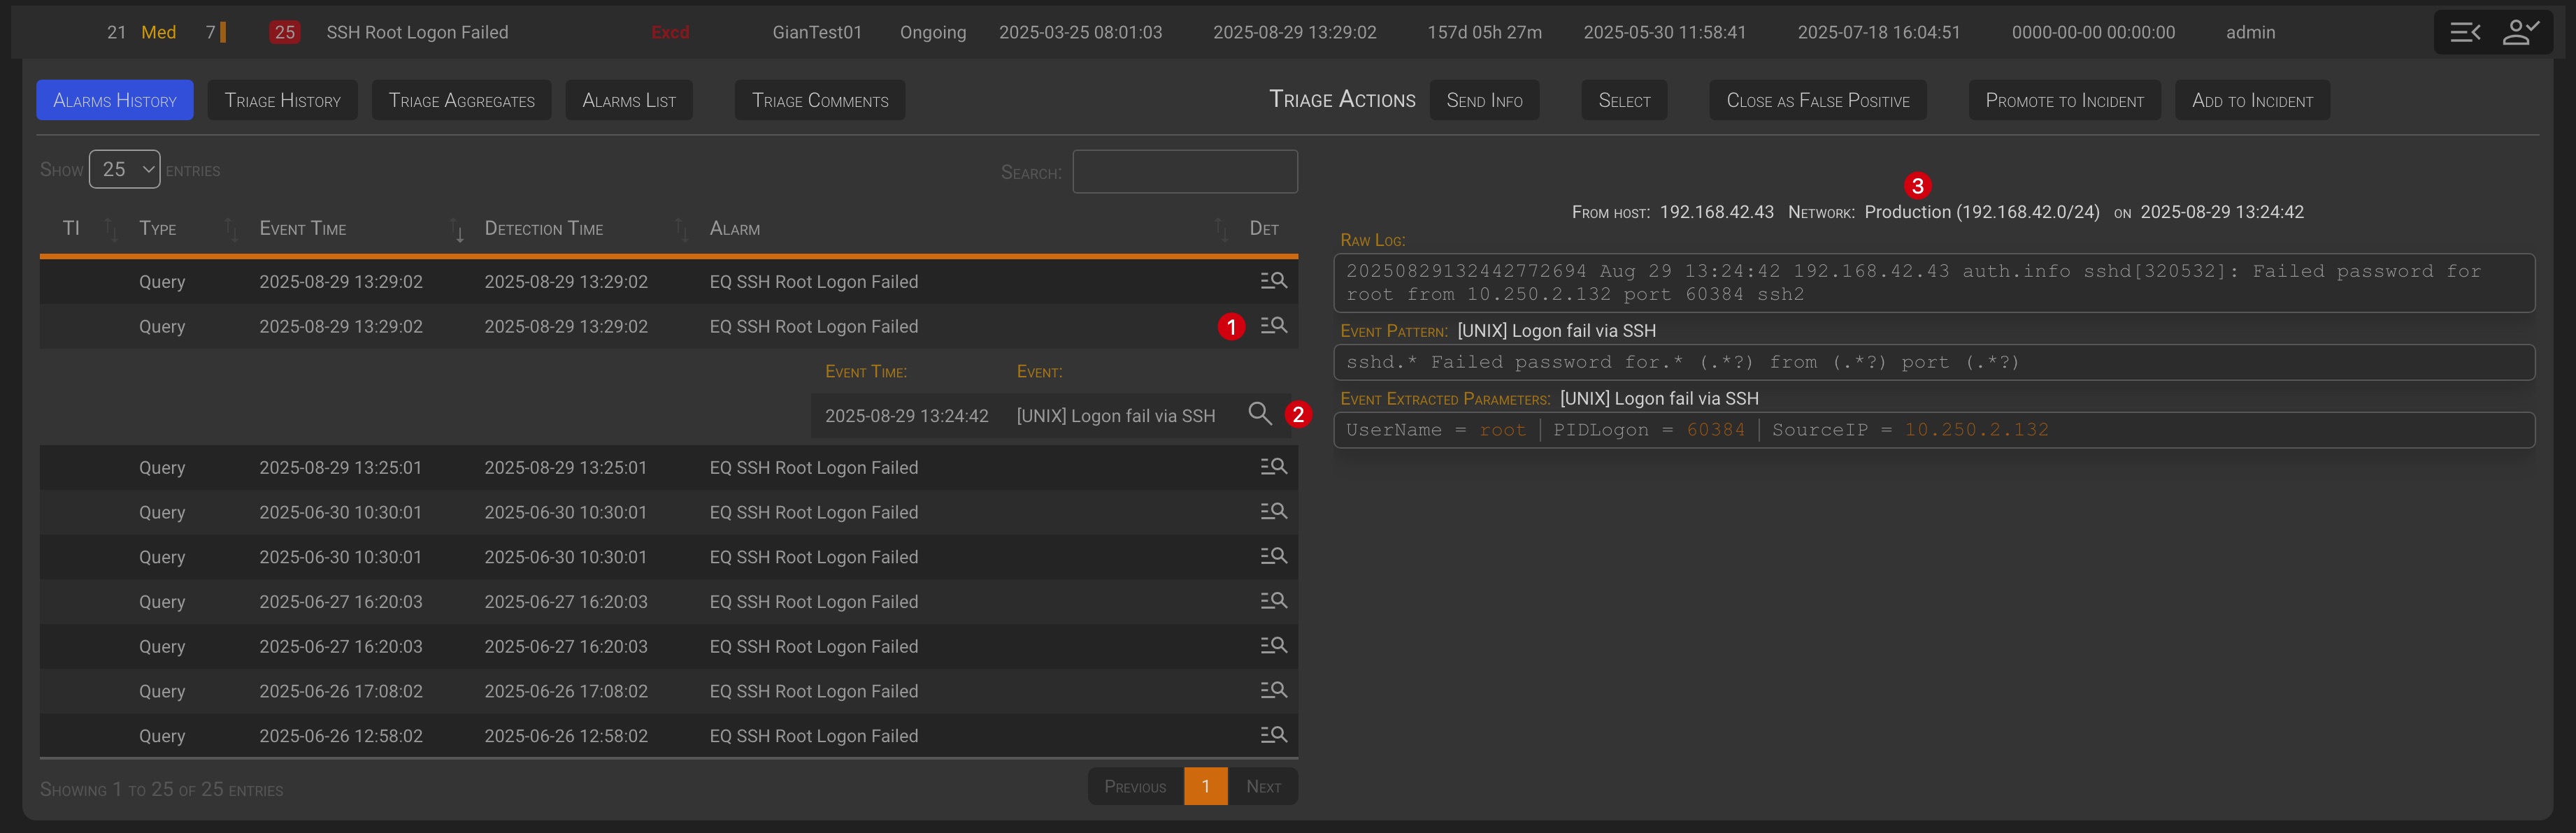
In the Alarm History tab you will see all the alarms within the triage and, clicking on the ![]() button (1), all the events that generated the alarm.
Then, click the
button (1), all the events that generated the alarm.
Then, click the ![]() button (2) for each event to view its raw log, pattern, and extracted parameters (3), as well as its alarm details.
button (2) for each event to view its raw log, pattern, and extracted parameters (3), as well as its alarm details.
2.2.1.2 Alarm List
In the Alarm List tab you will see the list of all the alarms within the triage.
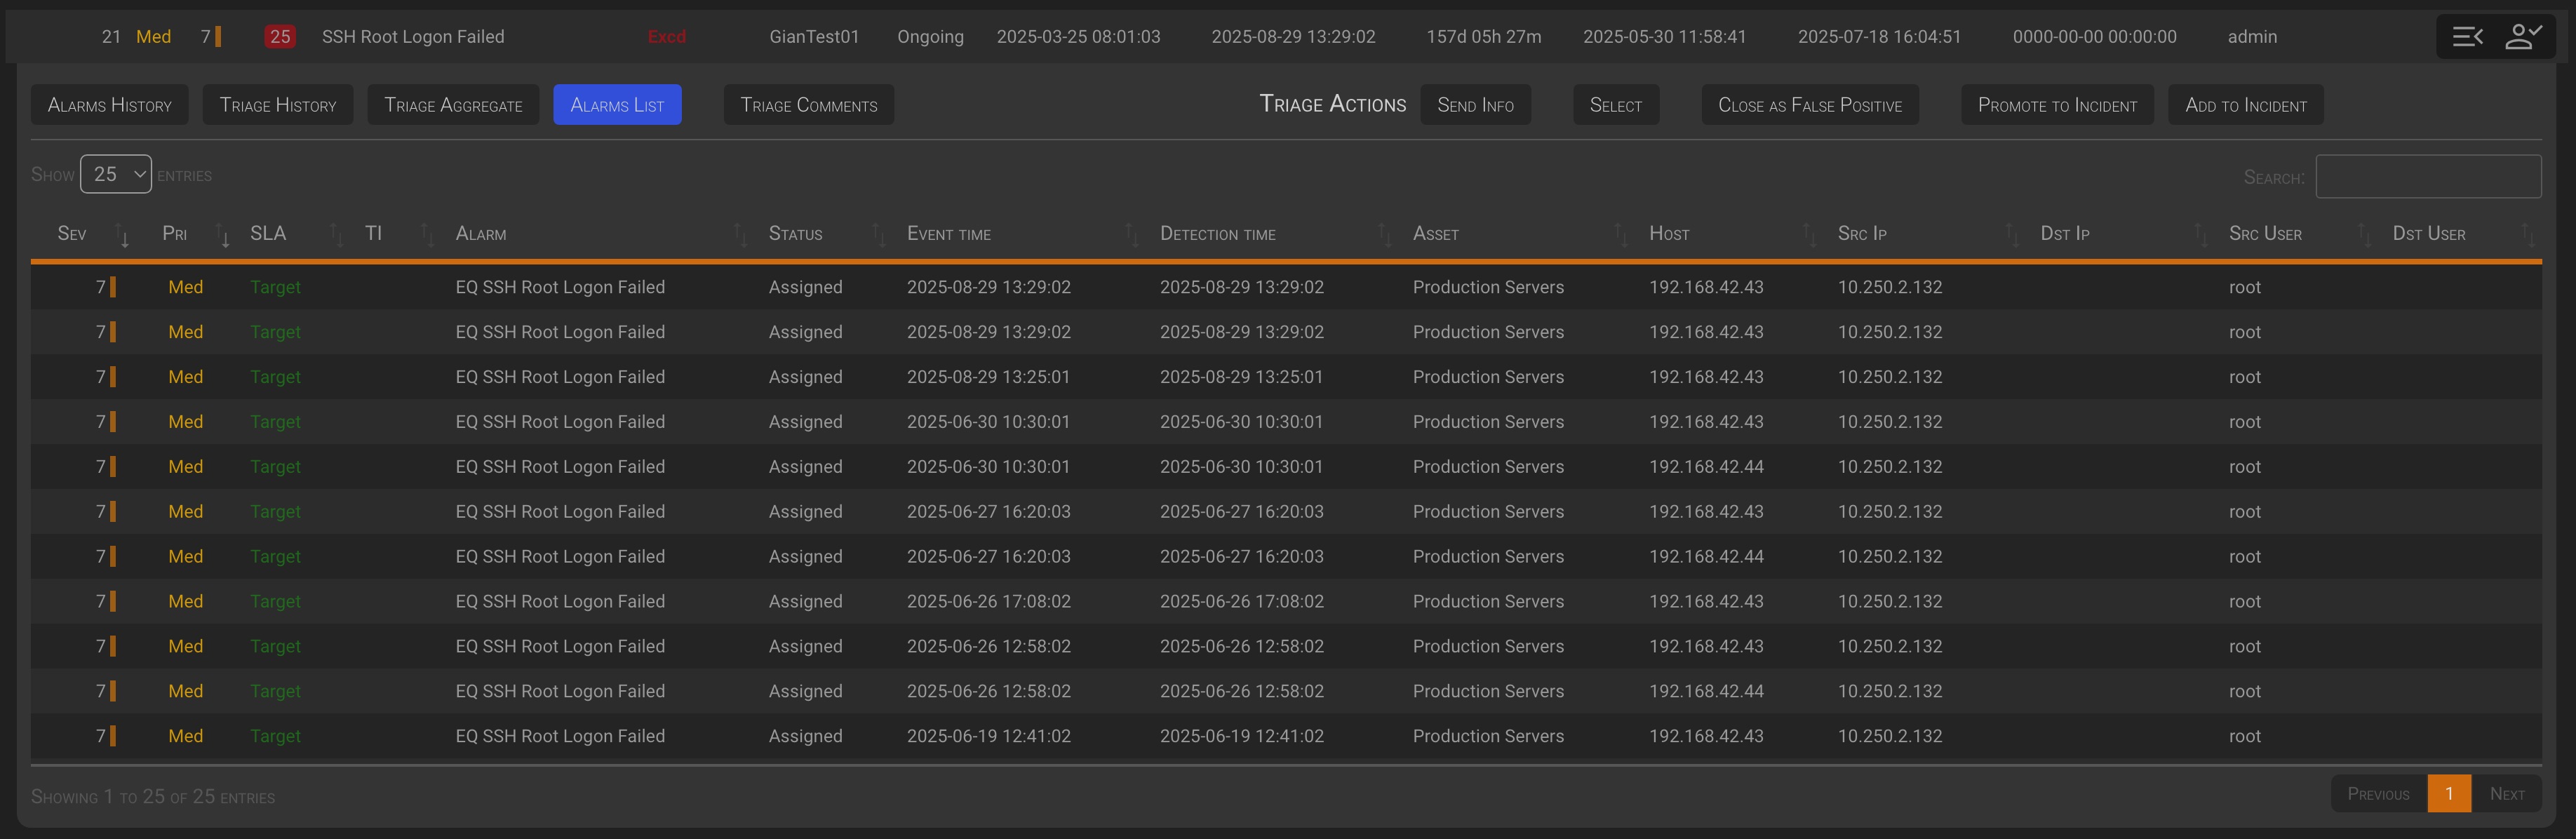
Important!
This is the point where it is possible to create a False Positive Rule, by clicking on the desired alarm row.
2.2.1.2.1 Triage Alarm management
Clicking on any row in the Alarms List tab of the Triage Management panel will open the Alarm Management panel for the selected alarm.
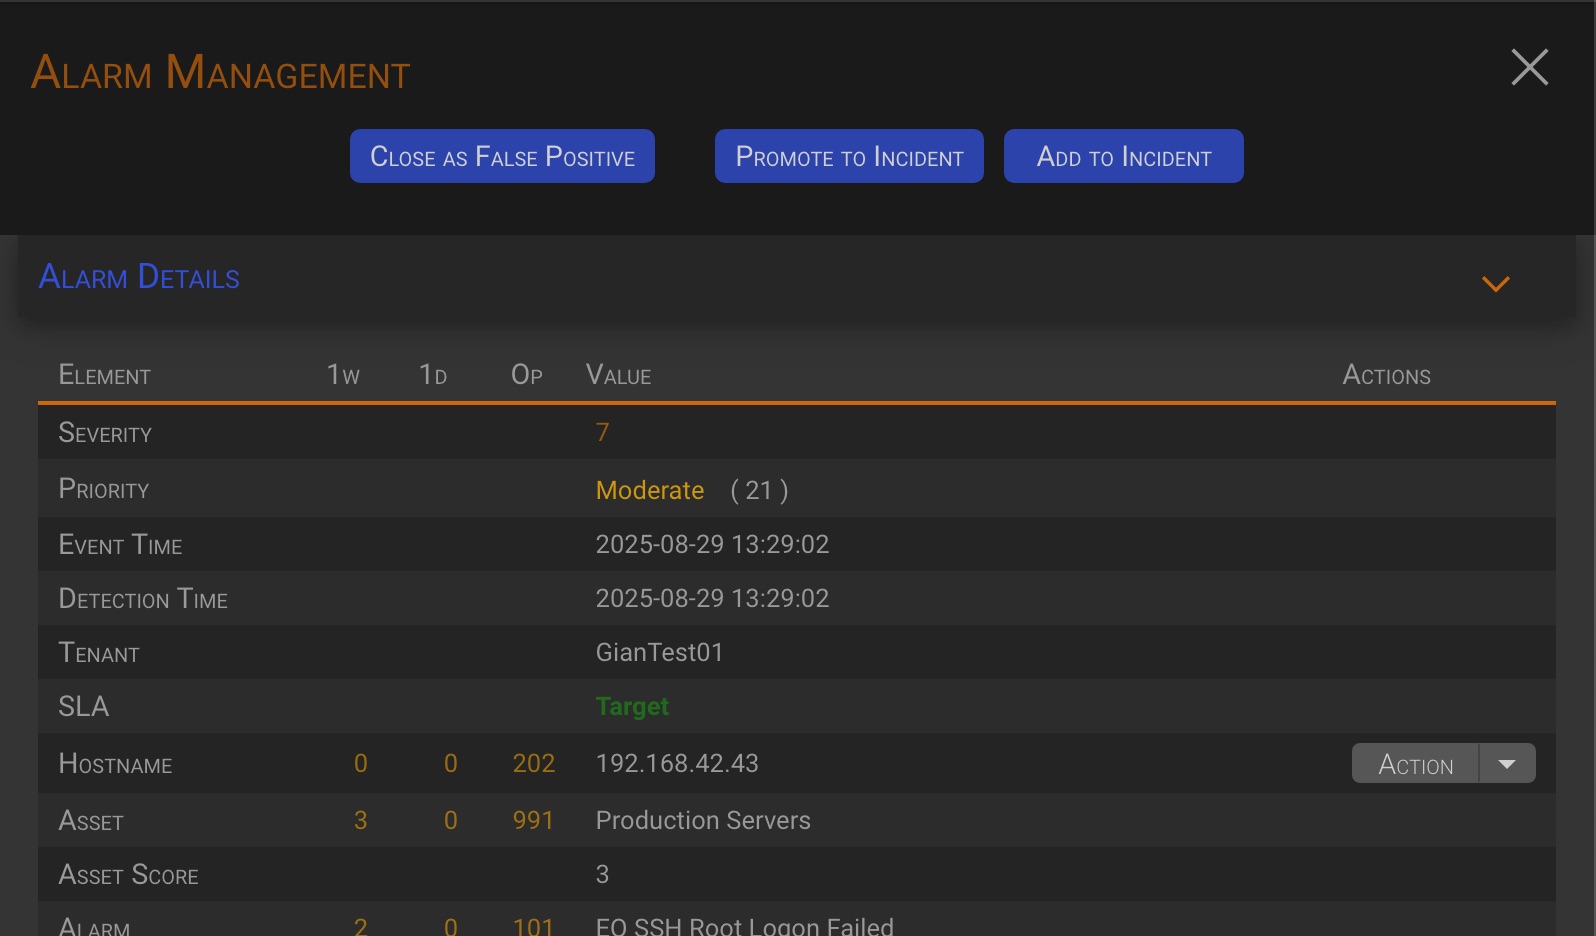
As you can see, the Alarm Management section differs from the one on the Alarm Dashboard. This is because Alarm Management Actions change depending on the context.
Let’s go deep in this new actions.
TIP
Please see the 03 - Alarm Details and Operation for more details on the alarm detail section.
Close as False Positive By clicking the Close as False Positive button, an hidden section will appear below the management actions button.
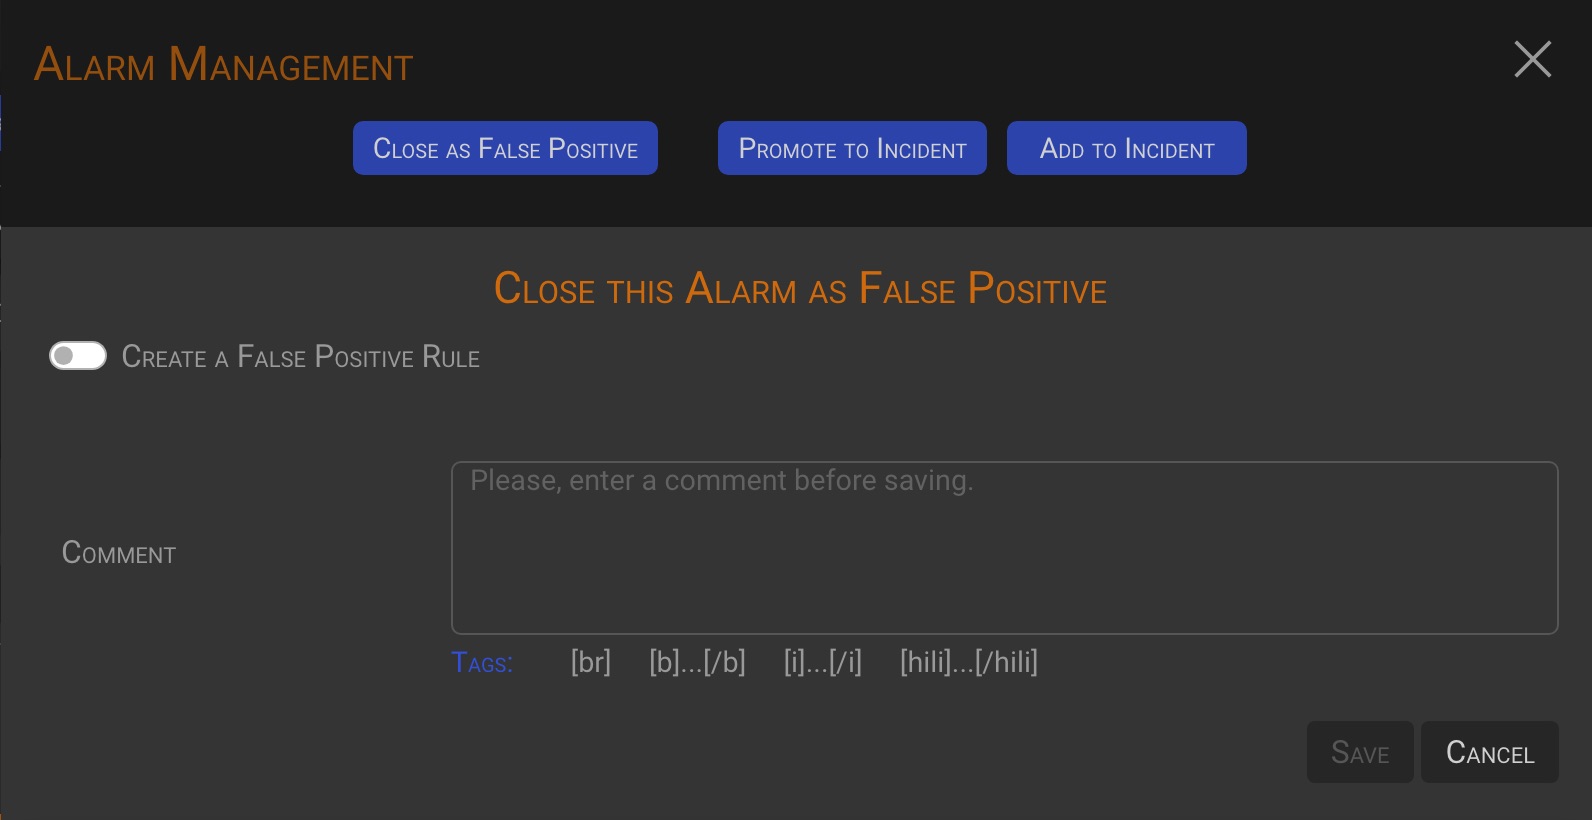
After entering a Comment, the Save button will be enabled, allowing you to close the alarm as a false positive.
Create a False Positive Rule Activating the Create a False Positive Rule switch a new hidden section will appear enabling you to define a false positive rule.
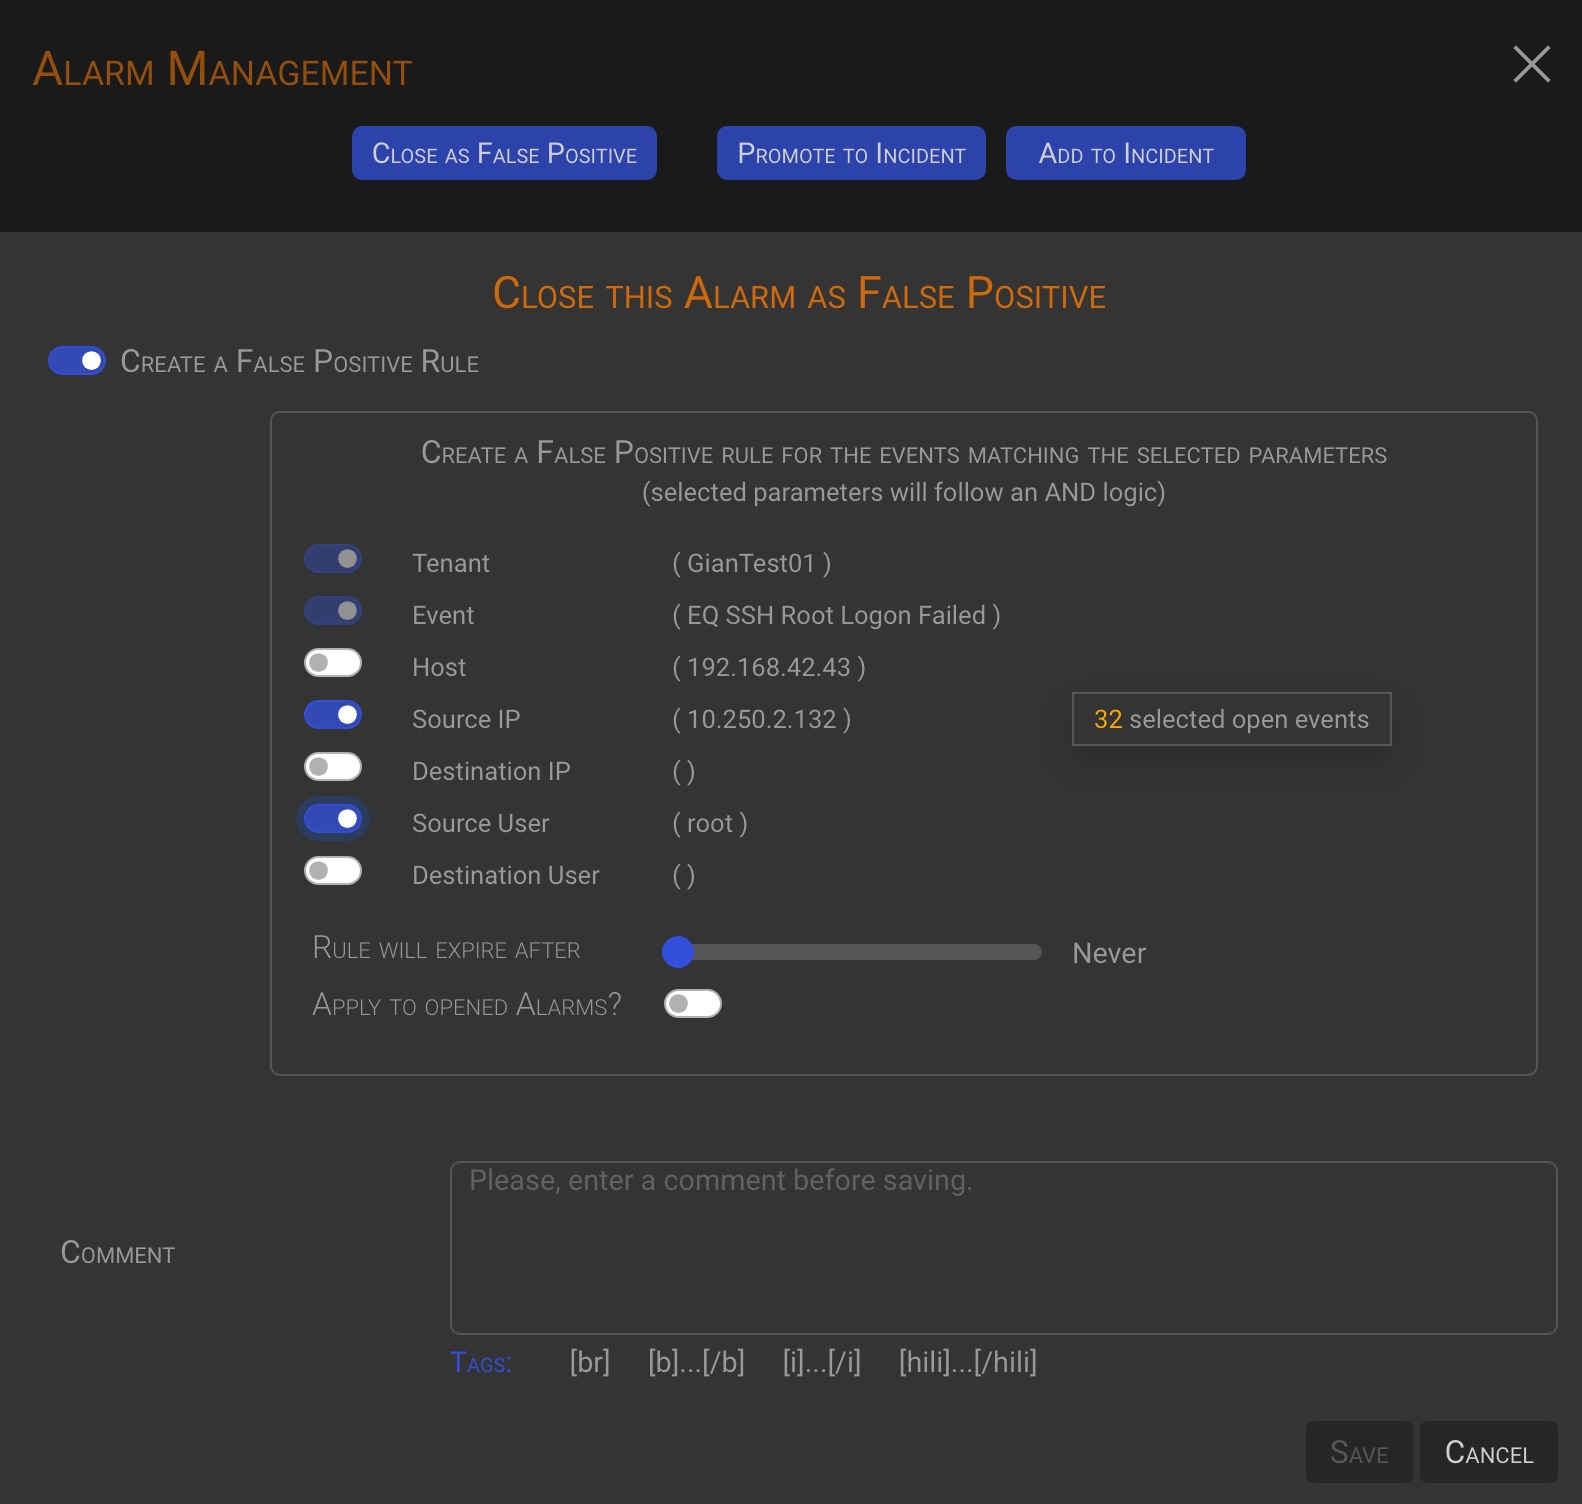
How to create a rule
-
First, select the parameters to be used in building the rule. In the example, the source IP address and source user name were selected. The tenant and event name are selected by default. Note that as you select parameters, the system will update the number of open events that match your current criteria (+).
-
After selecting the parameters, you may want to set an expiration date for the rule. Use the Rule will expire after slider to set the expiration date. The backend will drop the rule when the expiration date will is met.
-
You can also choose to apply the current rule to the alarms that are currently open, turning on the Apply to opened Alarms? switch. The number of affected events is displayed in the rule box. (+).
-
Enter a comment and click the Save button to save the rule and close the current alarm as a false positive
TIP
The backend will apply false positive rules to all incoming alarms. Those matching a rule will be automatically closed as a false positive.
Important!
False positive rules can only be defined at the alarm level when the Alarm Management Panel is accessed by clicking on an alarm row in the Alarm List tab of either the Triages or Incidents page.
NOTE
Please refer to the 05 - False Positive Rule management chapter for more information on rules management.
Promote to incident
TIP
This management action creates a new Incident and assigns the current alarm to it.
By clicking the Promote to Incident button, an hidden section will appear below the management actions button.
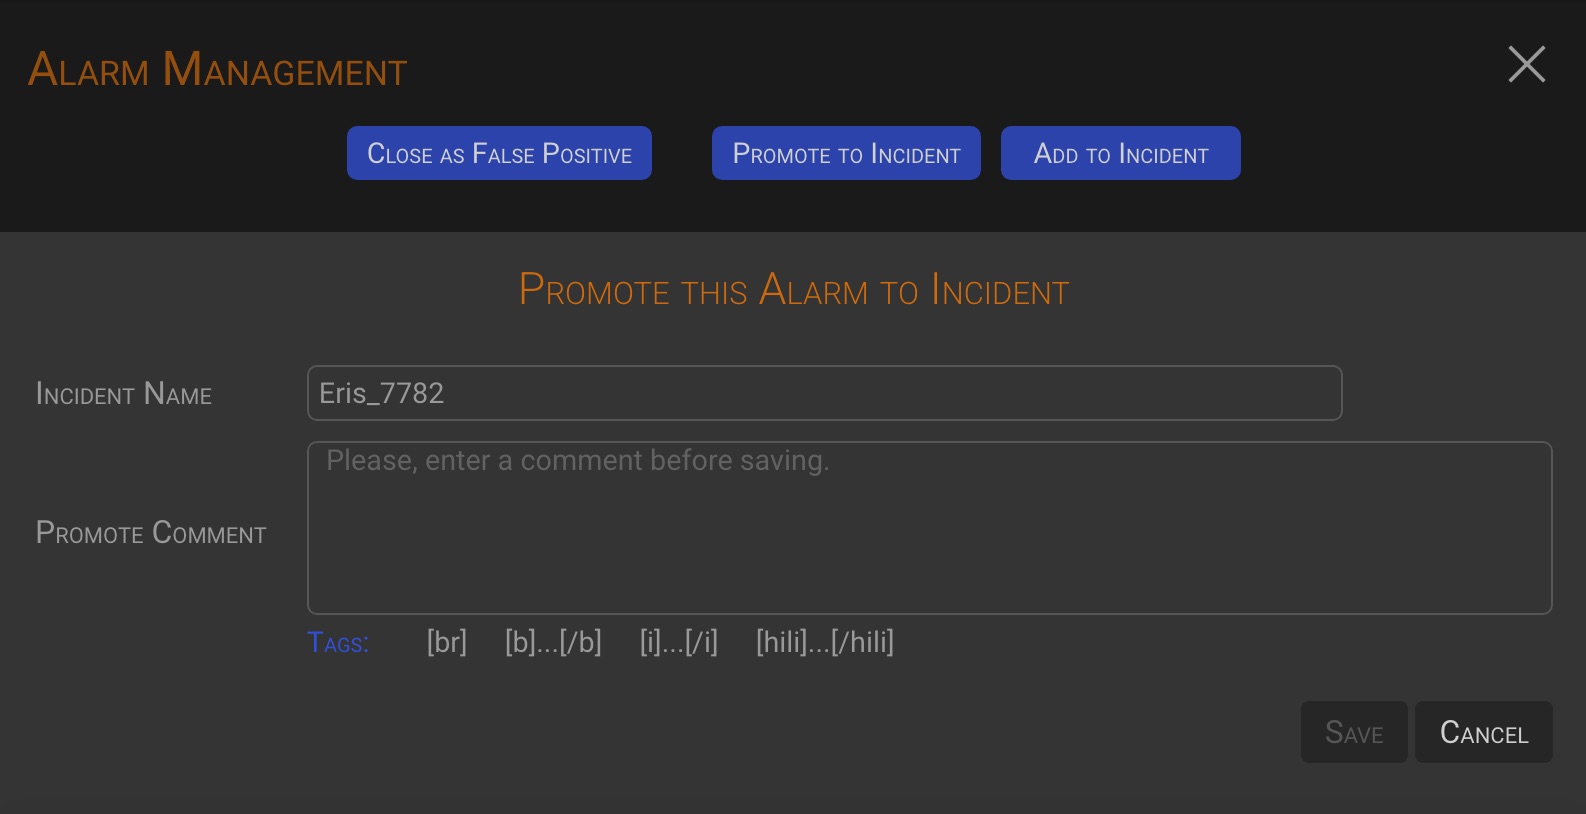
The system generates a unique Incident Name, but you can change it to your own text. After entering a Promote Comment, the Save button will be enabled, allowing you to create the new incident.
Add to Incident
TIP
This management action adds the current alarm to an already existing incident.
By clicking the Add to Incident button, an hidden section will appear below the management actions button.
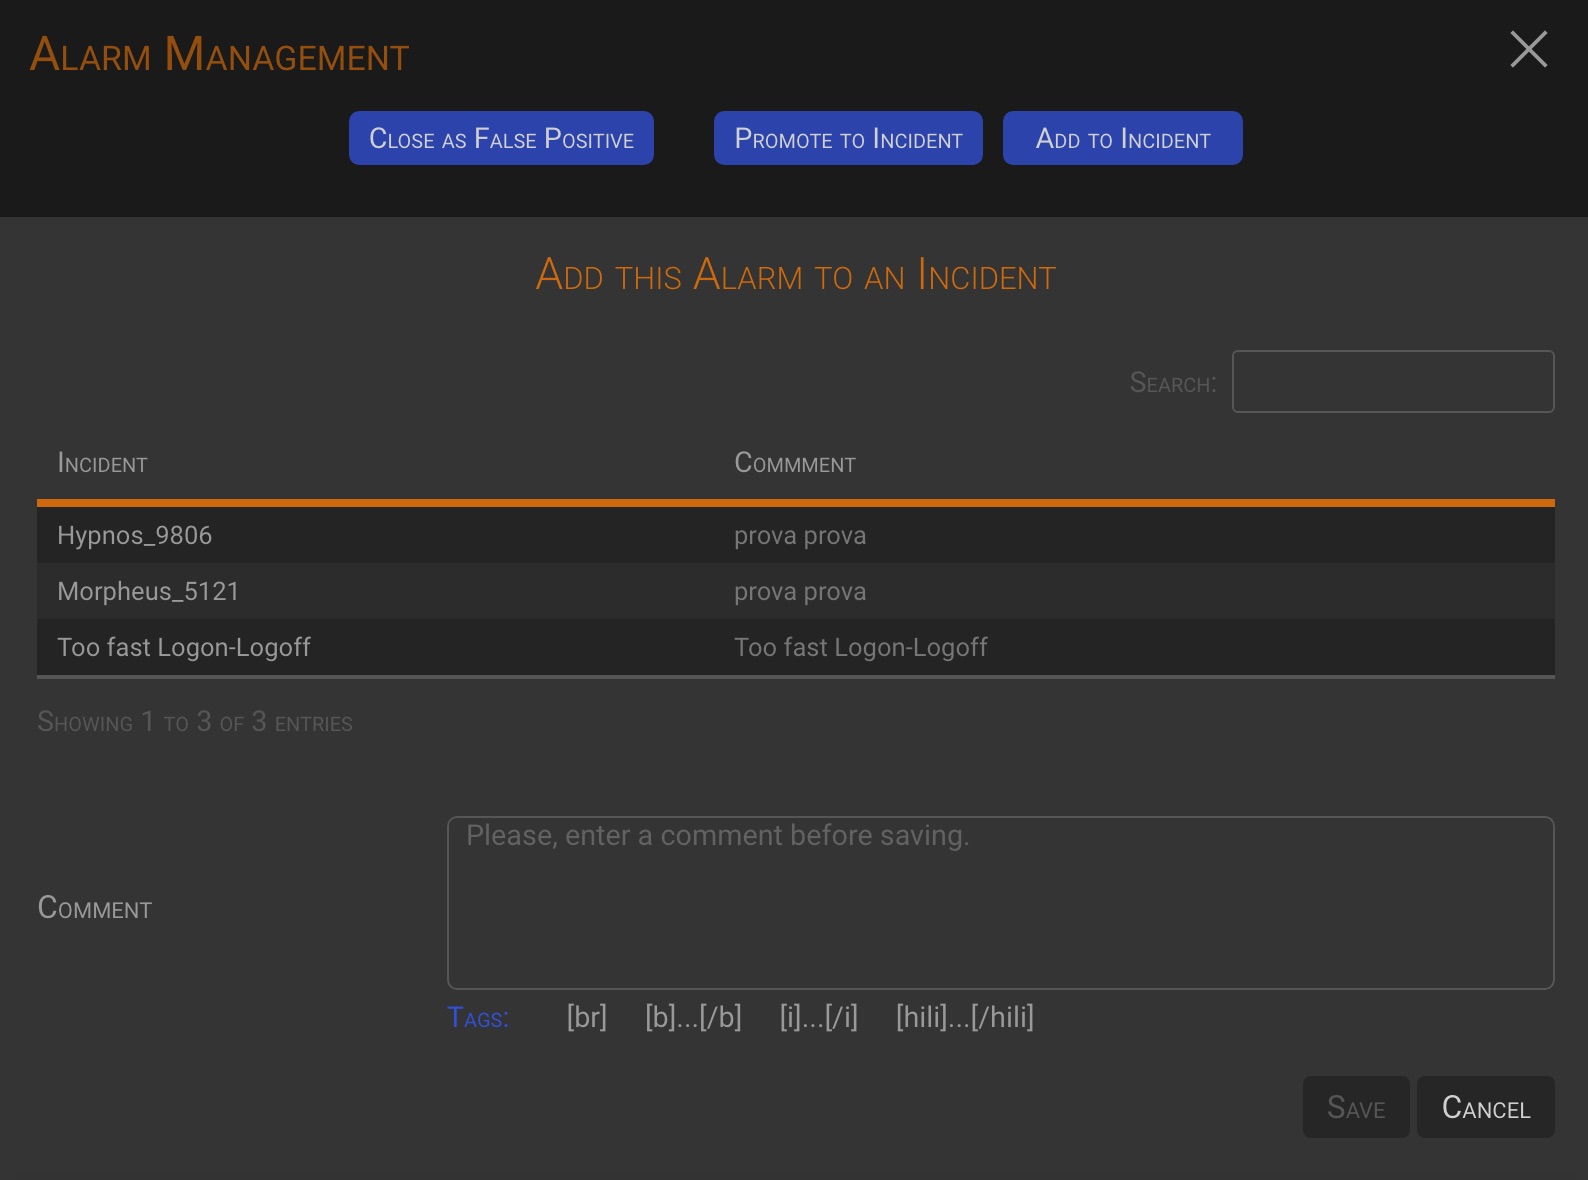
Select the incident to which you want to add the alarm to by clicking on the incident line in the incident table (the line will turn green). After entering a Comment, the Save button will be enabled, allowing you to add the current alarm to the selected incident.
2.2.1.3 Triage History
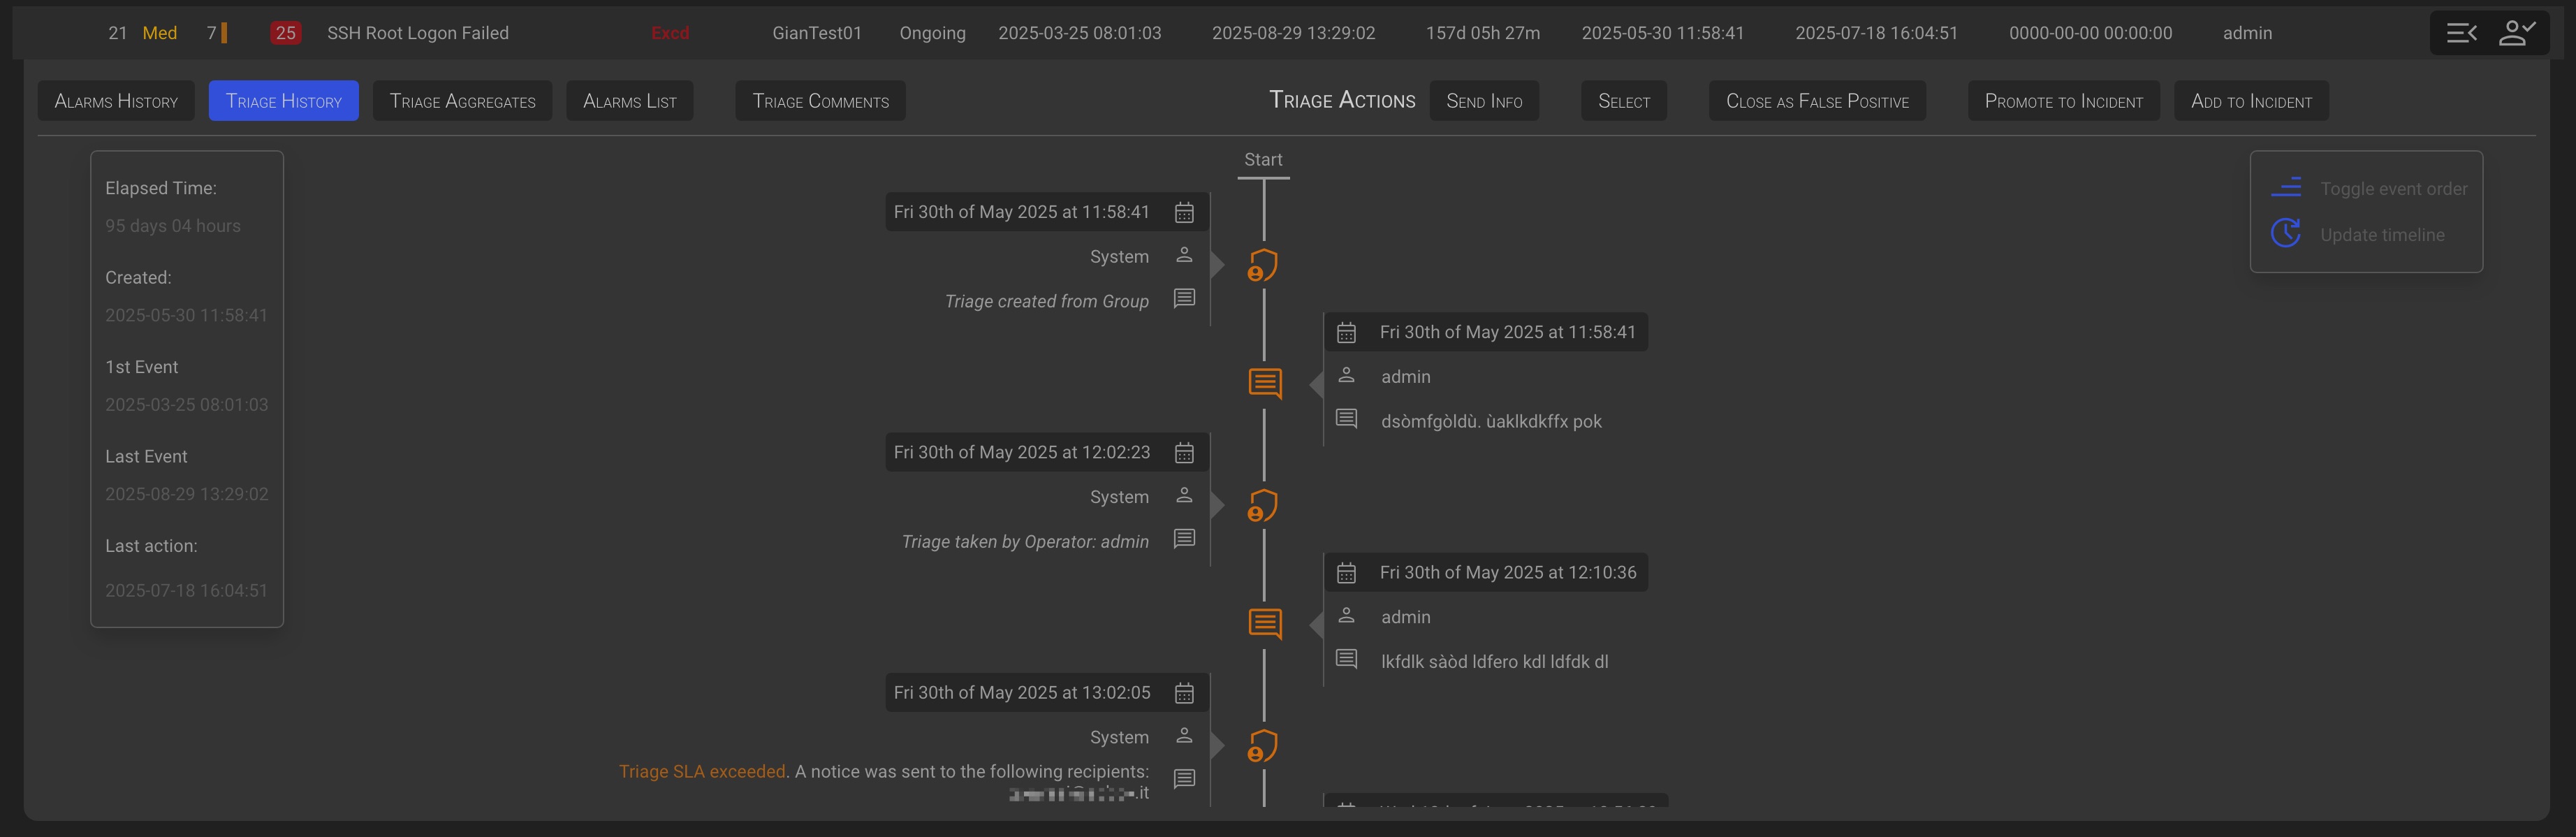
In the Triage History tab you will find the triage timeline. A chronological list of all management action taken against the triage by the users and the backend functions.
2.2.1.4 Triage Aggregate
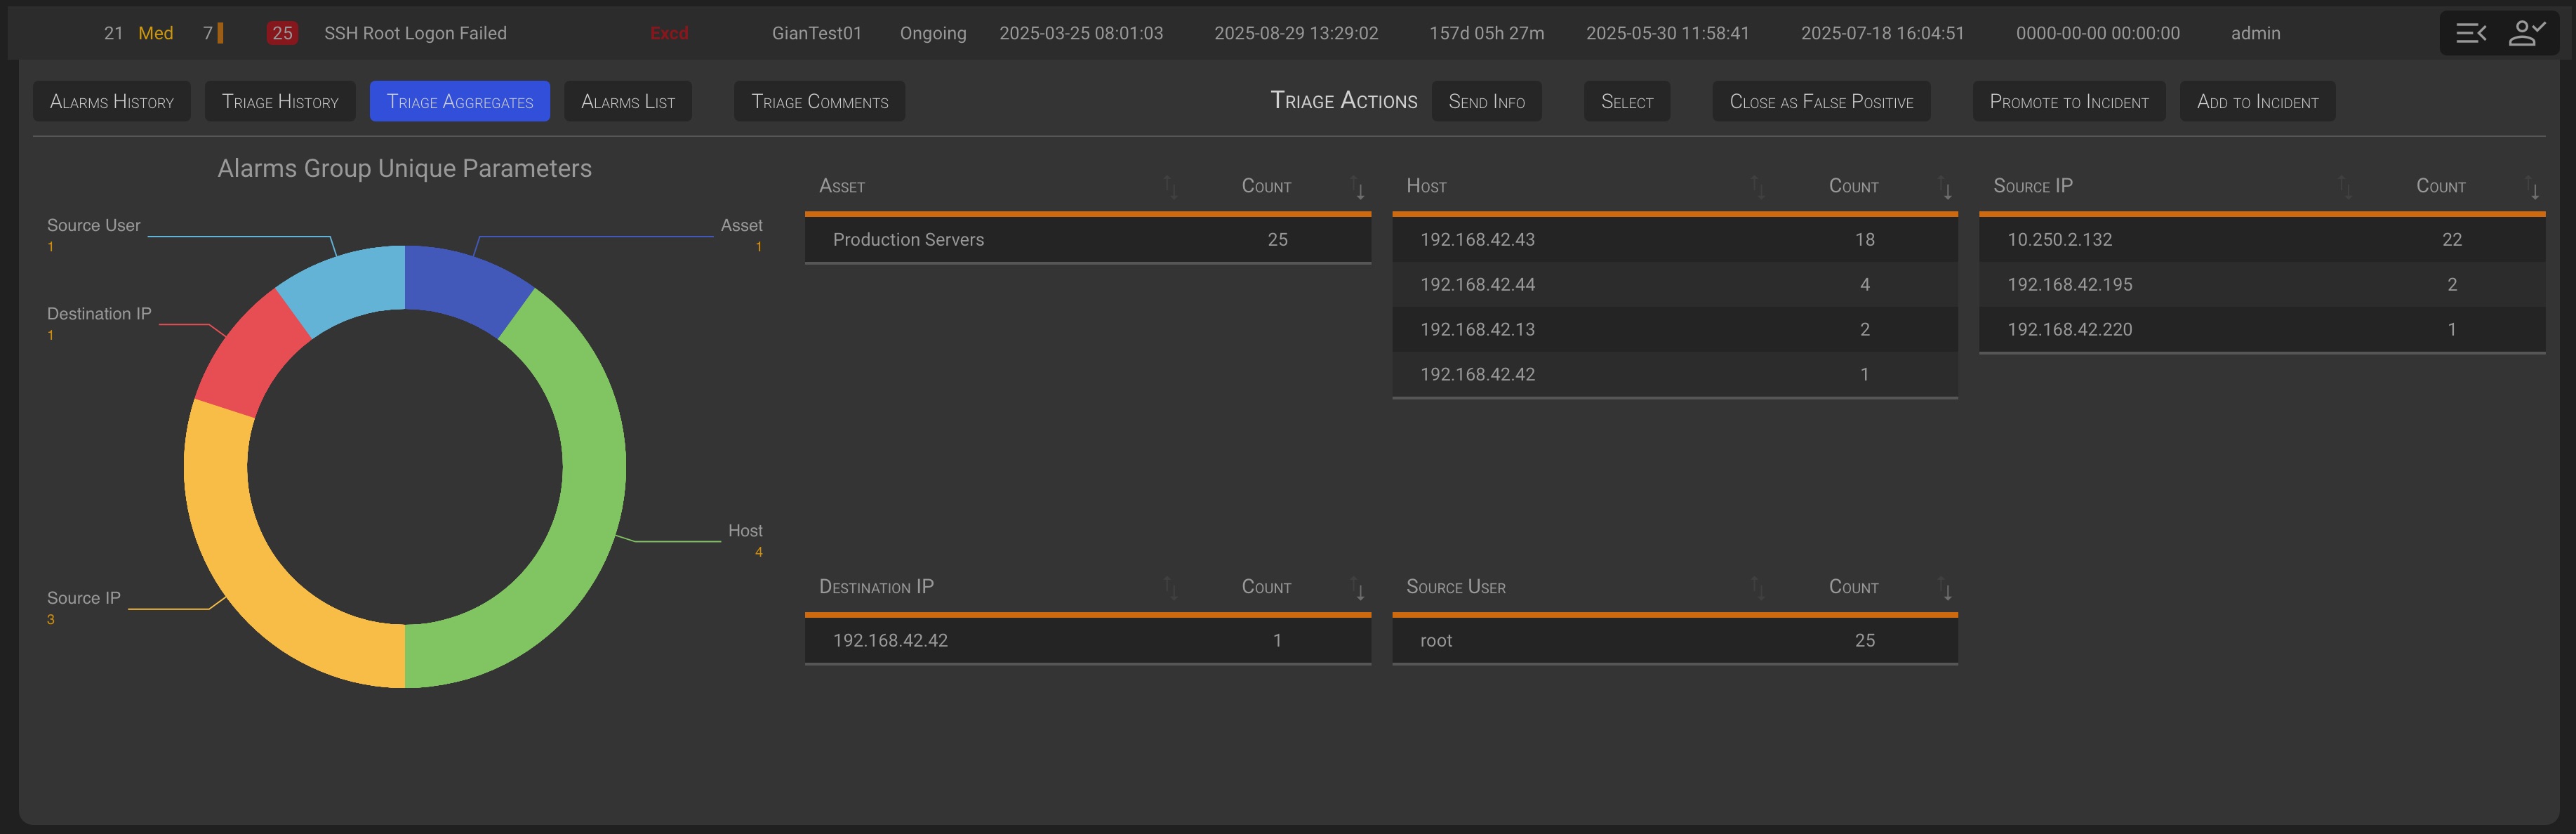
In the Triage Aggregate tab you will see an aggregate overview of the events’ parameters within the triage.
2.2.1.5 Triage Analysis
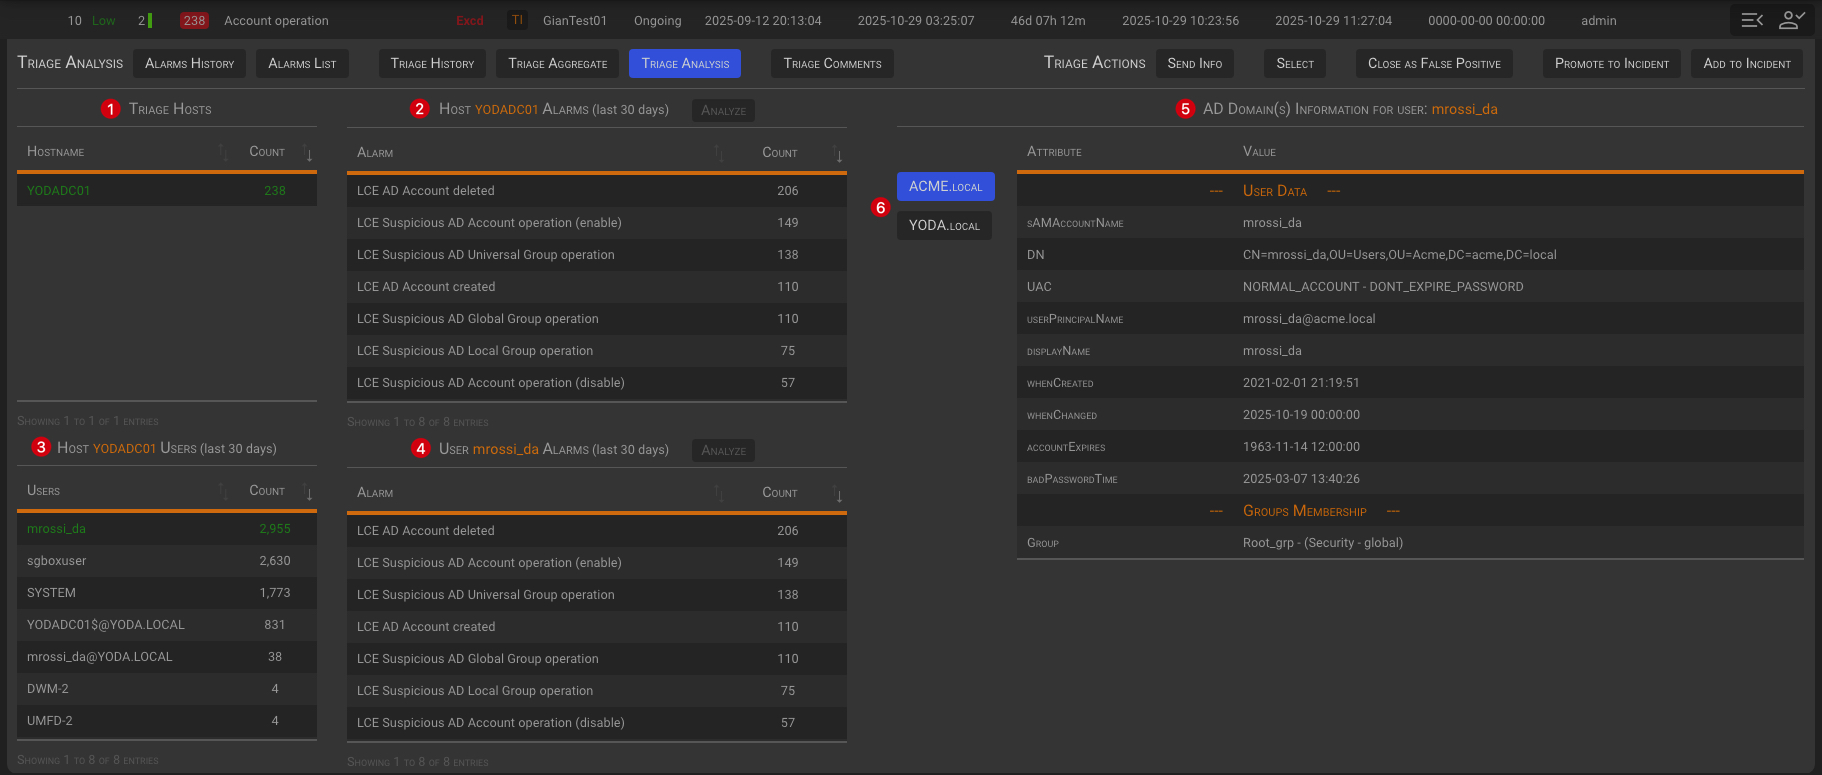
In the Triage Analysis tab, you will have a broader view of the alarms and users involved with each triage host.
2.2.1.5.1 Analysis tables
- Triage Hosts (1)
- The table shows a list of hosts related to the alarms contained in Triage.
- Hosts Alarms (2)
- The table shows a list of the alarms related to the selected host over the past 30 days.
- Hosts Users (3)
- The table shows a list of the users who were active on the selected host over the past 30 days.
- User Alarms (4)
- The table shows a list of the alarms related to the selected user over the past 30 days.
- User AD Domain information (5)
- The table shows a list of the Active Directory attributes of the selected user, if the selected users belongs to one or more AD Domains (6).
TIP
- All the tables will load automatically when you open the tab.
- By default, the Hosts Alarms table will load alarms related to the first host in the Triage Hosts table.
- By default, the Hosts Users table will load users related to the first host in the Triage Hosts table.
- By default, the Users Alarms table will load alarms related to the first user in the Hosts Users table.
- By default, the User AD Information table will load information about the first user in the Hosts Users table.
2.2.1.5.2 Analysis Actions
Host/User selection
- Host Selection
- Clicking on a host will update the content of the Host Alarms and Host Users tables. The User Alarms and User AD Information tables will update accordingly.
- User Selection
- Clicking on a User will update the content of the User Alarms and User AD Information tables.
Alarm(s) analysis
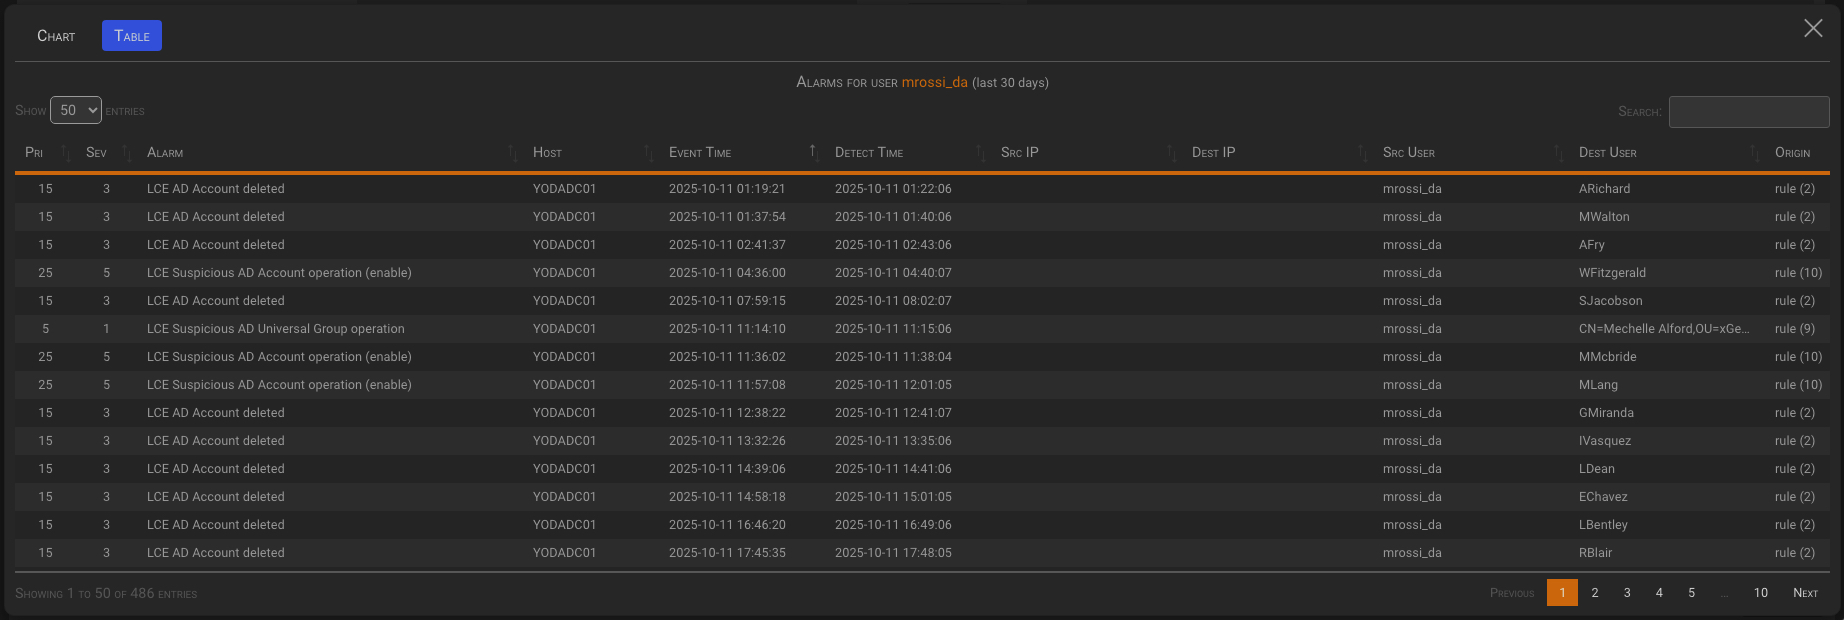
Selecting one or more alarms in the Host Alarms or User Alarms tables will enable the Analyze button related to the selected table. Click the Analyze button to access the Alarms analysis panel.
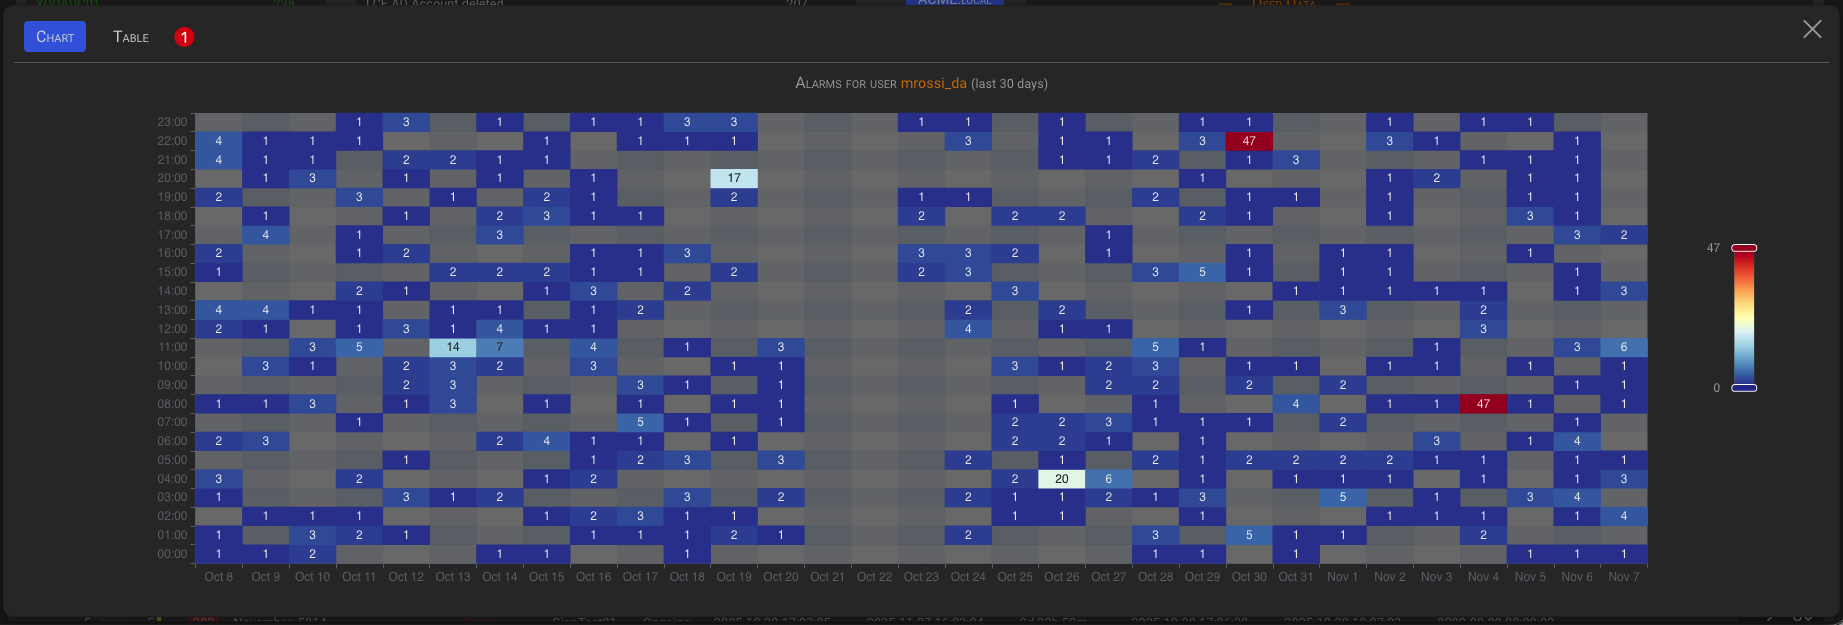
The Analysis panel will show a chart and a teble view of the selected alarms.
The chart view, selected by default, will show the hourly distribution chart of the selected alarms within the last 30 days by default and the table view will show a sortable table of the selected alarms details.
You can switch between these vies by clicking on the Chart or the Table button (1)
TIP
You can scroll the table to the right to see more details.
2.2.1.6 Triage Comments
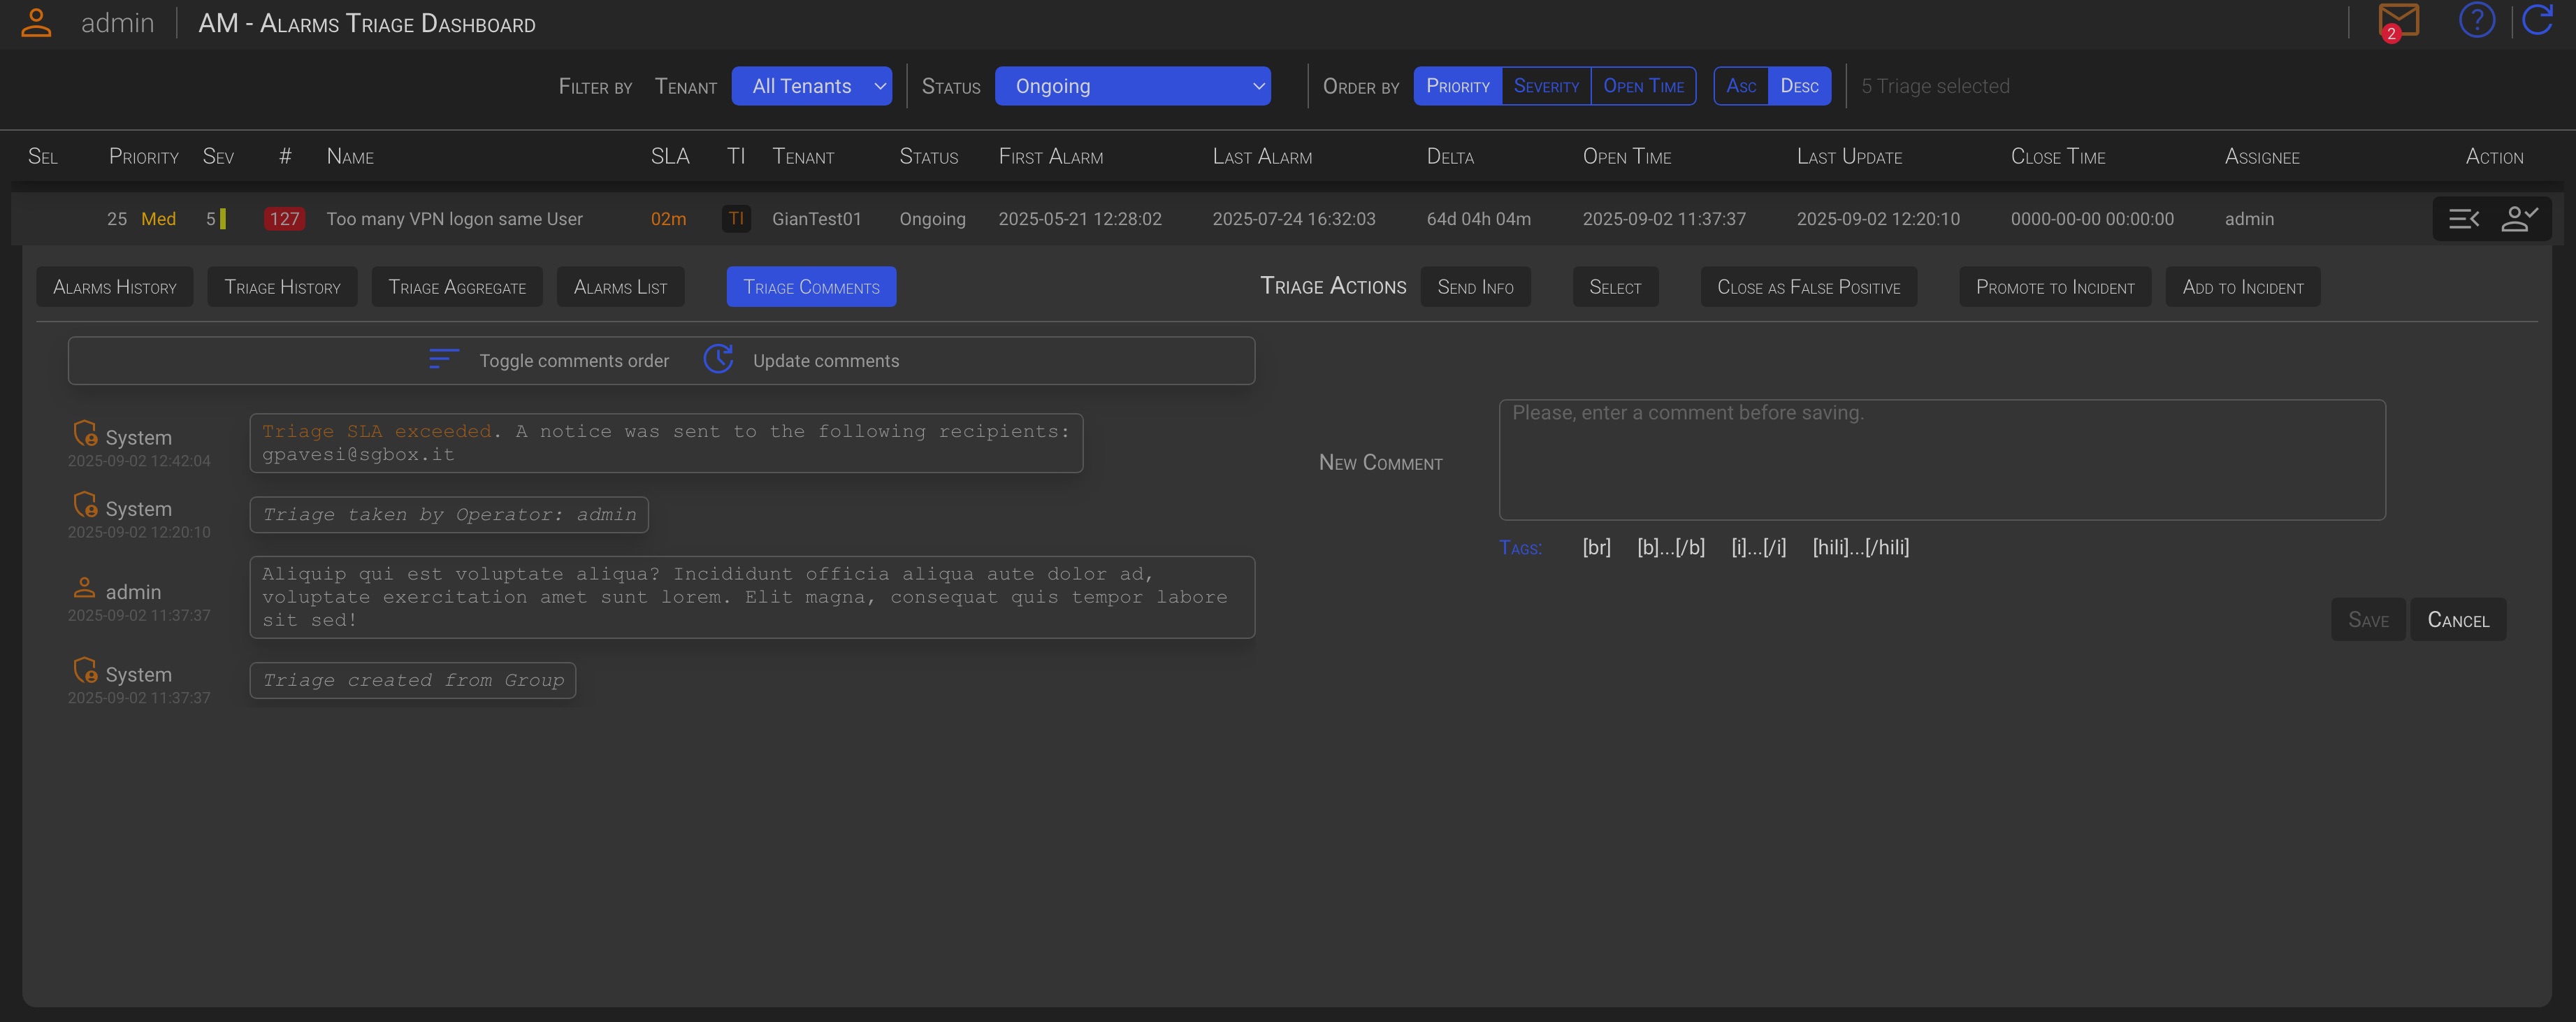
In the Triage Comment tab, you will see all existing comments, whether they are automatic or user-created. You also have the option to add your own comments. After entering a New Comment, the Save button will be enabled, allowing you to add the current comment to the triage.
TIP
The added comments will also appear in the Triage History tab.
2.2.2 Triage Actions
2.2.2.1 Send Info
The Send Info tab allows you to send an information request on the current triage to the customer recipients defined for the current tenant in Tenant’s Criteria. The email will include triage details, alarm details, and raw logs.
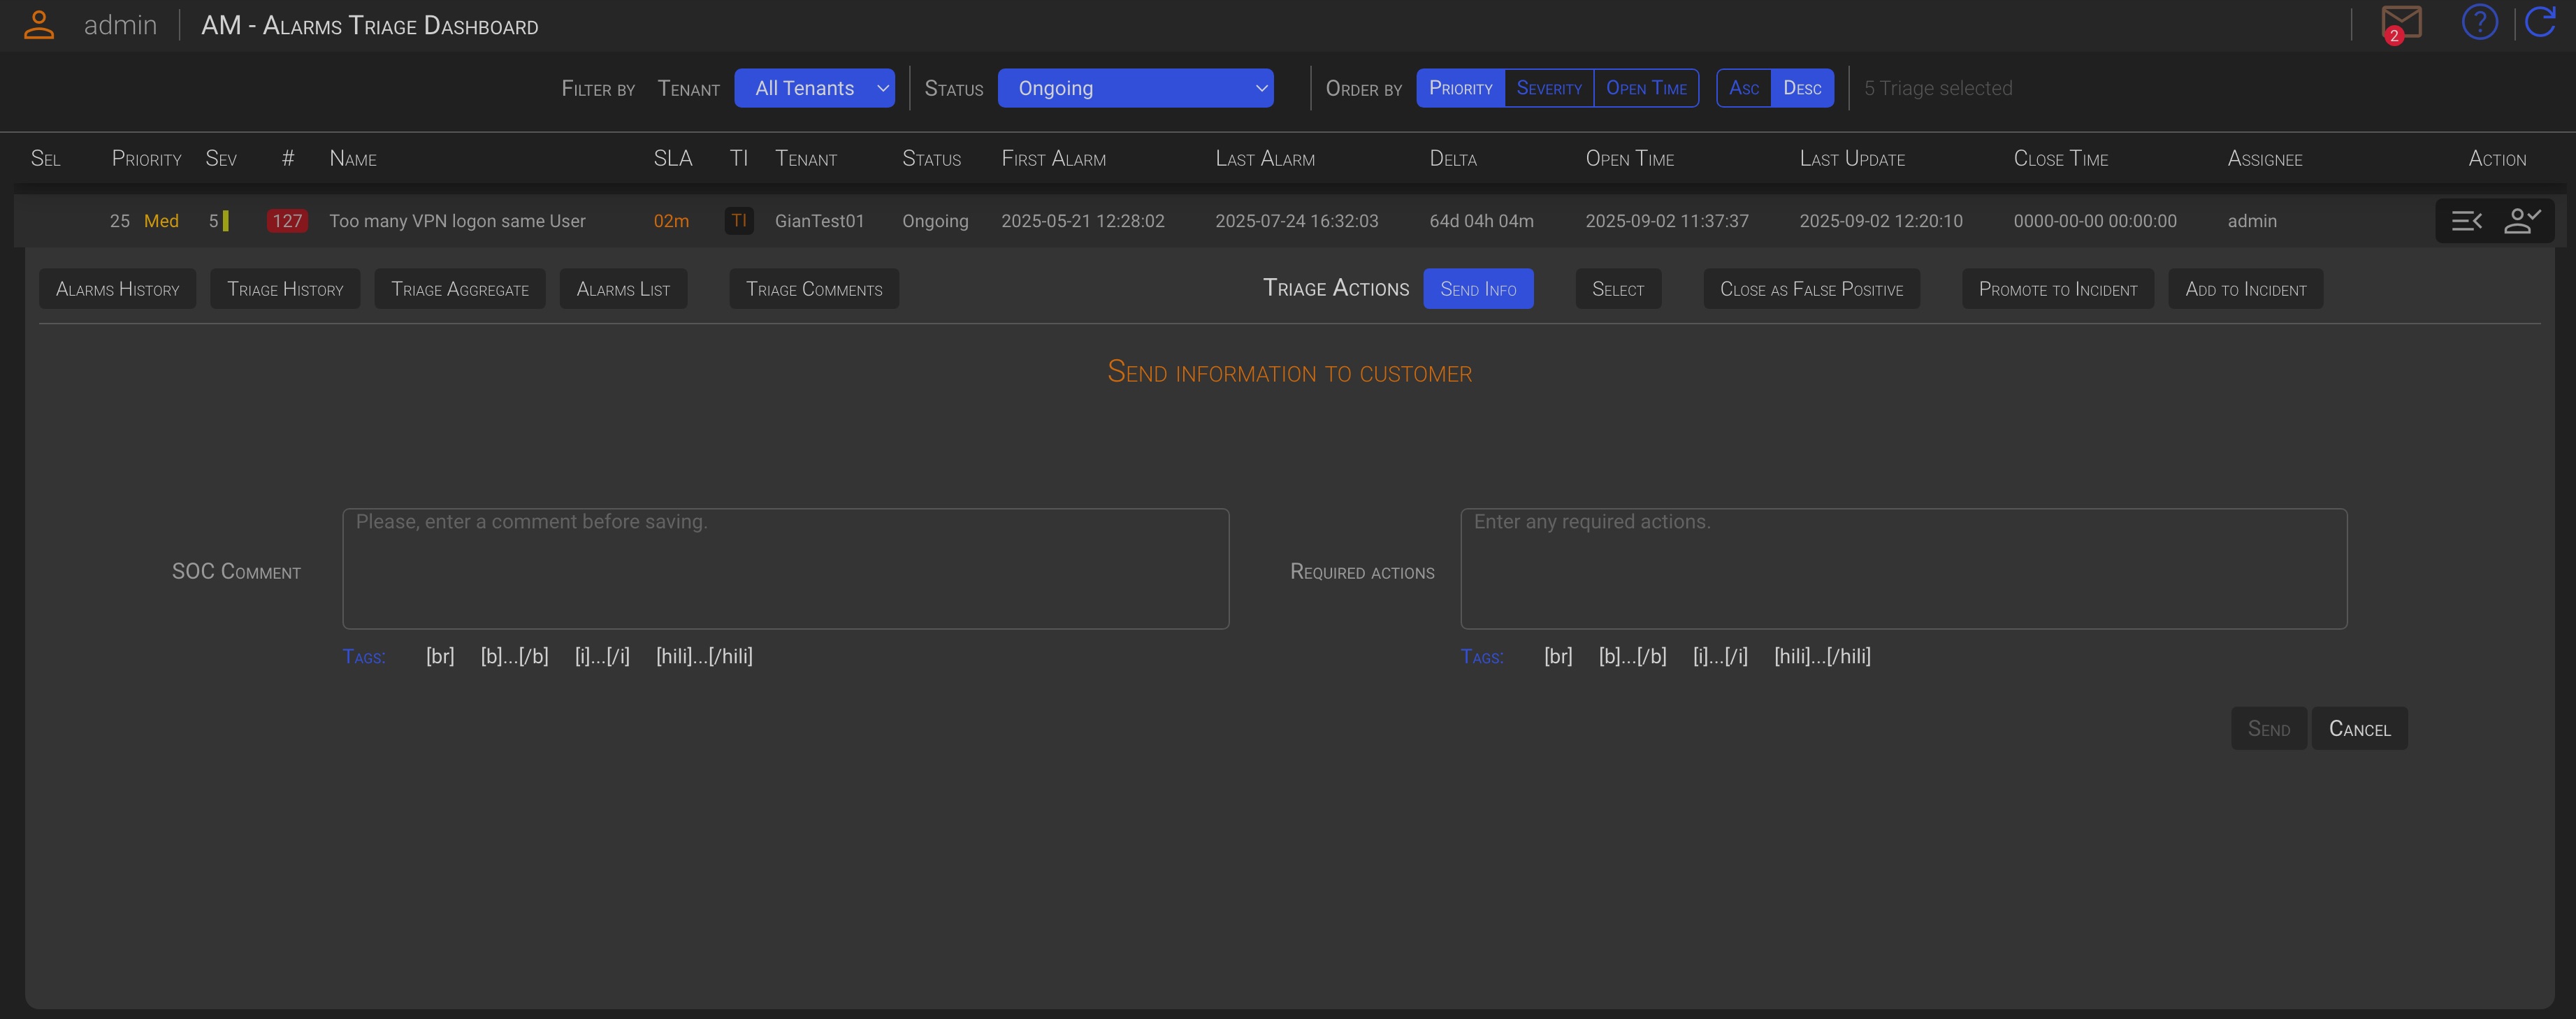
Enter a SOC comment, and an optional customer Required Actions, then click the Send button to send the information request to the customer.
TIP
The operator and his supervisor will receive a copy of the email.
2.2.2.2 Select
The Select function allows you to group two or more triages, coming from the same Tenant, and take one of the available actions against them.

To select the current triage for bulk processing, click on the Select button in the Triage Management panel. To individually deselect previously selected triages, open the management panel of the triage you want to deselect and click the Deselect button.
When you select a triage, the management panel will close and a green check icon will appear in the first triage column.

Once two or more triages has been selected the hidden section Multiple Triage Actions will appear under the Filters section.
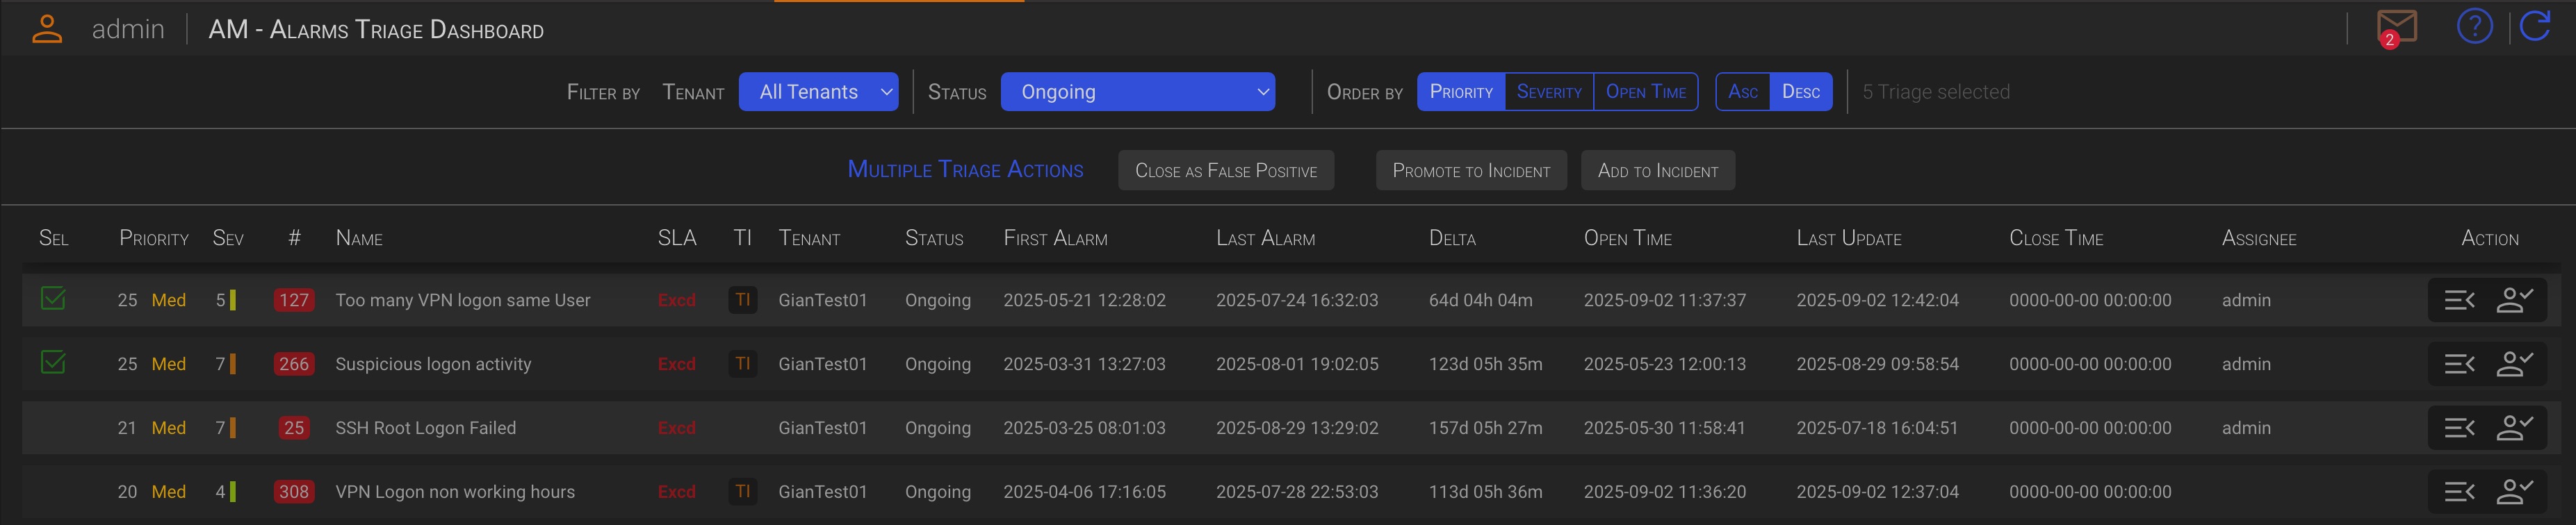
Clicking one of the buttons in this section will perform the corresponding action on all of the selected triages. Available actions are:
- Close as False Positive
- Promote to Incident
- Add to Incident
You can cancel the operation by clicking the Cancel button.
Since collective actions are performed in the same way as individual actions, please see the next chapters for details on how to perform these actions.
TIP
Bulk triage operations are only possible between triages from the same tenant.
2.2.2.3 Close as False Positive
TIP
This management action closes one or more triages and all their associated alarms as false positives.
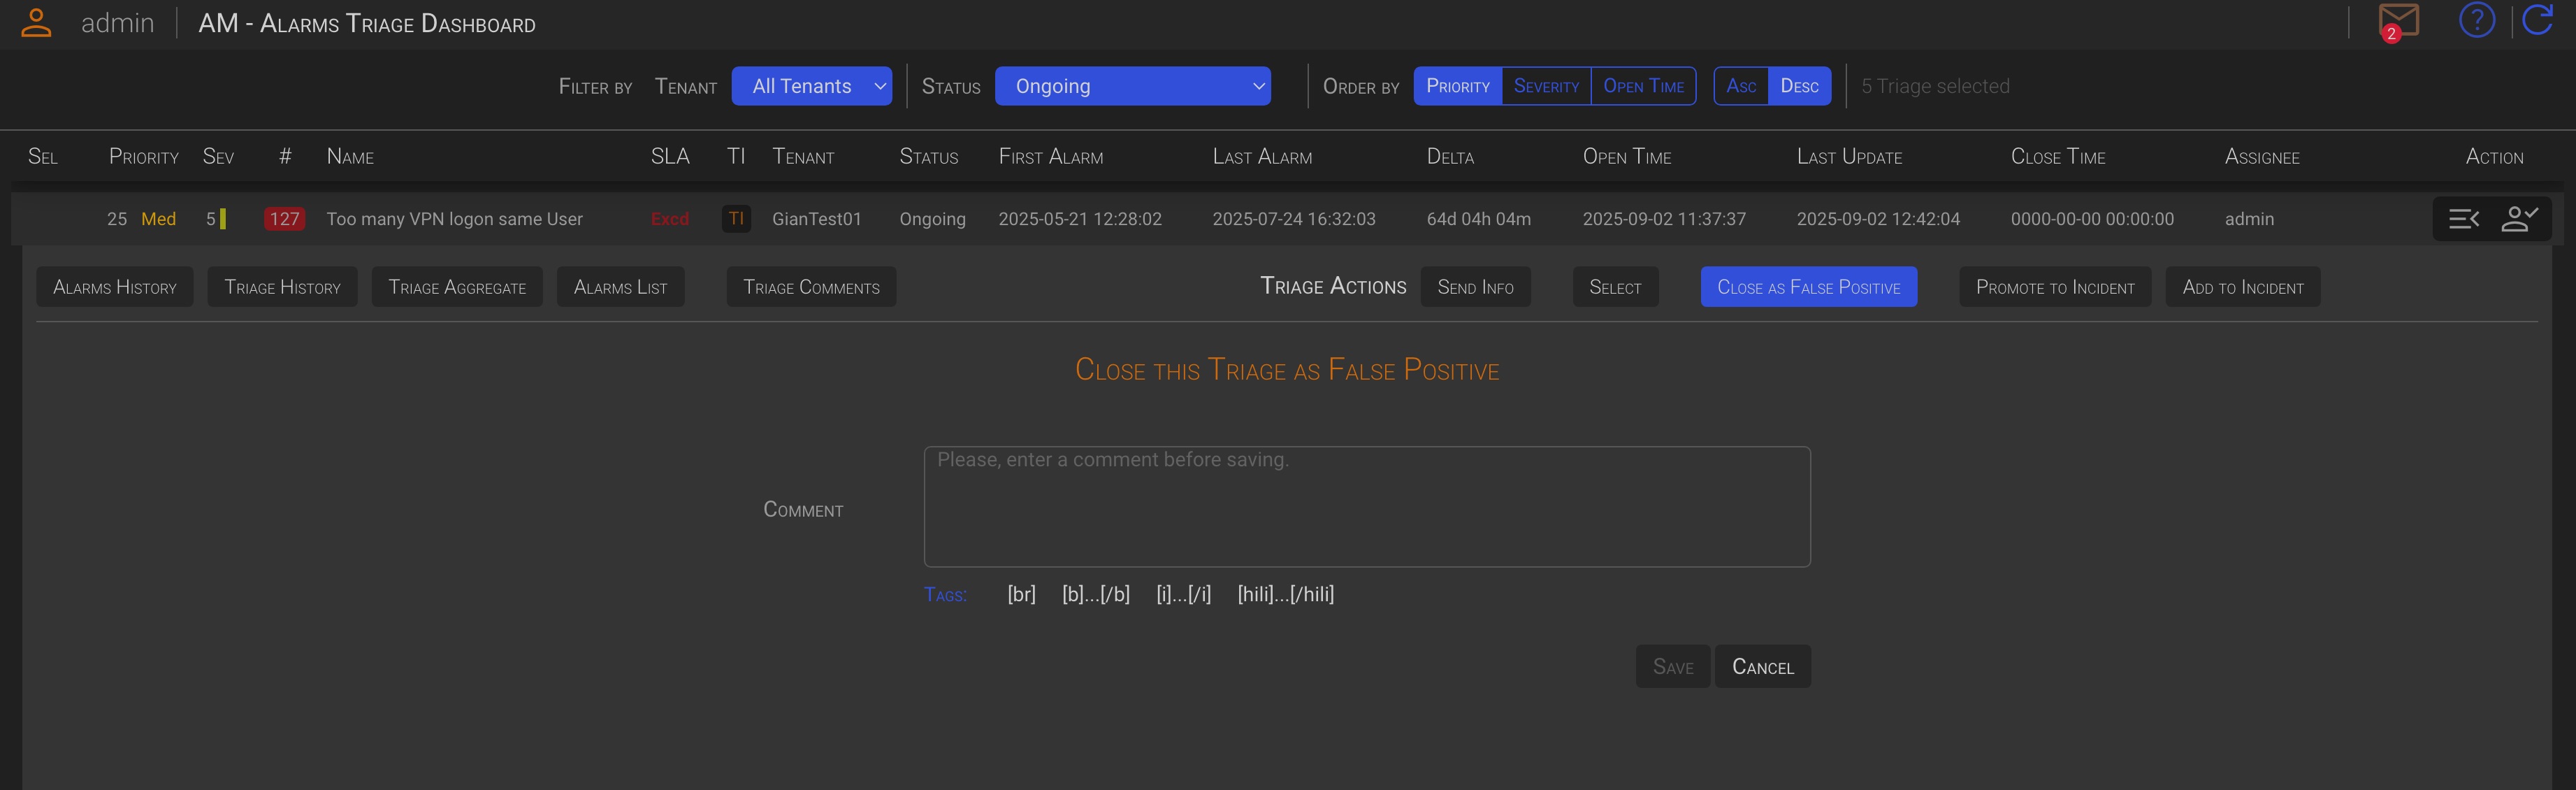
By clicking on the Close as False Positive button, in the Triage Management panel or in the Multiple Triage Actions, an hidden section will appear.
After entering a Comment, the Save button will be enabled, allowing you to close the triage, or the selected triages, as a false positives.
2.2.2.4 Promote to incident
TIP
- This management action creates a new incident.
- All alarms within the current or selected triages will be associated with the new incident.
- The current triage, or the selected triages, will be marked as Closed as Incident.
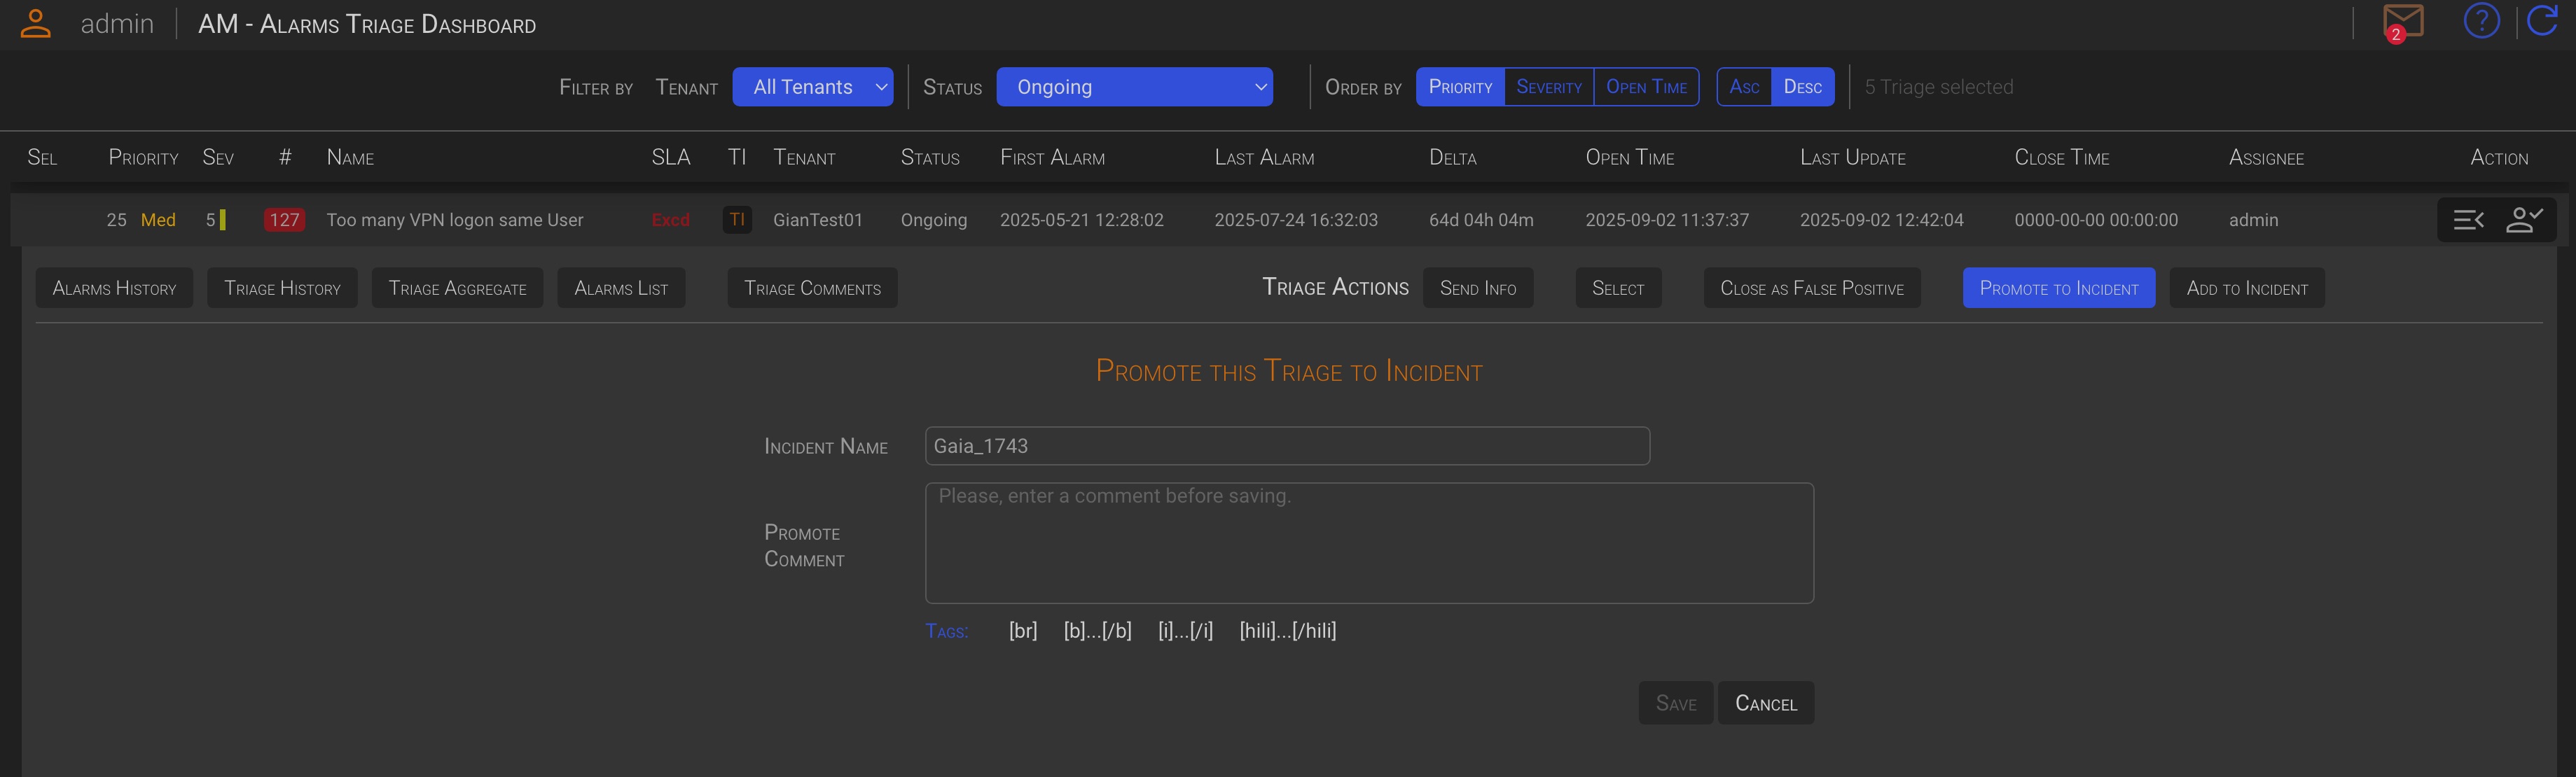
By clicking on the Promote to Incident button, in the Triage Management panel or in the Multiple Triage Actions, an hidden section will appear.
The system generates a unique Incident Name, but you can change it to your own text.
After entering a Comment, the Save button will be enabled, allowing you to promote the current triage, or the selected triages, to a new incident.
2.2.2.5 Add to Incident
TIP
- This management action adds all alarms within the current or selected triages to the selected incident.
- The current triage, or the selected triages, will be marked as Closed as Incident.
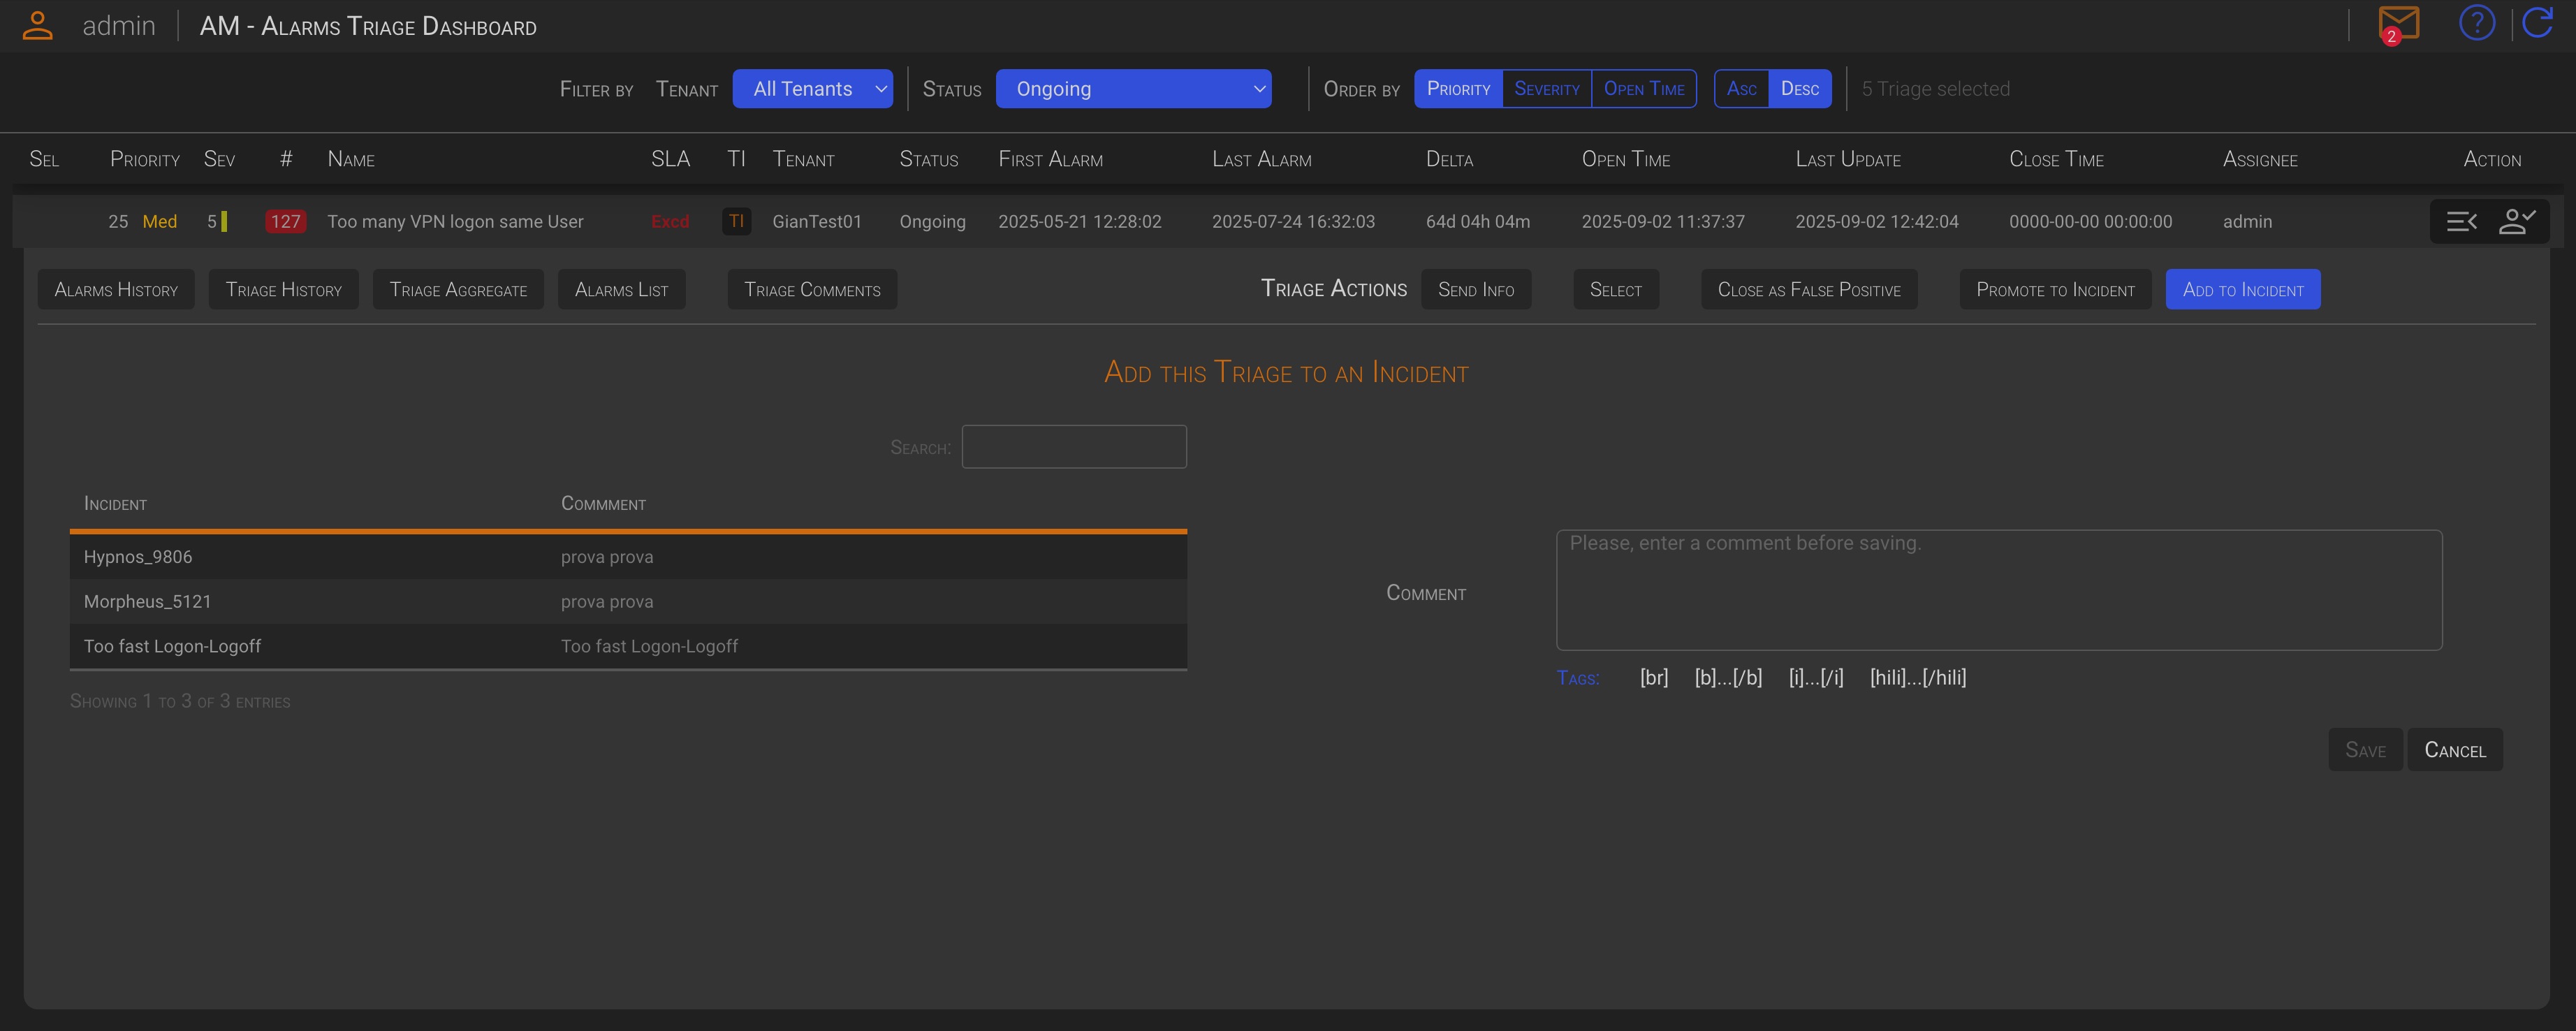
The dialog window will display a list of the open incidents for the same Tenant as the selected triages.
Choose the Incident you want to add the current triage, or the selected triages, to by clicking on the desired Incident row (it will turn green). Then, add a comment to explain the context.
Click the Save button to add the current triage, or the selected triages, to the selected Incident.