To be effective to begin with, the AM/IM Module needs to be properly configured.
1 Enabling the module
First of all we need to enable the module components we’re going to use.
Alarm Management
- The Alarm Management module component allows you to analyze and group incoming alarms, send them to triage, and use triage to determine if they are false positives or if they can trigger an incident.
- The Alarm Management module component can be used as a standalone component. In this case, during the triage phase, the triage itself can be closed as an Incident instead of triggering an incident.
Incident Management
-
The Incident Management component allows a deeper analysis and guide the Operators through the Incident Life Cycle
- Containment
- Investigation
- Remediation
-
When the Incident Management component is enable together with the Alarm Management, Triage will trigger Incidents.
Warning
Enabling one or both module components will initiate backend processes that may result in disk space saturation on the SGBox server if generated alerts, triages, and incidents are not managed properly.
- Don’t enable module components unless you intend to use them.
- Disable module components if you don’t want to use them anymore.
When you access the module configuration for the very first time, all of the configuration options will be disabled until the alarm or both of the module components are enabled.
To enable a module component, click on its Enable button, then click on the Save button to apply.
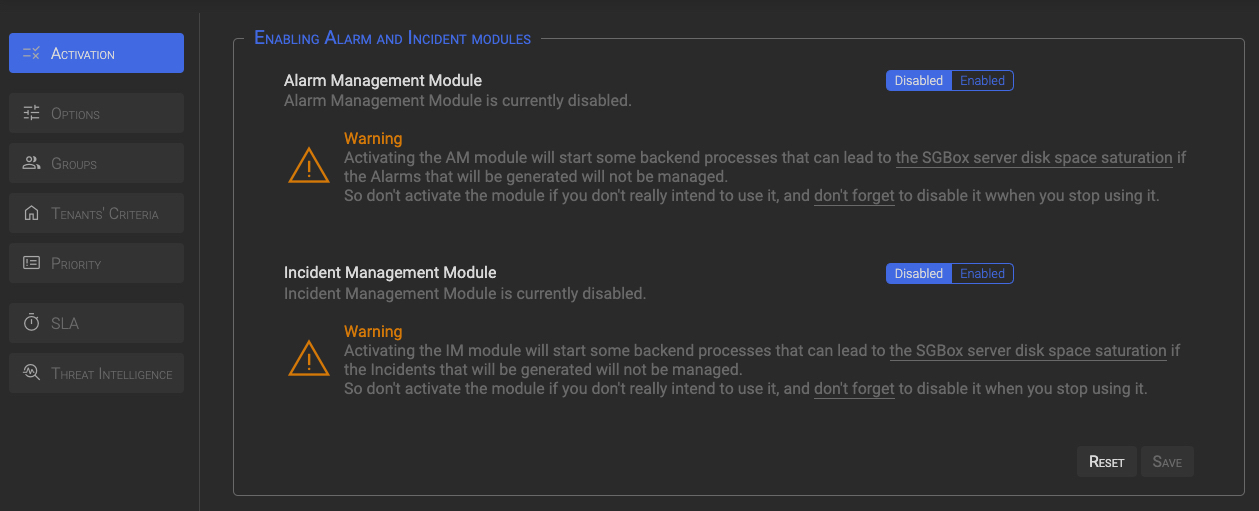
Once one or both modules are enabled, configuration options will be enabled too.
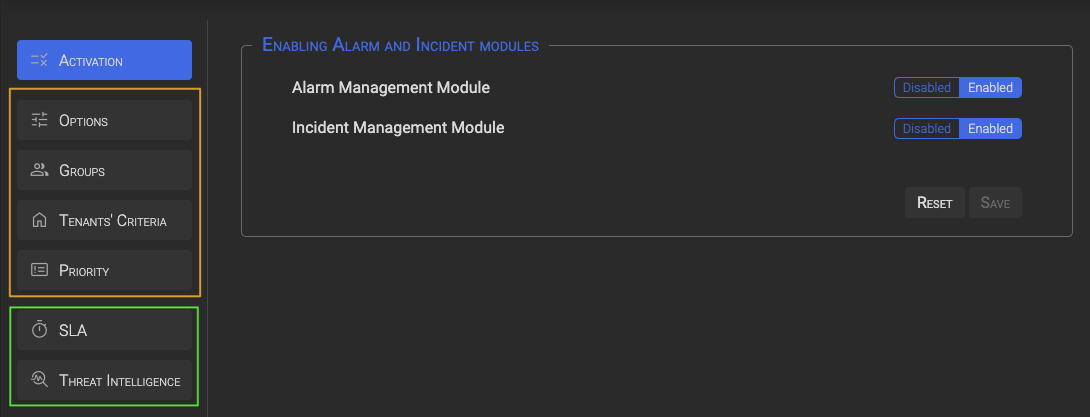
Configuration Options are split in two groups:
- options of the first group are always active and can be customized to fit customer needs.
- options of the second group, are disabled by default and must be enabled and properly configured to work.
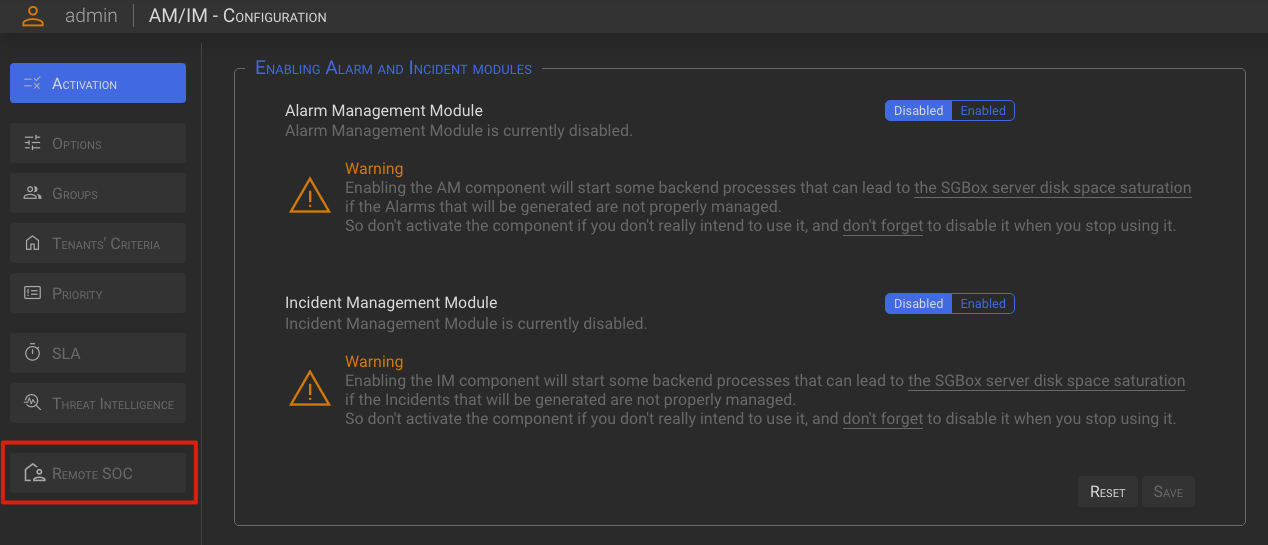
Only for Single Tenants or locally managed Tenants
An additional configuration option is available to activate Remote SOC management for customers running on a single tenant or locally managed tenant. See the 8 Remote SOC chapter below for operational details.
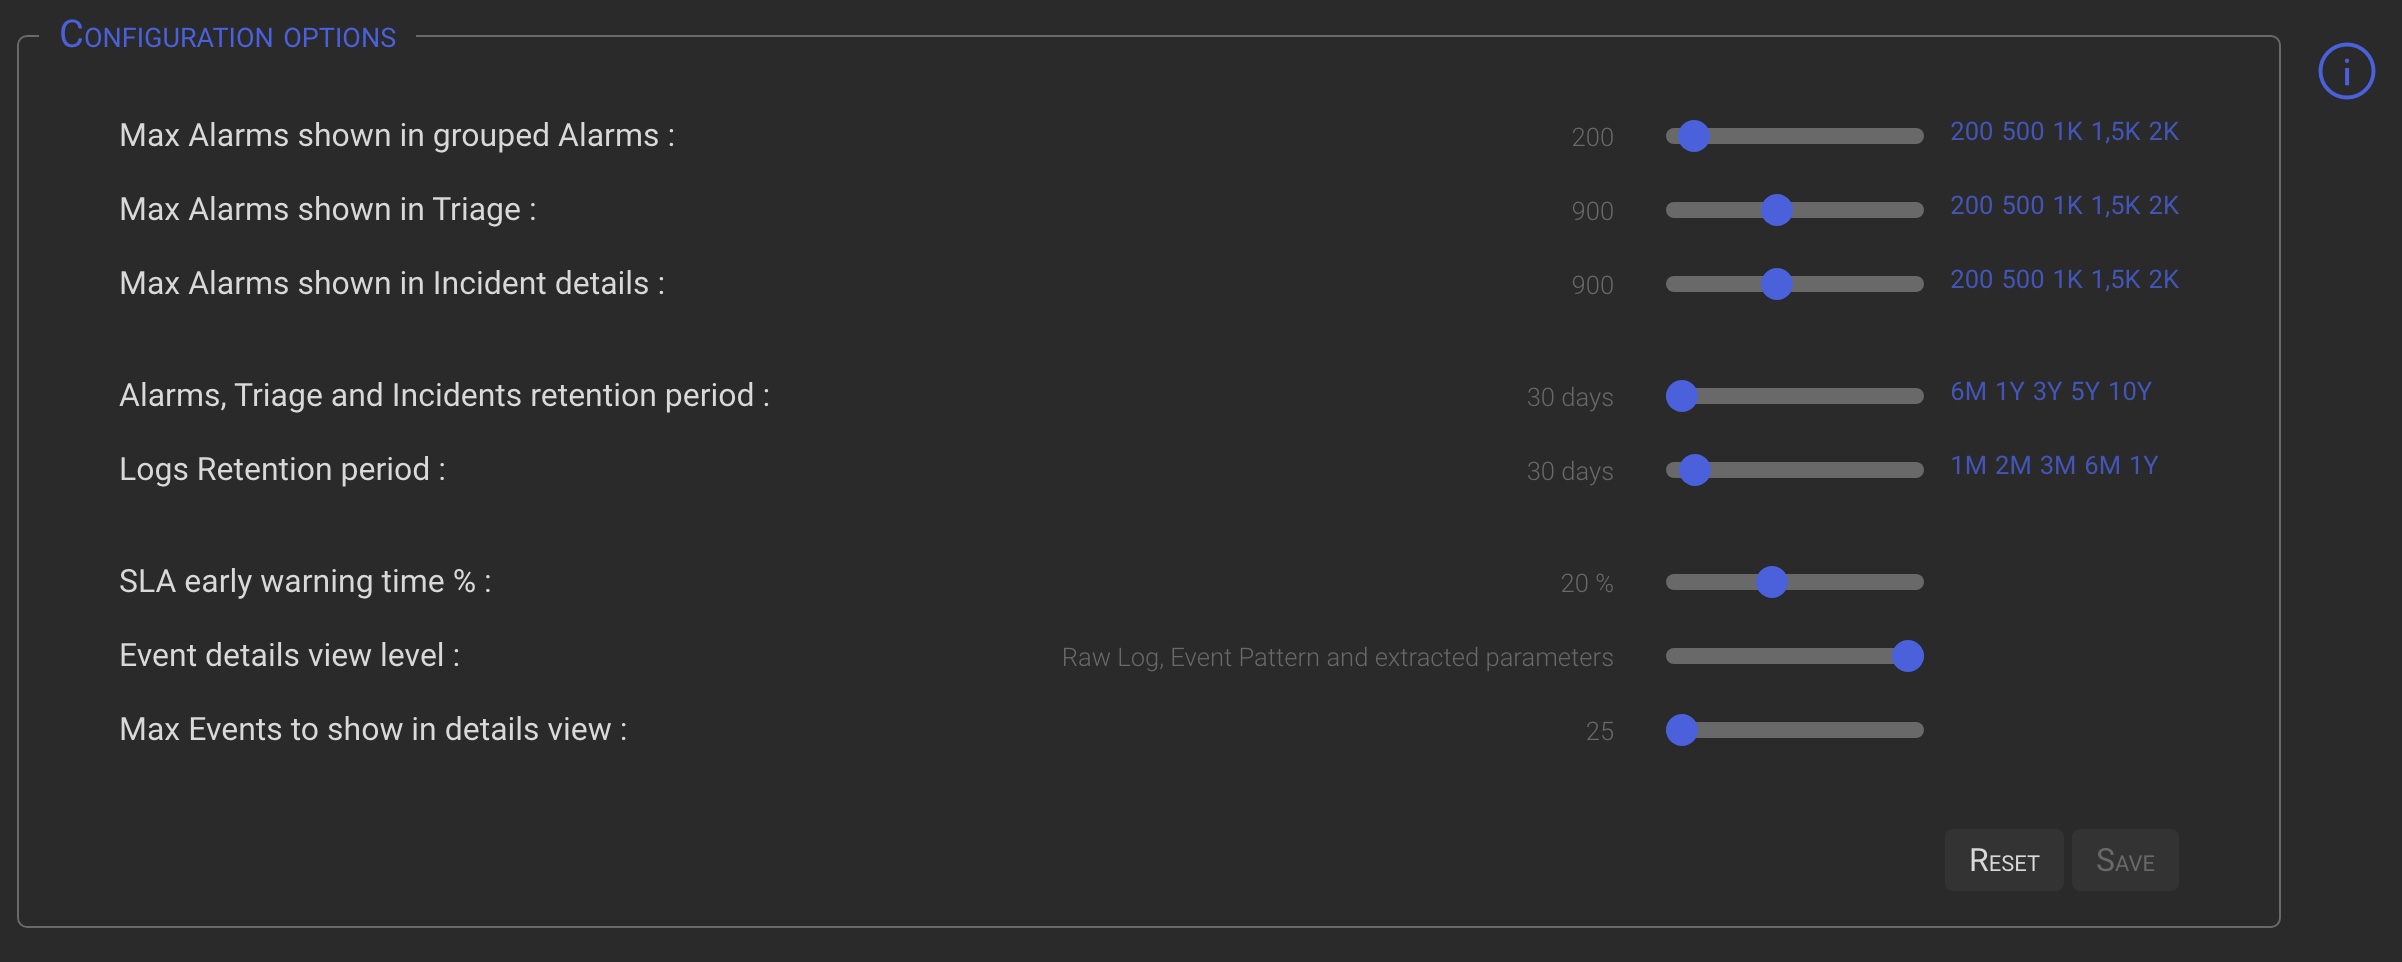
2 Configuration Options
Clicking on the Options button will open the Configuration Options panel, where you can set the following parameters:
| Option | Description |
|---|---|
| Max Alarms shown in grouped Alarms | The maximum number of Alarms that will be shown in the Grouped Alarm detail view. The lower is the value, the faster is the details loading. |
| Max Alarms shown in Triage | The maximum number of Alarms that will be shown in the Triage detail view. The lower is the value, the faster is the details loading. |
| Max Alarms shown in Incident details | Specify the maximum number of Alarms to be shown in the Incident details Alarm List view. The lower is the value, the faster is the details loading. |
| Alarms, Triage and Incidents retention period | Specifies how long Alarms, Triage and Incidents data will be kept after being closed. Once the specified period has expired, old objects will be purged by back-end processes. |
| Logs Retention period | Specifies the number days after which daily operations logs will be purged by back-end processes. |
| SLA early warning time % | Specifies the percentage of time you want to be alerted before an SLA expires. (ie. if SLA = 2 hours and Warn % = 20, you will be warned 24 minutes before SLA expiration time). |
| Event details view level | Determines the amount of information to be shown in the Alarm’s events detail views. For alarms generated by many events, a high value may slow down the display of details.. |
| Max Events to show in details view | Limit the number of Events show in the Alarm’s events detail views. For alarms generated by many events, a high value may slow down the display of details. |
| Remote Customer Management | This enables the additional features of Remote Customer Management. This option should only be enabled if you are acting as a SOC and managing “Remote Customers.” |
TIP
You can fine-adjust option values by clicking on the slider handle and then using the keyboard arrows.
3 Groups
Before configuring groups, in the AM/IM Configuration, it is necessary to define the desired users at SGBox level in SCM→Users→Users
For everything to work best, when defining users, there are some rule to follow:
- A personal email address needs to be set for each user. The system will send operational messages and notification to that address.
- One or more Tenant needs to be associated to each user. AM/IM operation will be limited to the Tenants to which each user is associated with.
- IM users needs to be associated to a profile that allows access to the IM menu options
3.1 Groups Roles
Assigning the correct role to a group is very important because the operational level of the group members is strictly dependent on the role assigned.
Roles description
- Supervisor Common to AM/IM
- Supervises Operators and Analysts.
- Can impersonate any role.
- Can change Manager Level Options
- IM Analyst Incident management Analyst
- Analyzes and manages Incidents until their closure
- Can impersonate both the AM Analyst and AM Operator roles
- AM Analyst Alarm management Analyst
- Analyzes Triage and generates Incidents, False Positive and False Positive Rules
- Can impersonate AM Operator role
- AM Operator Alarm management Operator
- Analyzes Alarms and creates Triage from the Alarm and Grouped Alarms dashboards
3.2 Add Groups
NOTE
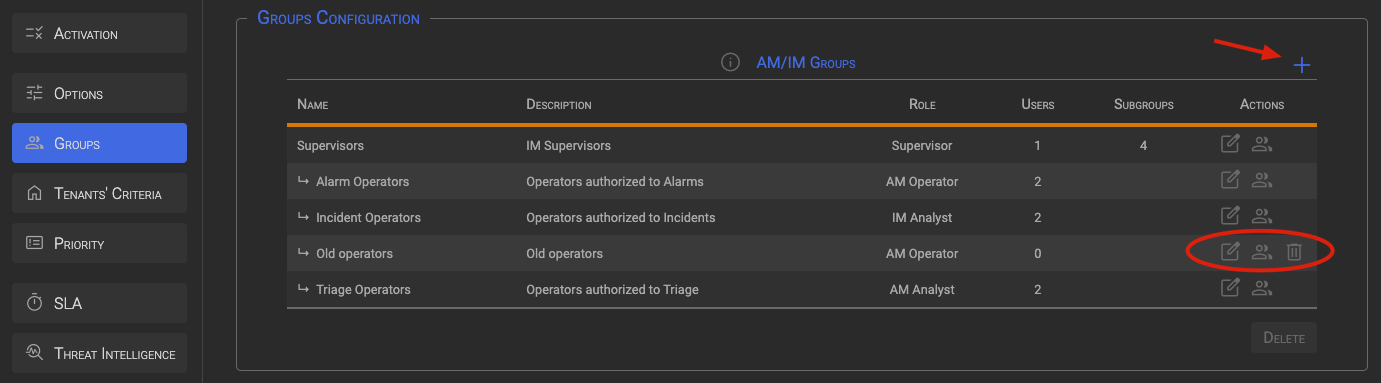
The first time you access the panel, a table containing only the Supervisors Group and the admin user will show up. To add new groups simply click on the + icon in the top-right corner and fill the form with the requested values.
Assumptions:
- A user can belong to one or more groups.
- Supervisors groups cannot have a parent group.
- A group can be deleted only if it has no child groups and does not contain any user.
- Only Supervisor groups can have subgroups.
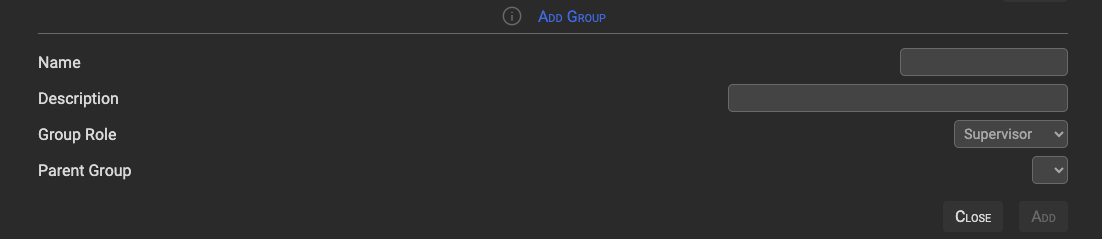
Clicking on the + (plus) symbol in the upper right corner will bring up the panel below. Fill in the required fields and click the Add button to add the new group.
3.3 Edit Group
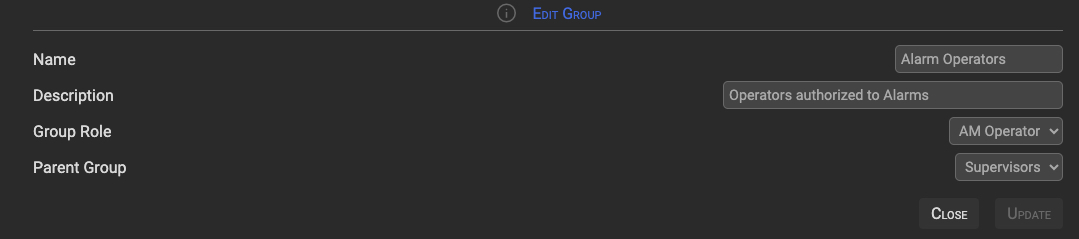
Clicking the edit icon in the Group row displays the Edit Group section. Fill in the required fields and click the Update button to update the group.
3.4 Add/Delete Users from Group
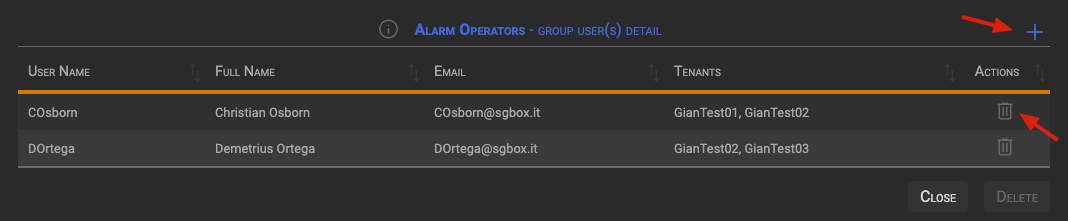
Clicking the user icon in the Group row displays the Group User(s) Detail section.
3.4.1 Delete Users
Clicking the trash icon in the User row will toggle the User deletion. Users marked for deletion will become red, then you can confirm the operation clicking the Delete button.
NOTE
This will not remove the user from SGBox, it will simply unlink the user from the current group. If the user does not belongs to other Groups, the user will loose the access to AM/IM panels.
Remove users
If you need to completely remove users from both the IM module and SGBox, the best way is to delete them from the SGBox main menu SCM→Users→Users. AM/IM backend procedures will take care of cleaning up the users and managing Triage or Incidents assigned to the deleted users.
3.4.2 Add Users
Clicking the + (plus) icon, in the top right of the Group User(s) Detail section, displays the Add user(s) to group section.
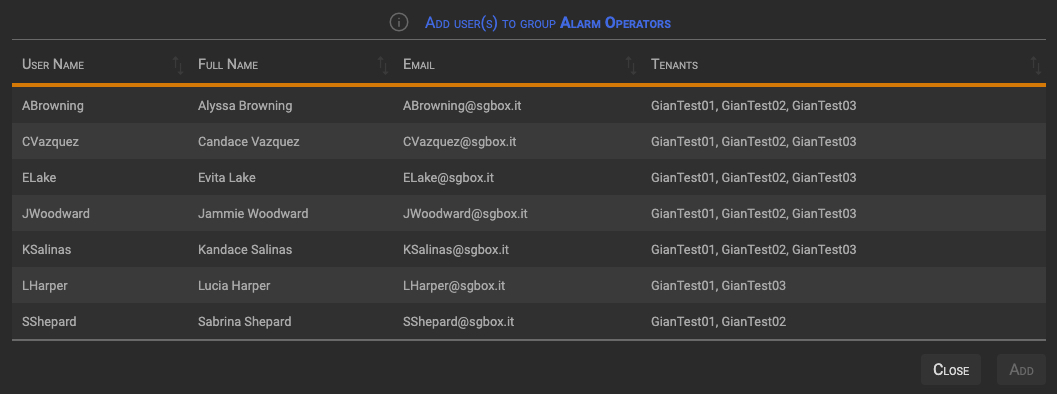
The system will display all users defined at the SGBox level (SCM > Users > Users), except for those already assigned to the current group.
Clicking on a user row toggle the User addition. Users marked for addition will become green, then you can confirm the operation clicking the Add button.
NOTE
The Tenants column shows the Tenants to which the user has access.
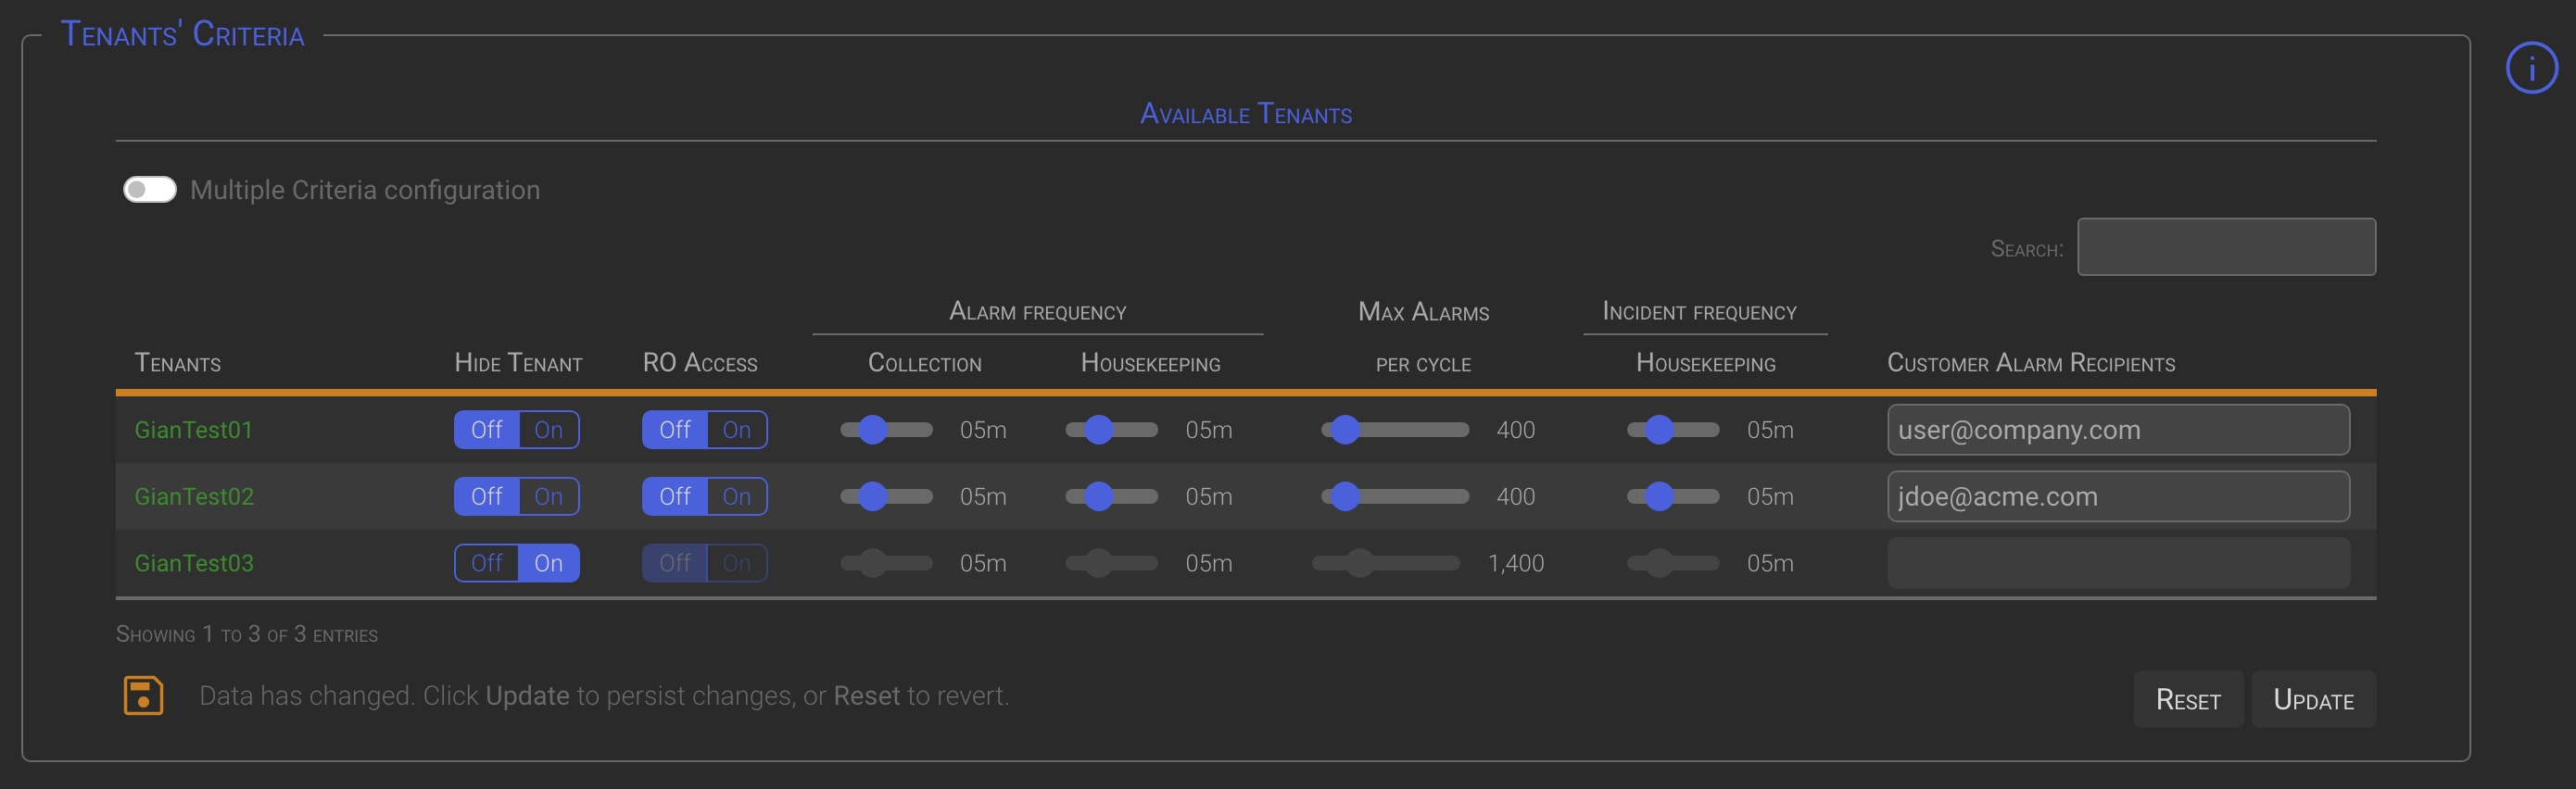
4 Tenant’s Criteria
The Tenant Criteria configuration section is the central place to configure how tenants are managed, especially for SOC managers.
| Column | Description |
|---|---|
| Tenant | The Tenant name |
| Hide Tenant | Setting this option to On will hide the tenant from central management. This means that the selected tenant will be locally managed and will no longer appear on central management dashboards. |
| RO Access | By setting this option to On, users of the local tenant will have read-only access to their dashboards. This option can be set to On only while the tenant is centrally managed (Hide Tenant = Off). |
| Alarm Collection | Allows to change the Alarms collection backend process execution frequency. |
| Alarm Housekeeping | Allows to change the Alarms housekeeping backend processes execution frequency. Housekeeping backend processes takes care of daily/timely maintenance operations and notifications (ie SLA expiration). |
| Max Alarms per cycle | Specify the maximum acceptable number of Alarms that can be collected by a single back-end collection cycle. A high number of new Alarms in a short period of time is usually a symptom of misconfiguration issues, but it can also be due to a VA-PT or a real attack. Since you will be warned when the specified value is exceeded, carefully evaluate the correct value for your installation. A higher value can lead to significant performance degradation if one of the previously described situations, or a similar one, occurs. |
| Incident Housekeeping | Allows to change the Incidents housekeeping backend processes execution frequency. Housekeeping backend processes takes care of daily/timely maintenance operations and notifications (ie SLA expiration). This option is only available when the IM component is activated. |
| Custome Alarm Recipients | Allows to specify a list of customer recipients, separated by commas, to whom Triage and Incident details can be sent by AM/IM operators. |
TIP
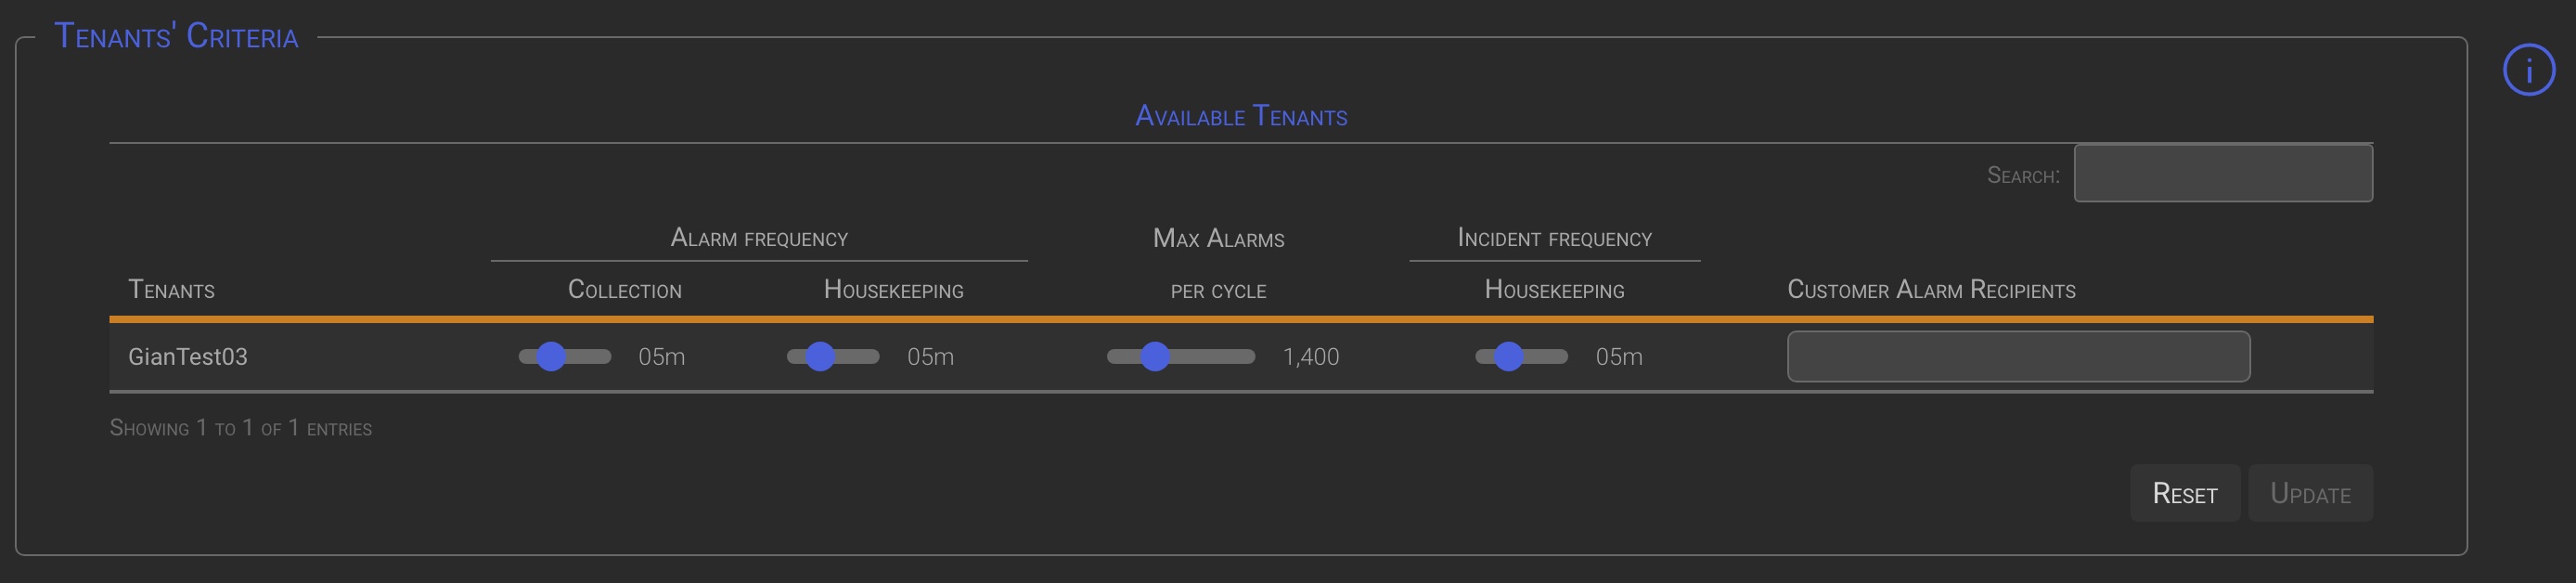
When the Hide Tenant option is set to On, the tenant’s line is grayed out and his controls, except for the Hide Tenant one, cannot be managed from the Instance Manager console. This highlights that the Tenant and his options are managed locally on the Tenant itself.
Note
This section behaves slightly differently when the IM module is managed locally. Central management specific options are not available.
4.1 Tenants’ criteria Multiple Configuration
When the IM module is centrally managed, there are two methods to set Criteria for the managed Tenants:
Tenant by Tenant
- One or more Tenants at time, selecting them manually or using the search box, and individually setting the desired options.
Multiple Criteria configuration
- Operating the Multiple Criteria configuration switch in the top left corner, will bring up a special section where you can specify the criteria you want to apply to multiple tenants.
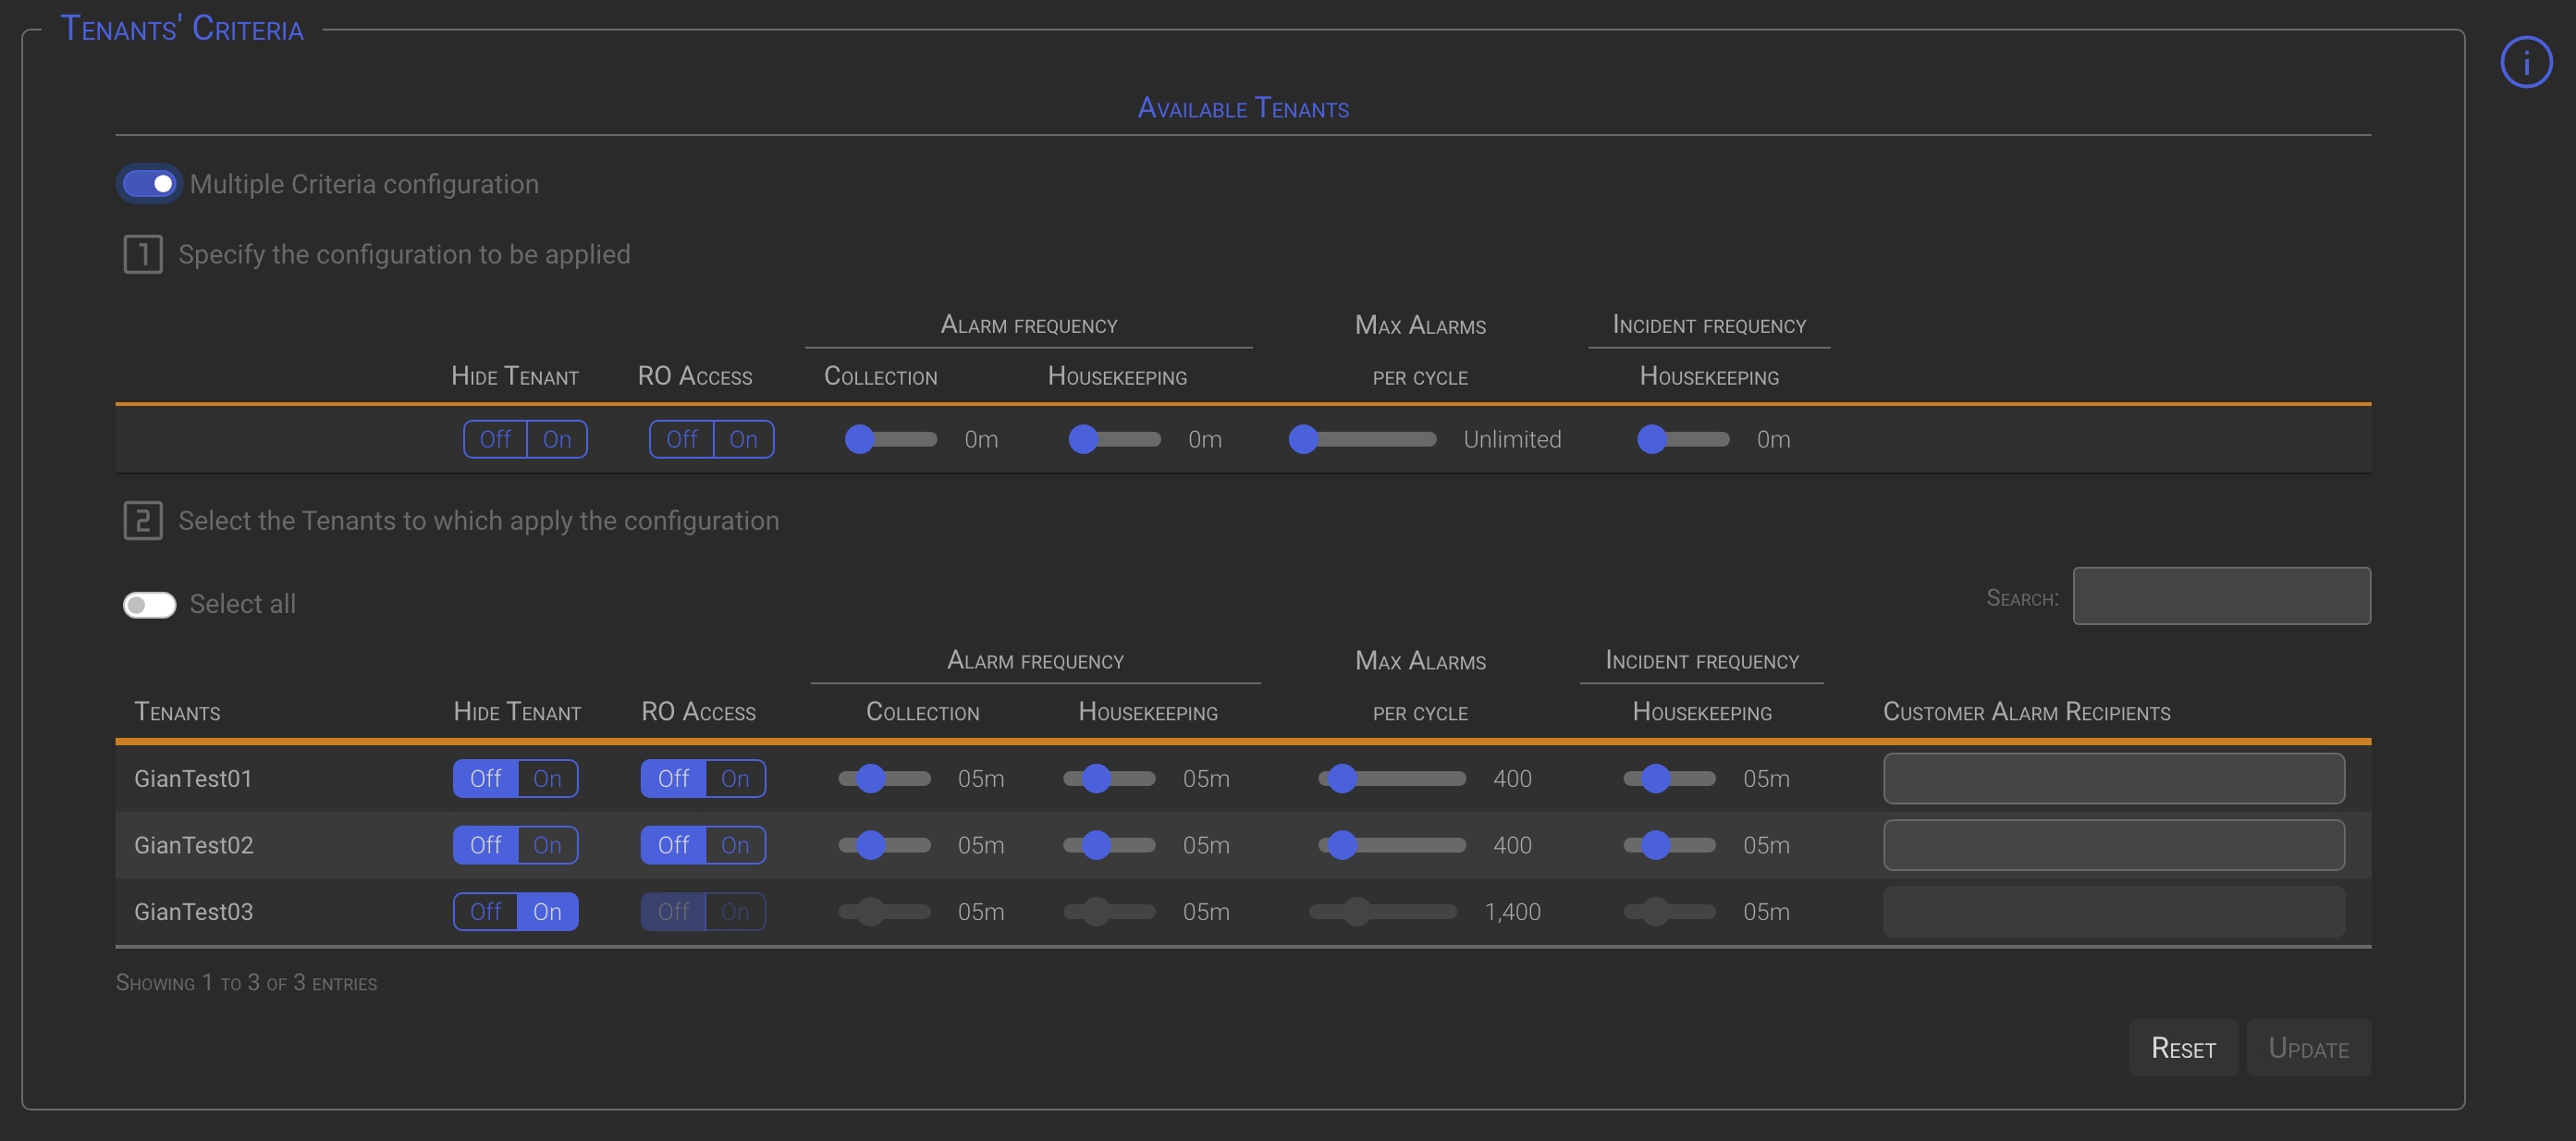
Once the Criteria mask has been configured (point 1), the Tenants to which the mask is to be applied can be selected in the following ways (point 2):
- Operating the Select all switch. This will select all listed Tenants.
- Using the Search box to automatically select all the Tenants matching the search.
- Manually select the tenants to apply criteria to by clicking on one or more tenant names.
TIP
When the Multiple Criteria Configuration switch is checked, changes made at point 1 are applied to all tenants selected using one of the previously described methods.
NOTE
When the Multiple Criteria Configuration switch is checked, individual tenant changes to the tenant options in point 2 will be ignored.
4.2 How to manage remote customers
Warning
In order to manage remote customer alarms and incidents, it is strongly suggested that you configure your installation with a valid SSL certificate.
The following steps must be taken to create a remote customer tenant from the SGBox multi-tenant manager console (on the SOC side):
- Create a new tenant.
- DO NOT associate any probes with the newly created tenant.
- Access the newly created tenant and set the tenant API key from the SCM→Advanced Options menu.
- Provide the customer with the following information:
- The public IP Address of your SOC
- The newly tenant API Key
- The newly created Tenant ID
- The newly created Tenant Name
- Enable the Remote Customer Management option in the configuration’s Option panel. See chapter 2 - Configuration Options
Required Customer Actions
The customer will need to allow HTTPS (port 443) traffic from their SGBox instance to the SOC public IP address.
Please note
The newly created tenant will only contain data related to alarms and incidents. It is intended to work only for SOC management purposes.
After the customer has completed the configuration on the remote SGBox instance, the customer data will begin to arrive. You will then be able to manage the customer alarms and incidents from the alarms and incidents dashboards.
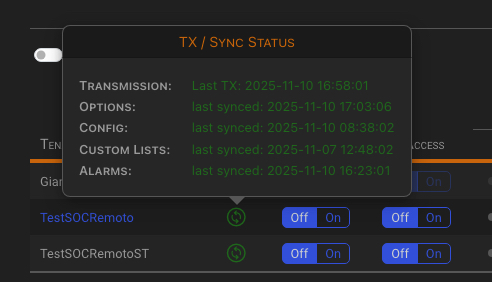
The Tenants’ Criteria configuration panel behaves a little differently when remote customers are defined. From this panel, you can individually monitor customer-to-SOC synchronization and analyze transmission API logs.

The ![sync.jpeg|35] icon will appear under the new Remote column (1) for each remote-managed tenant. The icon’s color will change depending on the synchronization status.
Hovering over the icon will display the synchronization details for the corresponding tenant.
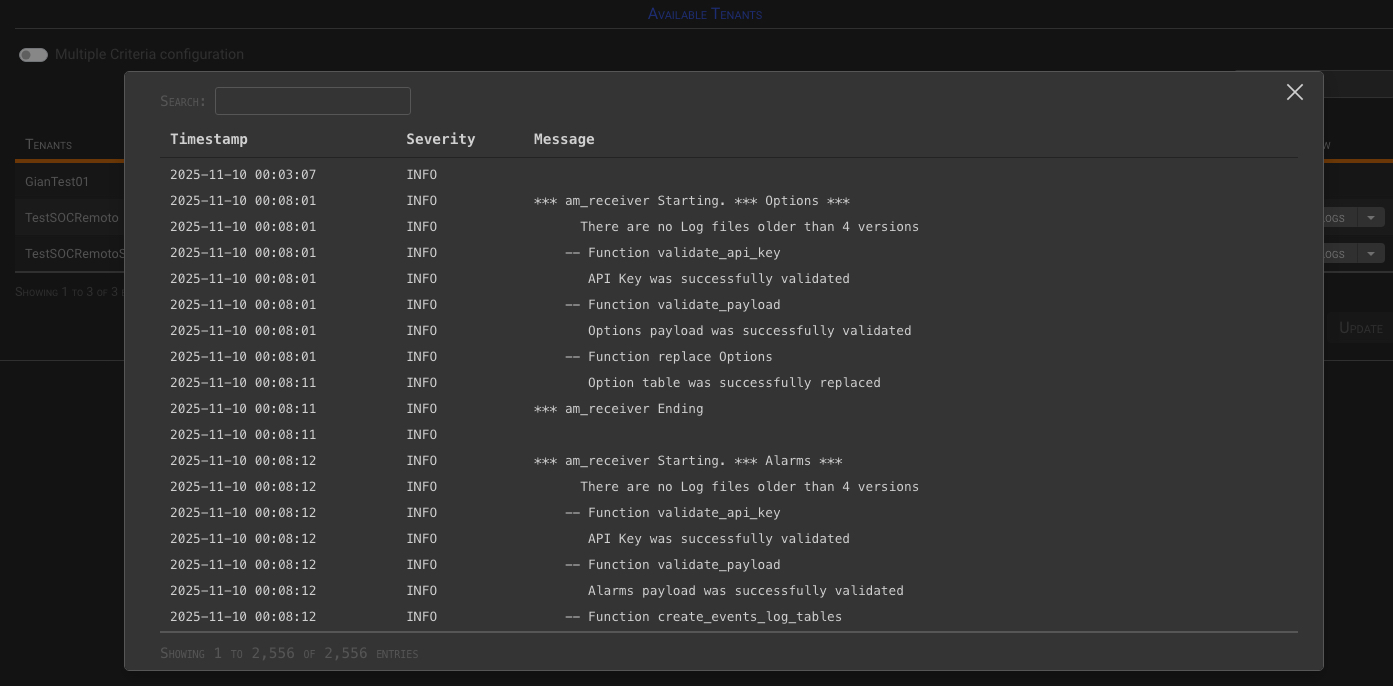
The Logs dropdown button will appear under the new View column (2) for each remote-managed tenant. Clicking the button displays a list of the last four days’ API logs. Selecting a day will display the full API log for that day.
5 Priority
Priority configuration section allows to set specific Priority levels for each Tenant.
Priorities are calculated by the Alarm backend processes multiplying the Event sub-family Score (aka severity level) by the Asset Risk Level to which the Host generating the events belong.
- Events sub-families can be configured in LM→Configuration→Events Families from the main menu
- Assets can be configured in SCM→Network→Assets from the main menu
NOTE
The calculated Priority will be as reliable as the event score and the risk level of the asset.
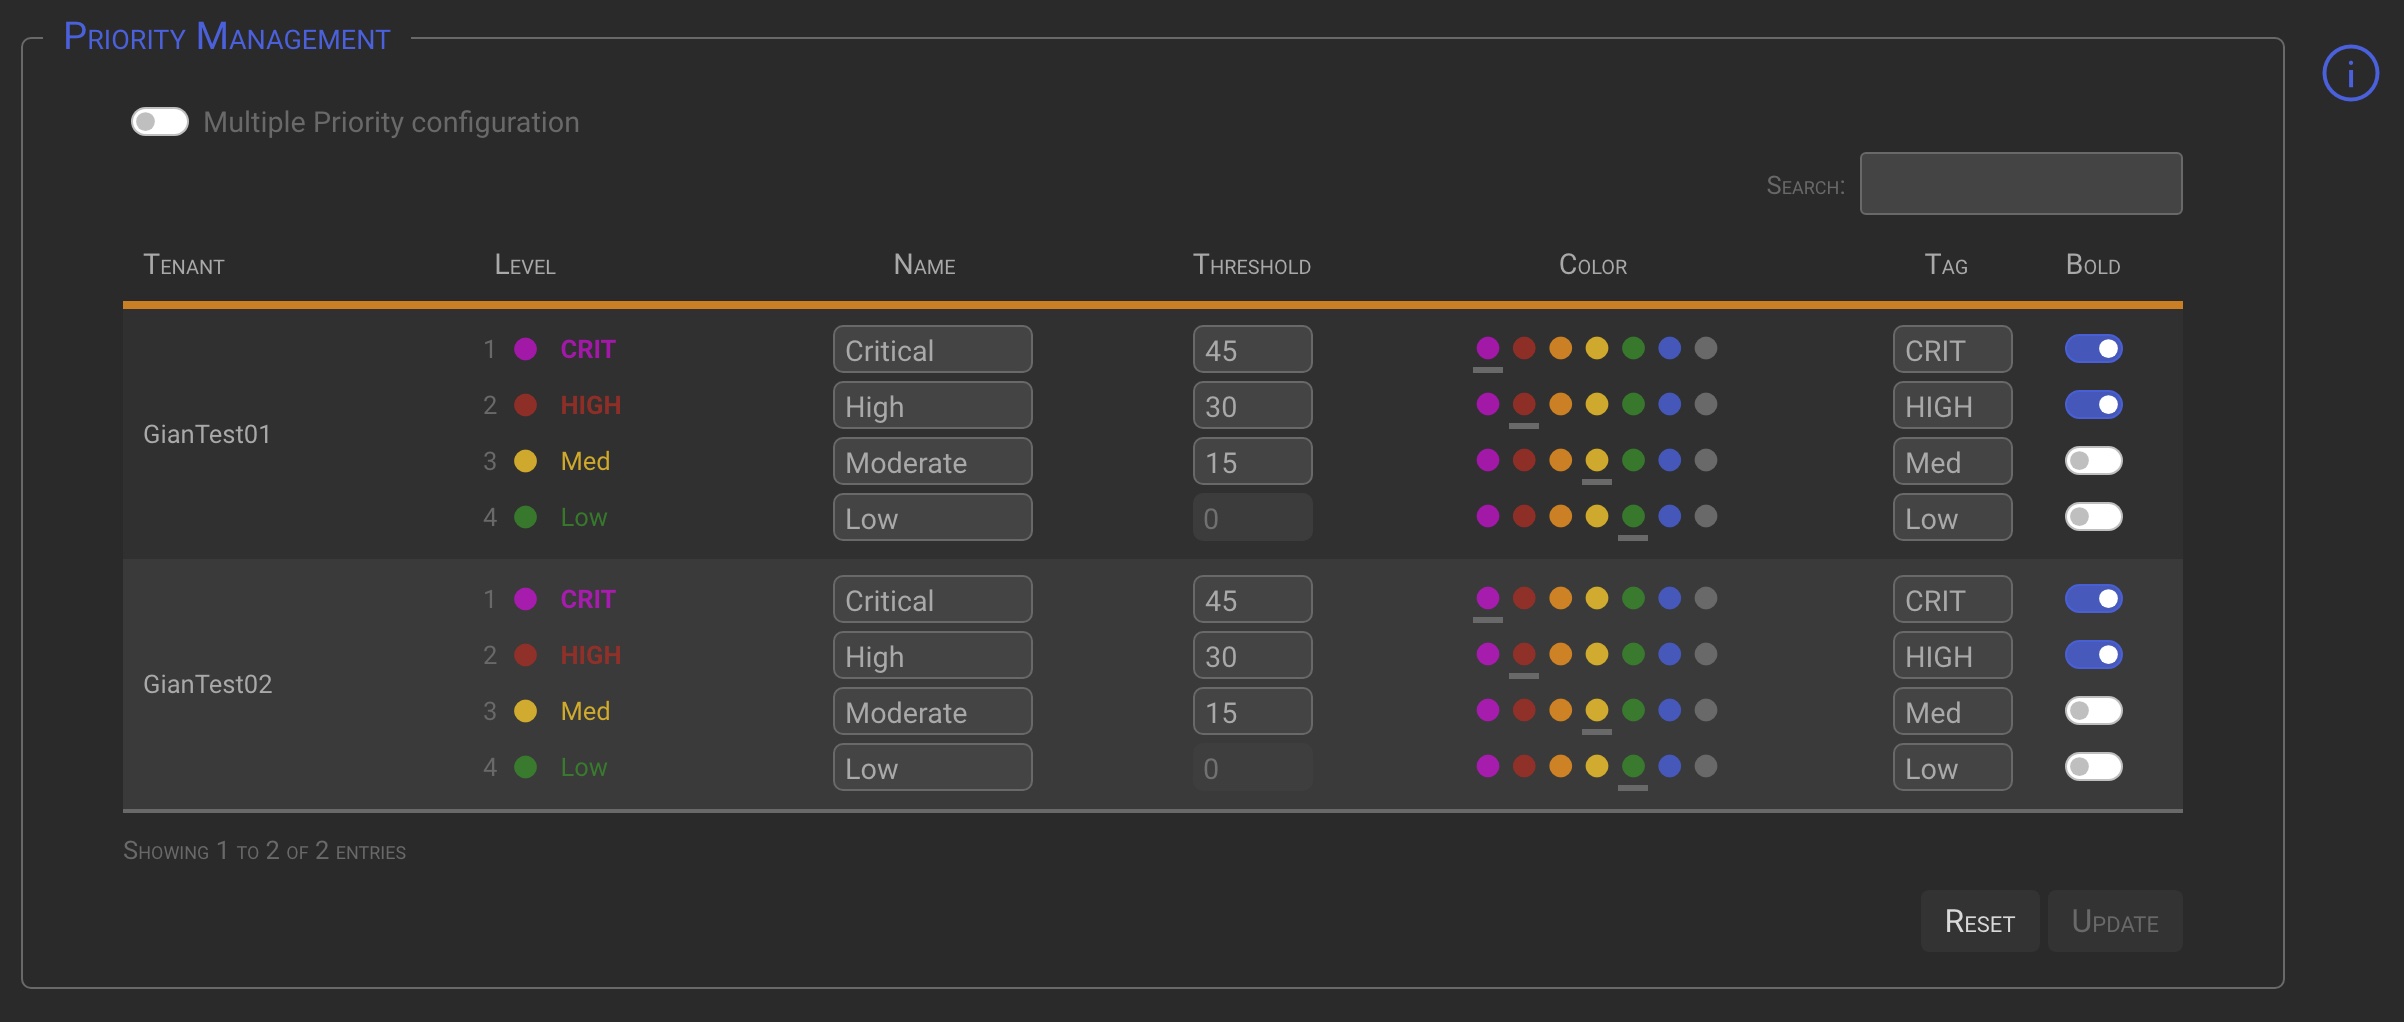
| Column | Description |
|---|---|
| Name | Specifiy the Priority name you want to assign to that specific Tenant/Level. |
| Threshold | Set the level threshold value. (i.e. If a threshold of 45 is specified for a level 1 priority, means that Alarm or Incidents having a priority greater or equal to 45 will be considered as level 1). The highest possible priority is 50. |
| Color | Select the color you want to associate to the Priority Level. |
| Tag | Specify a Tag (max 4 characters) for the Priority Level. This Tag will be used where necessary in place of the numeric priority value. |
| Bold | If checked the Tag will be rendered in bold. |
NOTE
Please note that when on the SGBox Manager instance, the Priorities of Tenants for whom the Hide Tenant option was set to On in the Tenant Criteria options, will not be shown because they are managed locally.
5.1 Priorities Multiple Configuration
When the IM module is centrally managed, there are two methods to set Priorities for the managed Tenants:
Tenant by Tenant
- One or more Tenants at time, selecting them manually or using the search box, and individually setting the desired options.
Multiple Priority configuration
- Operating the Multiple Priority configuration switch in the top left corner, will bring up a special section where you can specify the priorities you want to apply to multiple tenants.
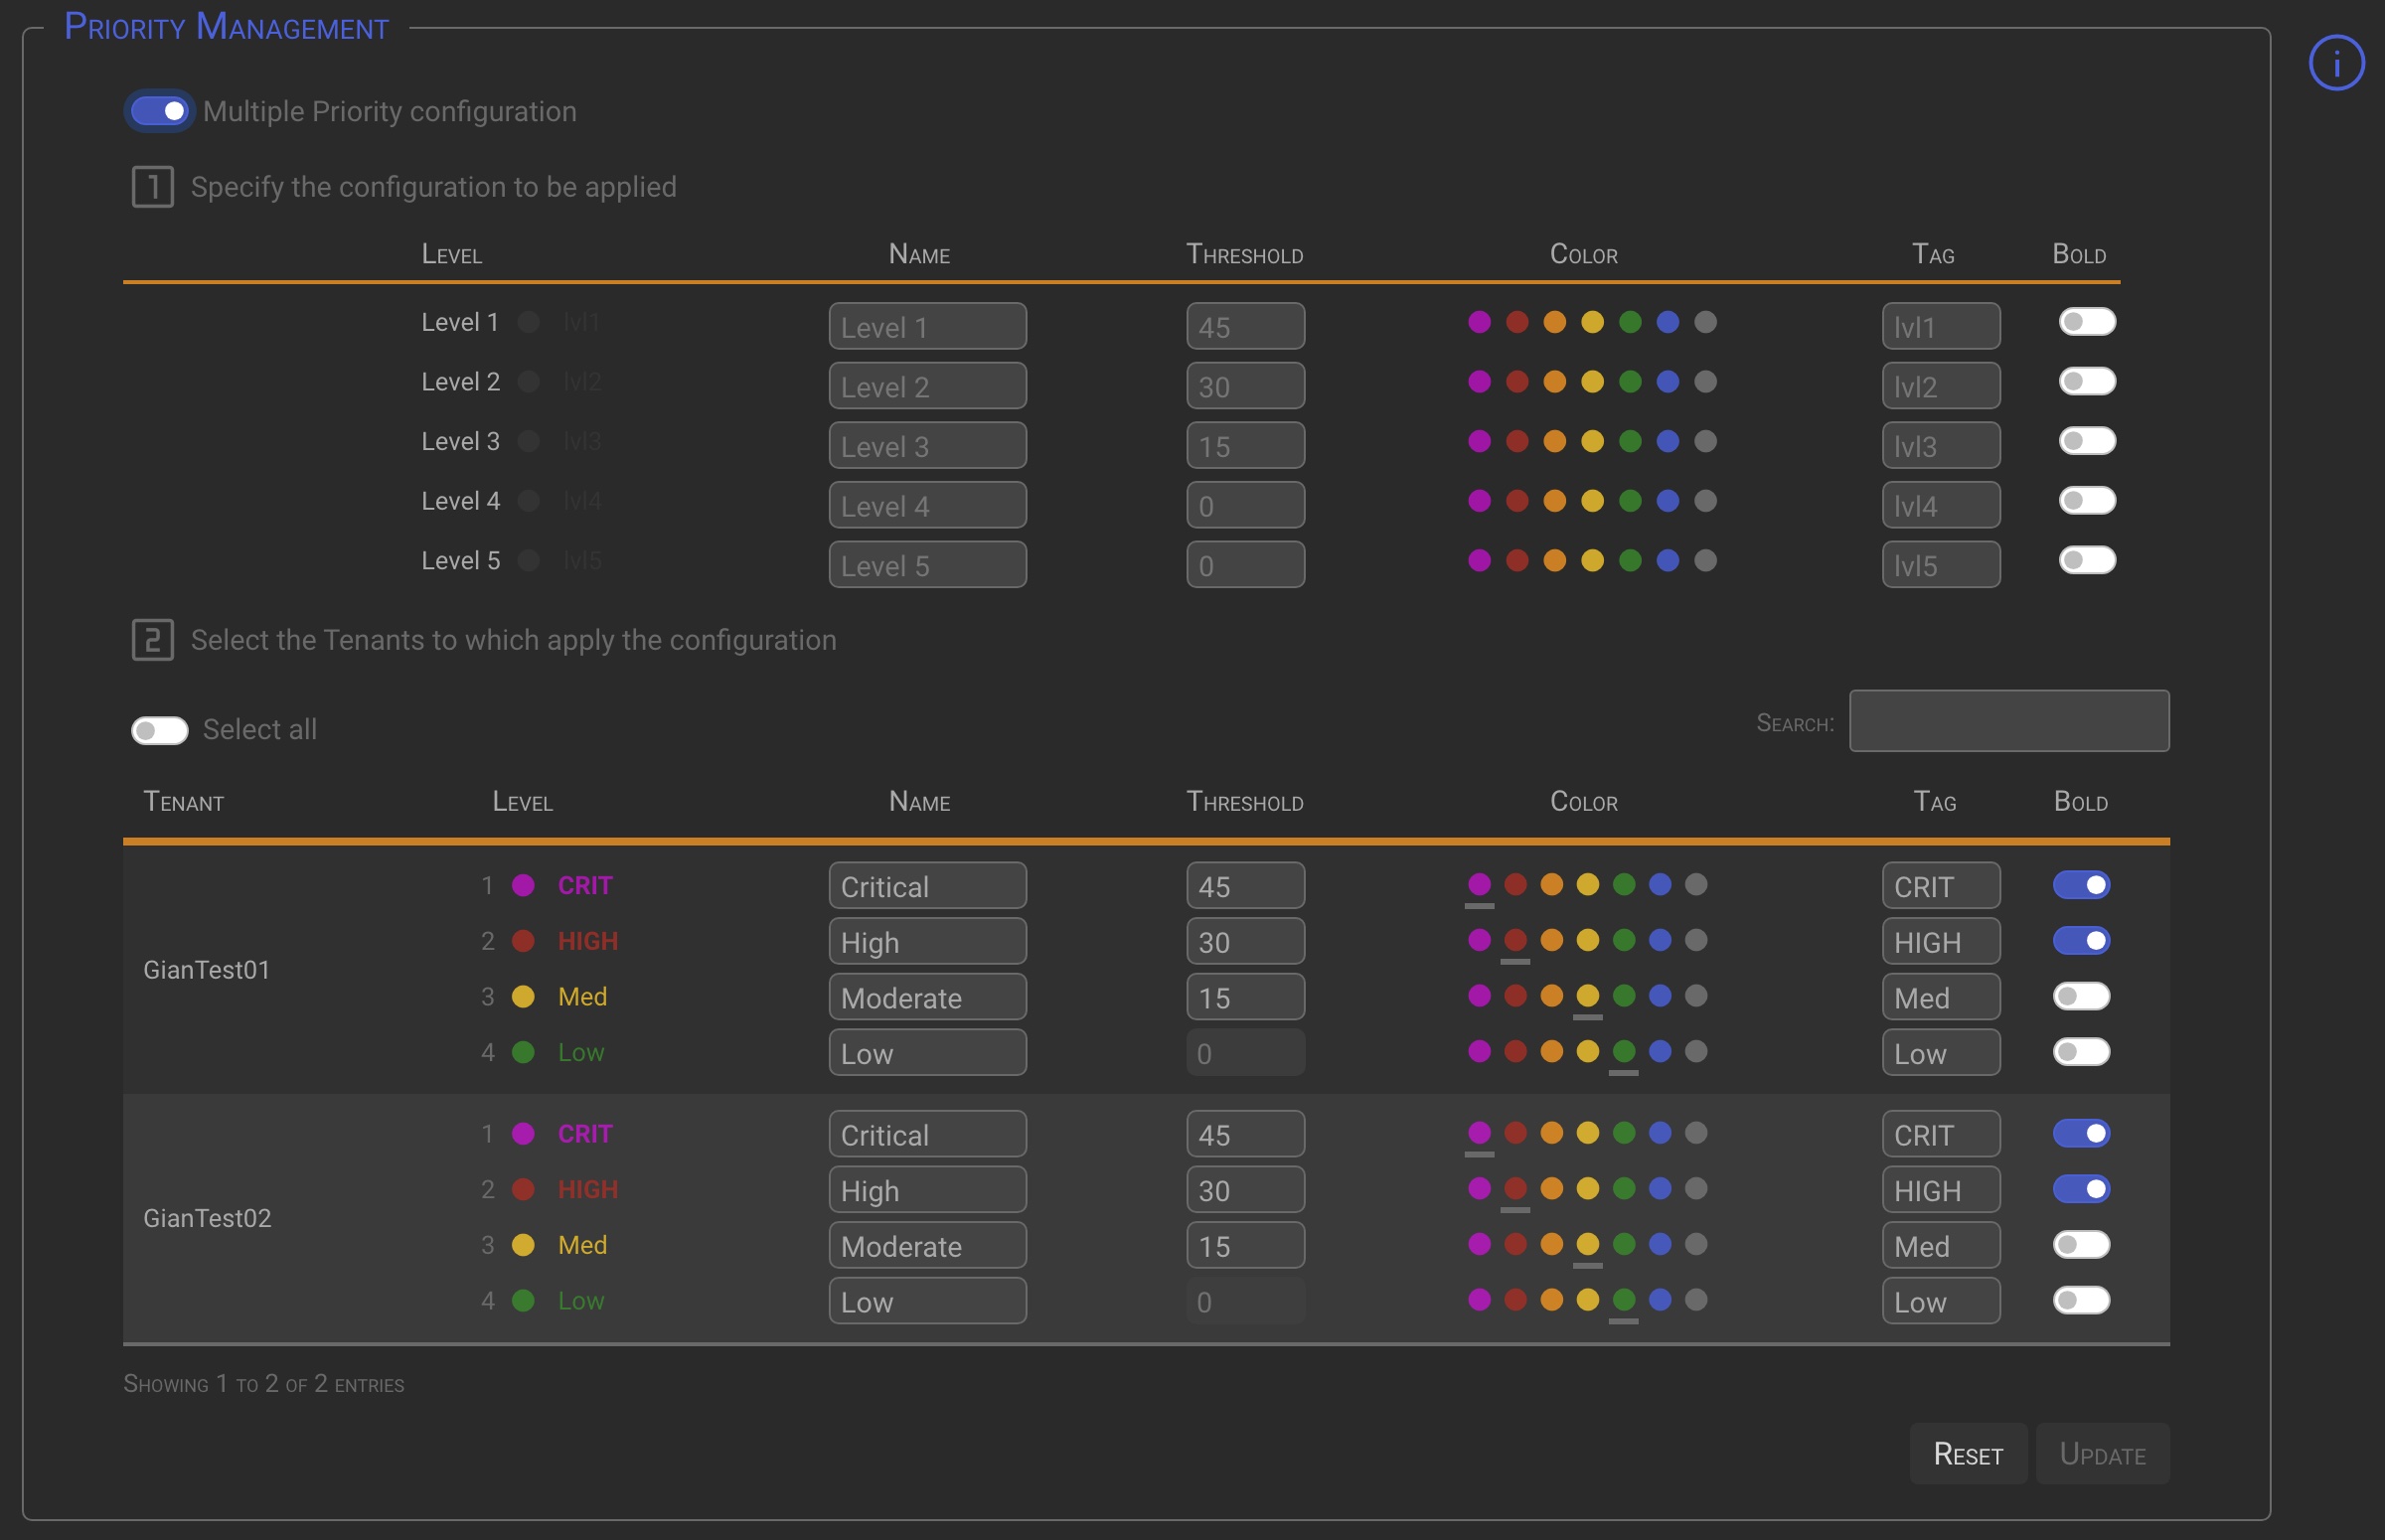
Once the Criteria mask has been configured (point 1), the Tenants to which the mask is to be applied can be selected in the following ways (point 2):
- Operating the Select all switch. This will select all listed Tenants.
- Using the Search box to automatically select all the Tenants matching the search.
- Manually select the tenants to apply criteria to by clicking on one or more tenant names.
NOTE
- When the Multiple Criteria Configuration switch is checked, individual tenant changes to the tenant options in point 2 will be ignored.
- As can be seen, up to 5 priority levels can be defined in the multiple configuration section. This is to adapt to the requirements of countries that do not use ITIL standards, such as in the Middle East.
- The 5th Priority level can only be added by selecting the Multiple Criteria Configuration option and choosing one or more Tenants to apply the configuration to.
TIP
When the Multiple Criteria Configuration switch is checked, changes made at point 1 are applied to all tenants selected using one of the previously described methods.
How to Remove 5th priority level
To remove the 5th priority level from one or more Tenants, enter remove in place of the level name and click the Update button. This works both for individual tenants (point 2) and for the Mutiple Priority Configuration (point 1)
6 SLA Management
The SLA Management option panel allows you to set a specific SLA for each alarm, triage, and incident management task for each tenant, depending on the priority assigned to the alarms.
6.1 Activation
The SLA configuration is disabled by default and must be enabled and configured properly to work.

To activate SLA management, select the Enabled option, then click the Update button.
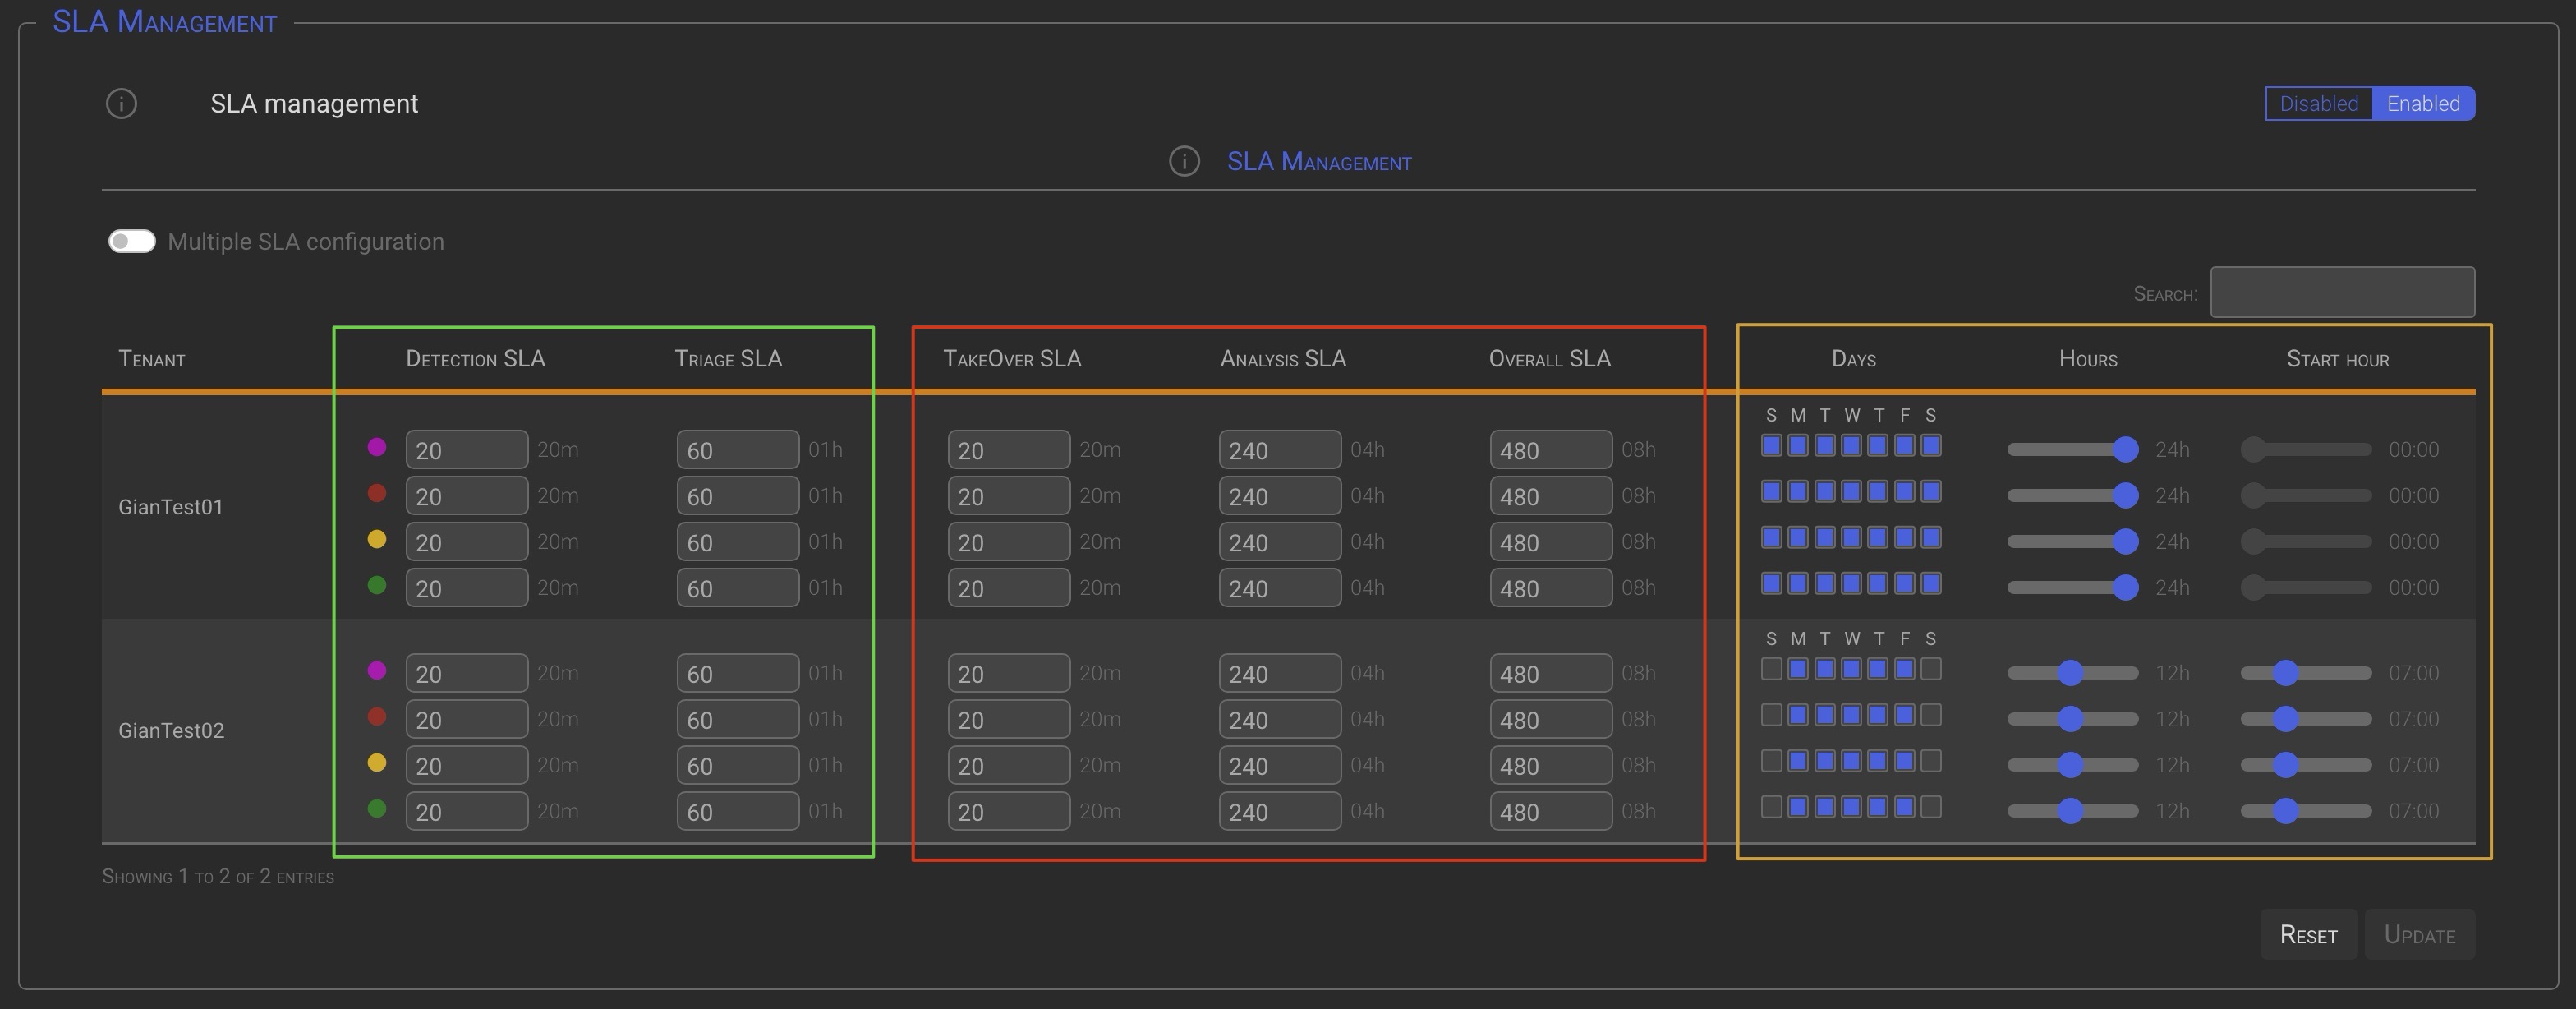
6.2 SLA Management panel overview
The SLA management panel is divided into three logical sections:
- Alarm and Triage SLAs, represented by the green box, is always enbled.
- Incident SLAs, represented by the red box, is only enabled when the incident management module is activated.
- The SLAs timing definition, represented by the yellow box, is always enabled.
| Column | Description |
|---|---|
| Detection and Triage SLA | Set the duration of the corresponding SLA in minutes. |
| TakeOver, Analysis and Overall SLA | Set the duration of the corresponding SLA in minutes. |
| Days | The days of the week you want the SLA to be active. |
| Hours | Specify how long is the SLA window (ie: 12h). |
| Start hour | Specify the SLA window start hour (ie: 07:00). |
6.2.1 SLA Types
Alarm
- Detection SLA (Alarm Takeover): Time elapsed from the creation of the alarm to its inclusion in triage
- Triage SLA: Time elapsed between the start and end of triage.
Incident
- TakeOver SLA: Time elapsed from opening the incident to the first containment action.
- Analysis SLA: Time elapsed between the first containment action and the end of the analysis.
- Overall SLA: Time elapsed between opening an incident and closing it.
EXAMPLE
In the above picture:
the Tenant GianTest01 is configured with a SLA active from Sunday to Saturday, for 24 hours a day starting at midnight. Practically a 24×7 SLA definition.
the Tenant GianTest02 is configured with a SLA active from Monday to Friday, for 12 hours a day starting at 07:00.
NOTE
Please note that when on the SGBox Manager instance, the SLA of Tenants for whom the Hide Tenant option was set to On in the Tenant Criteria options, will not be shown because they are managed locally.
6.3 SLA Multiple Configuration
When the IM module is centrally managed, there are two methods to set the SLA for the managed Tenants:
Tenant by Tenant
- One or more Tenants at time, manually or using the search box, and individually setting the SLA values
Multiple SLA configuration
- Operating the Multiple SLA configuration switch in the top left corner, will bring up a special section where you can specify the SLA you want to apply to multiple tenants.
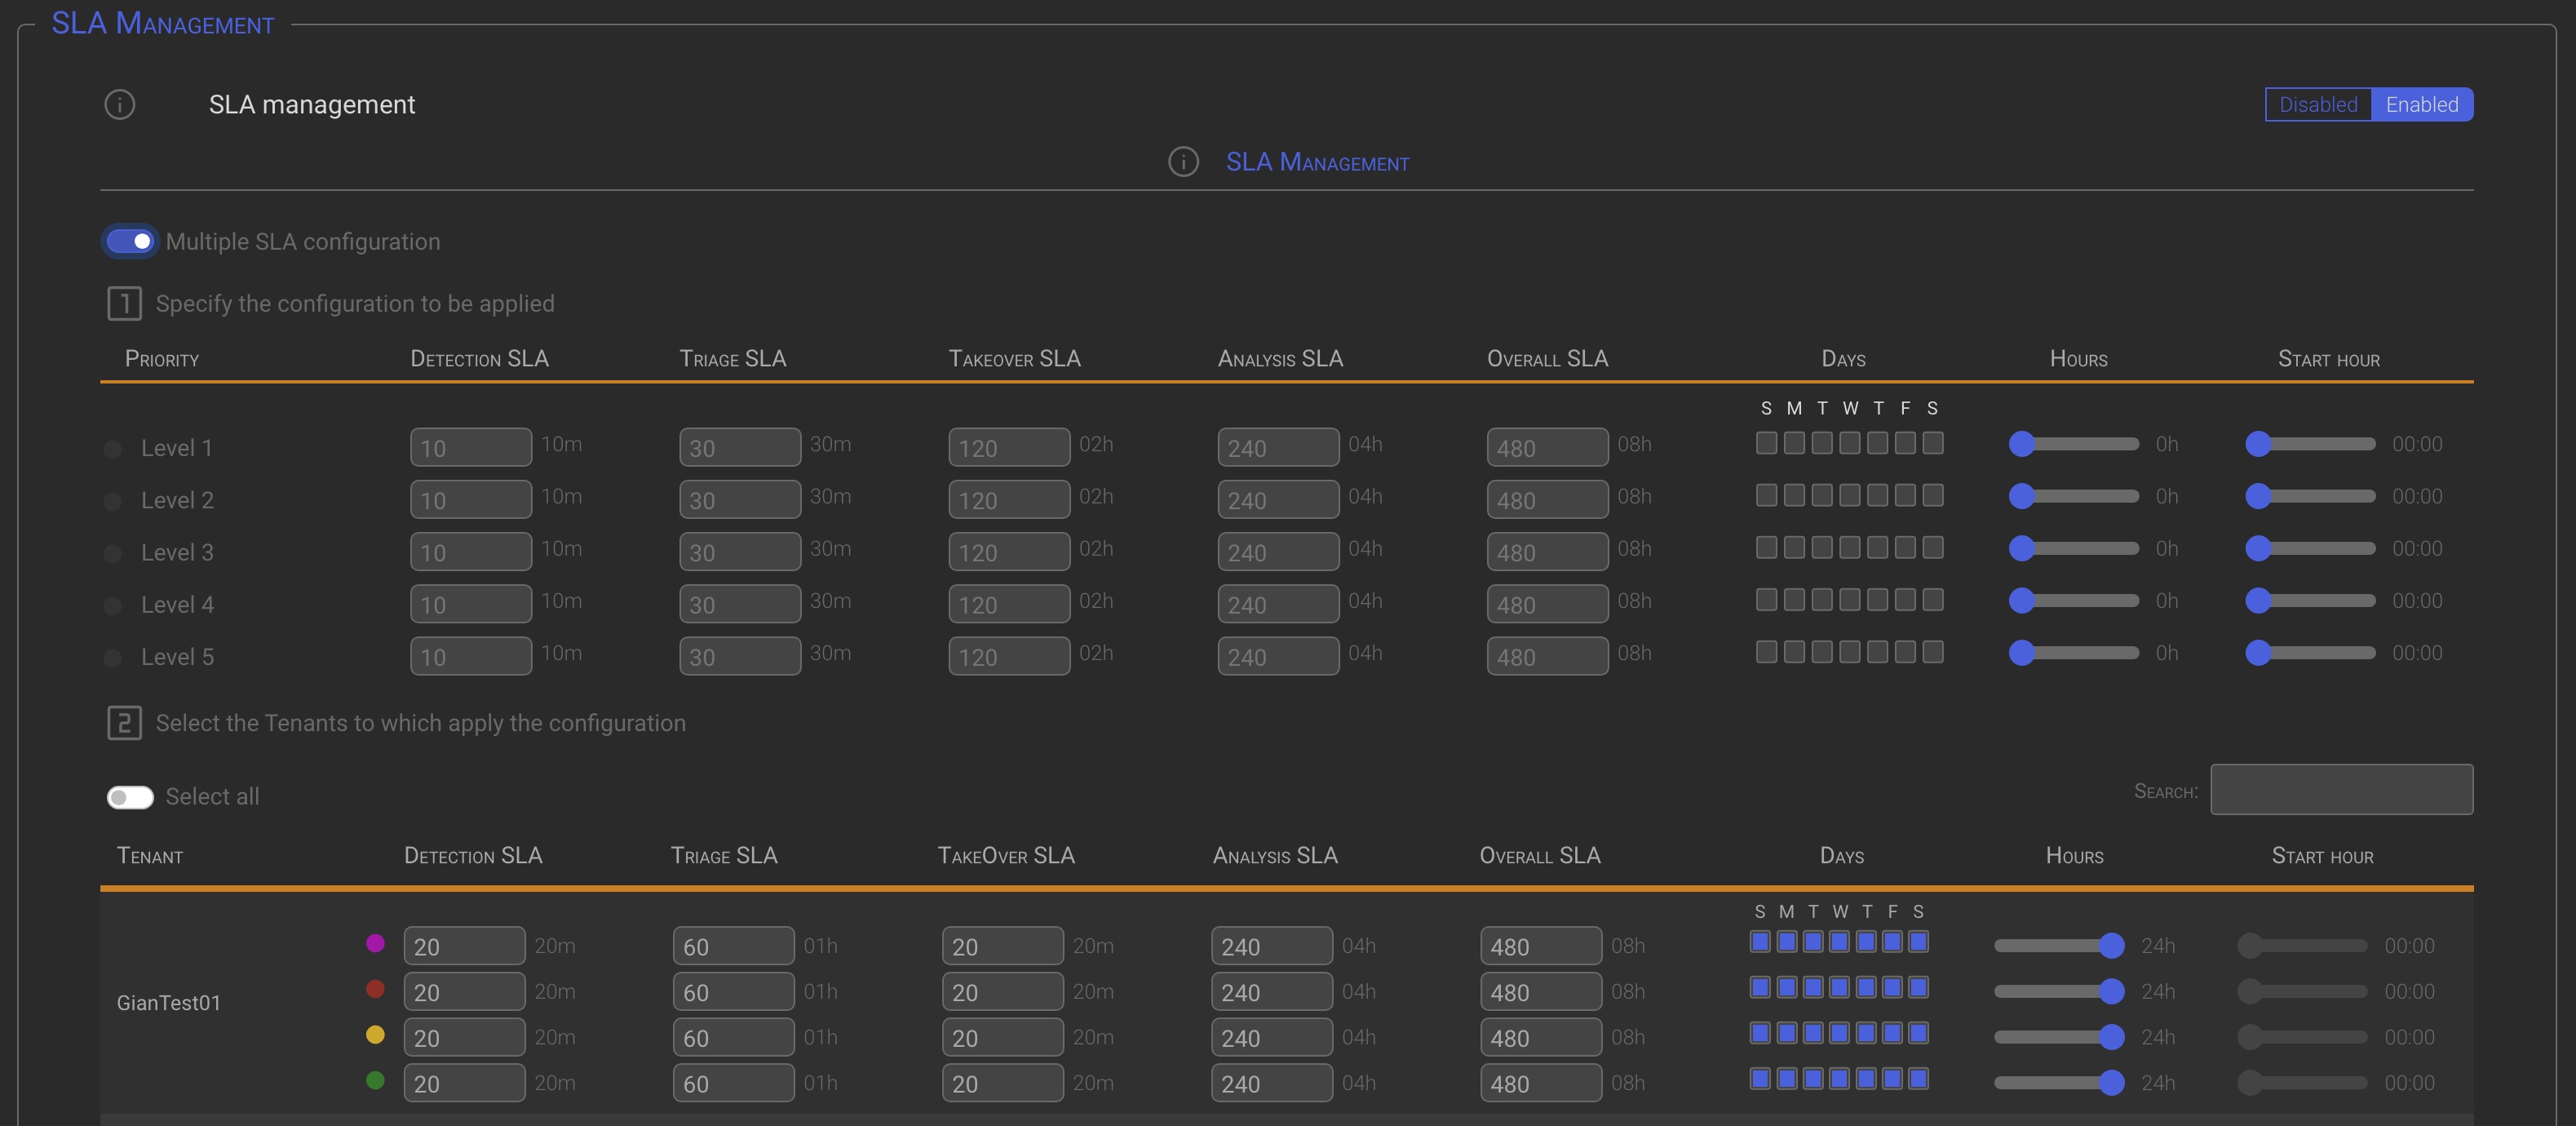
Once the SLA mask has been configured (point 1), the Tenants to which the mask is to be applied can be selected in the following ways (point 2):
- Operating the Select all switch. This will select all listed Tenants.
- Using the Search box to automatically select all the Tenants matching the search.
- Manually select the tenants to apply criteria to by clicking on one or more tenant names.
NOTE
When the Multiple Criteria Configuration switch is checked, individual tenant changes to the tenant options in point 2 will be ignored.
TIP
When the Multiple Criteria Configuration switch is checked, changes made at point 1 are applied to all tenants selected using one of the previously described methods.
Remove 5th SLA priority level
Since SLAs are directly related to Priorities, to remove the 5th SLA priority level from one or more Tenants you must remove the 5th Priority from the desired Tenants (see 01 - Configuration)
Add the 5th SLA priority level
To add the 5th SLA priority level, first add the 5th Priority level (see 01 - Configuration). The system will automatically add the corresponding fifth SLA priority level.
7 Threat Intelligence
Through Threat Intelligence-Based Enrichment, it is possible to add information from one or more threat intelligence sources to Alarms. This is done binding one or more TI Lists to the IM KPIs.
List can be created by your own through the SCM→Actions→Lists main menu option, or using the SGBox PlayBooks and/or the SGBox ADE modules.
- With the PlayBooks module we can define and schedule playbook execution to download IOC lists from free or paid sources.
- With the ADE module we can create lists directly from the configured Acrtive Directories Groups.
These lists can then be matched to IM-specific KPIs to determine whether incoming events match any of the IOC lists. For example, we can use Threat Intelligence enrichment to check if the source IP address of an incoming event is part of a known botnet or command and control (C&C) IP address list, or to check if the user contained in an Alarm is a member of a specific Active Directory Group.
7.1 Activation
The Threat Intelligence configuration is disabled by default and must be enabled and configured properly to work.

To activate the Threat Intelligence Enrichment, select the Enabled option, then click the Update button.
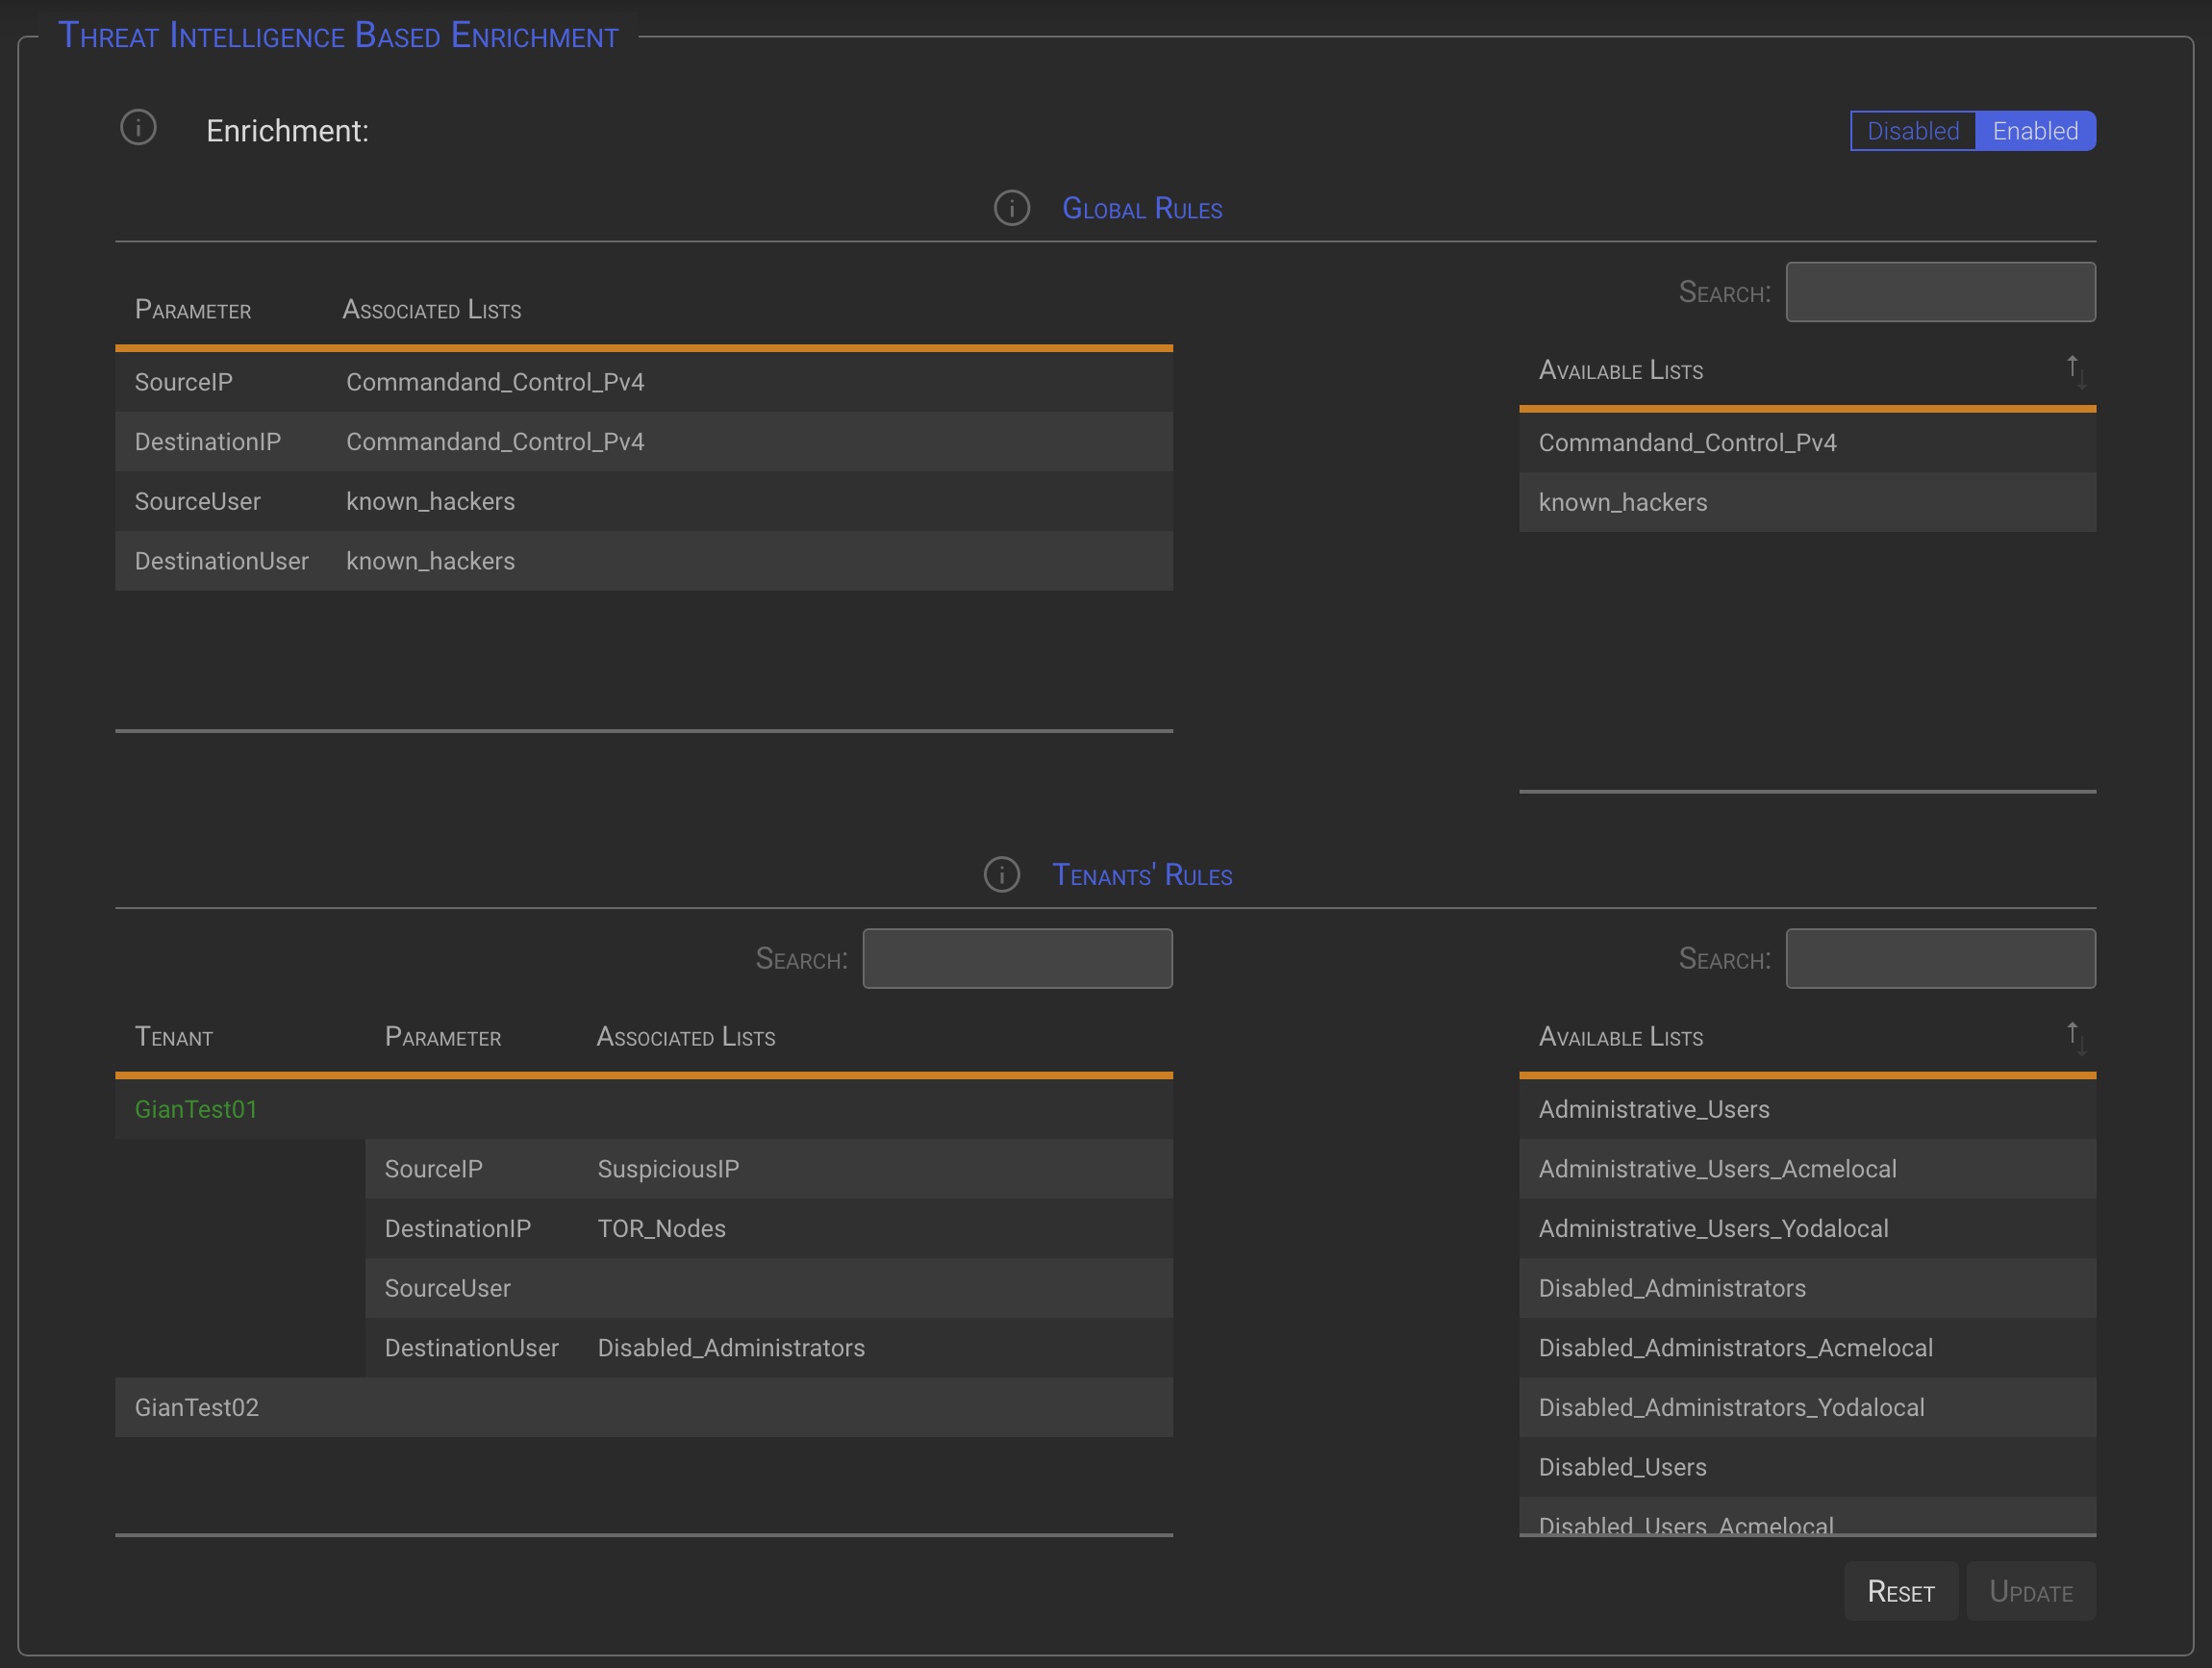
7.2 Global Rules section
The TI lists available in the Global Rules section depend on the environment..
- Manager instance (SOC or Service Provider): TI Lists that have been globally defined and marked as available for all tenants.
- Locally managed Tenants: TI Lists that have been globally defined and marked as available for all tenants or specifically assigned to the Tenant.
- Single Tenant: Locally defined TI Lists.
TIP
The TI Rules defined in this section will be applied to all globally managed Tenants.
NOTE
Locally managed tenants will not be able to see this section.
7.3 Specific Tenants’ Rules section
The TI Lists available in the Global Rules section depend on the environment.
- Manager instance (SOC or Service Provider): Specific Tenant TI Lists will be available by clicking on the desired tenant.
- locally managed: Locally defined TI Lists, plus TI Lists that have been globally defined and marked as available for all tenants or specifically assigned to the Tenant.
- Single Tenant: Locally defined TI Lists.
TIP
The TI rules defined in this section will apply to the selected Tenant, in addition to any global rules targeting the same Tenant.
NOTE
Single Tenant installation will not be able to see this section.
7.4 Binding Lists
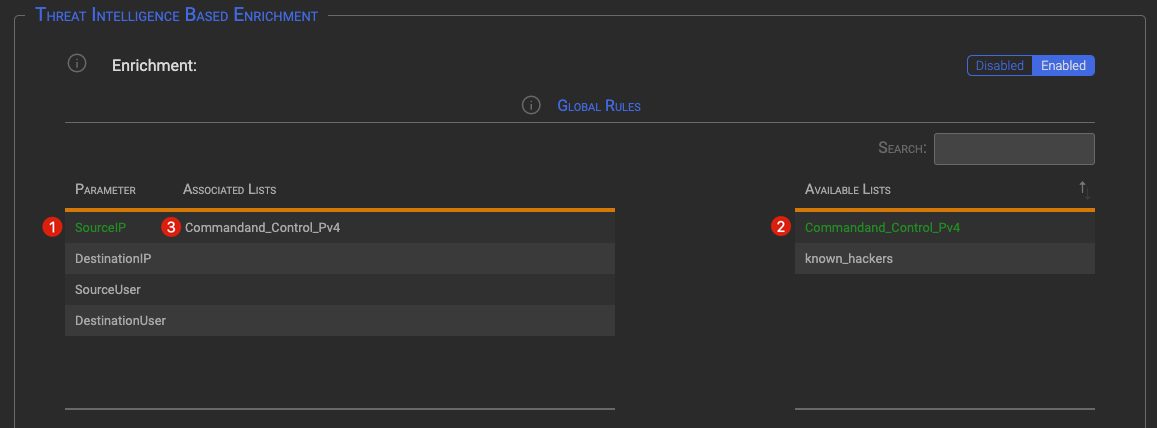
7.4.1 Global Rules
To bind a global List to one of the Parameters:
- Click on the parameter that you want to link to a list. The parameter will turn green.
- Click on the lists you want to link. Selected list(s) will turn to green
- The List name will be automatically added to the Associated List for the selected Parameter
TIP
If you click on a selected item, it will be deselected.
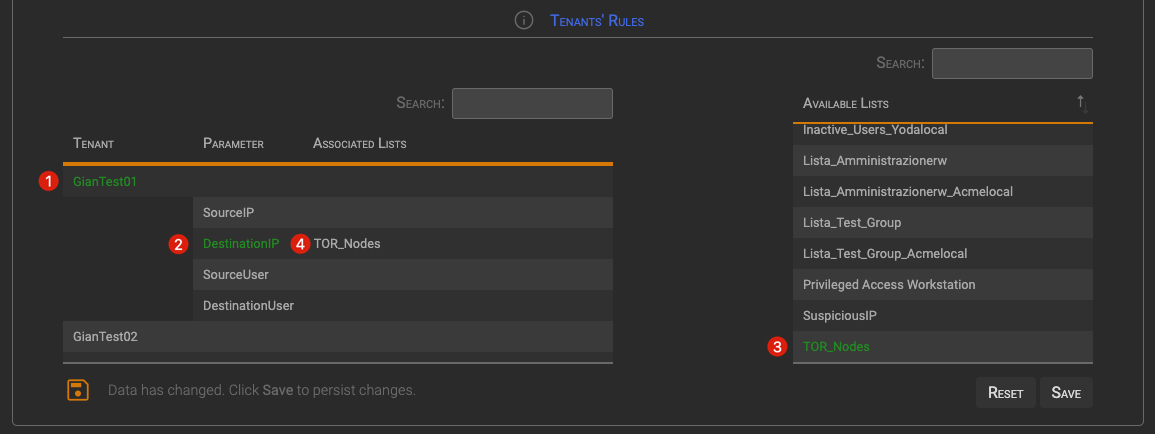
7.4.2 Tenants’ Rules
To bind a Tenant’s List to Tenant’s Parameters:
- Click on the desired Tenant (1). The Tenant will turn to green, Tenant parameter will display and the specific Tenant’s List will be loaded in the Available Lists table.
- Click on the parameter that you want to link to a list (2). The parameter will turn green.
- Click on the lists you want to link. Selected list(s) will turn to green (3).
- The List name will be automatically added to the Associated List for the selected Parameter (4).
TIP
If you click on a selected item, it will be deselected.
8 Remote SOC
The Remote SOC is a specific function for customers who have an on-premises installation of the SGBox instance and do not want to manage their alarms and/or incidents directly.
NOTE
- After activating the Remote SOC, the local SGBox instance begins sending information to the SOC via an HTTPS connection.
- Only the minimum amount of data necessary for the SOC to analyze alarms and incidents will be transferred.
8.1 How to configure
TIP
The Remote SOC functionality have to be configured on the customer SGBox instance.
Depending on the type of your SGBox installation, there are different steps to take to configure the Remote SOC.
Multi-tenant instances
If your on-premises SGBox instance is multi-tenant, set the Hide Tenant option to On in the Tenants’ Criteria configuration panel before taking any other actions.
After setting this option, access the tenant and complete the configuration as described in chapter 8.1.1 Configuration here below.
Single Tenant instances
If your on-premises SGBox instance is a single-tenant instance, complete the configuration as described in chapter 8.1.1 Configuration here below.
8.1.1 Configuration
Once you reach an agreement with the SOC owners, you will receive the necessary data to set up a secure connection between your SGBox instance and the SOC.
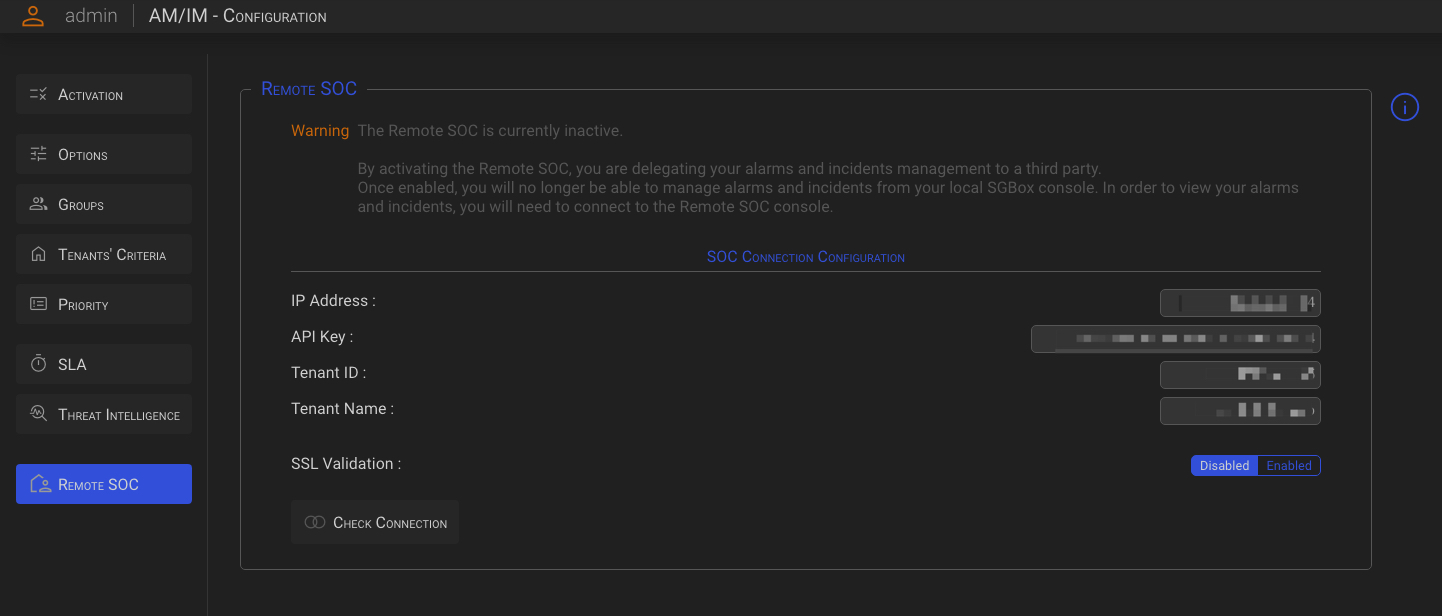
Enter the received data into the correct fields. Then, click the Check Connection button to verify that the connection is working.
If a successful connection is established, a success message (1) will be displayed and the Activate button will become available. Otherwise, a specific error message (1) will be displayed, and the Activate button will not be available.
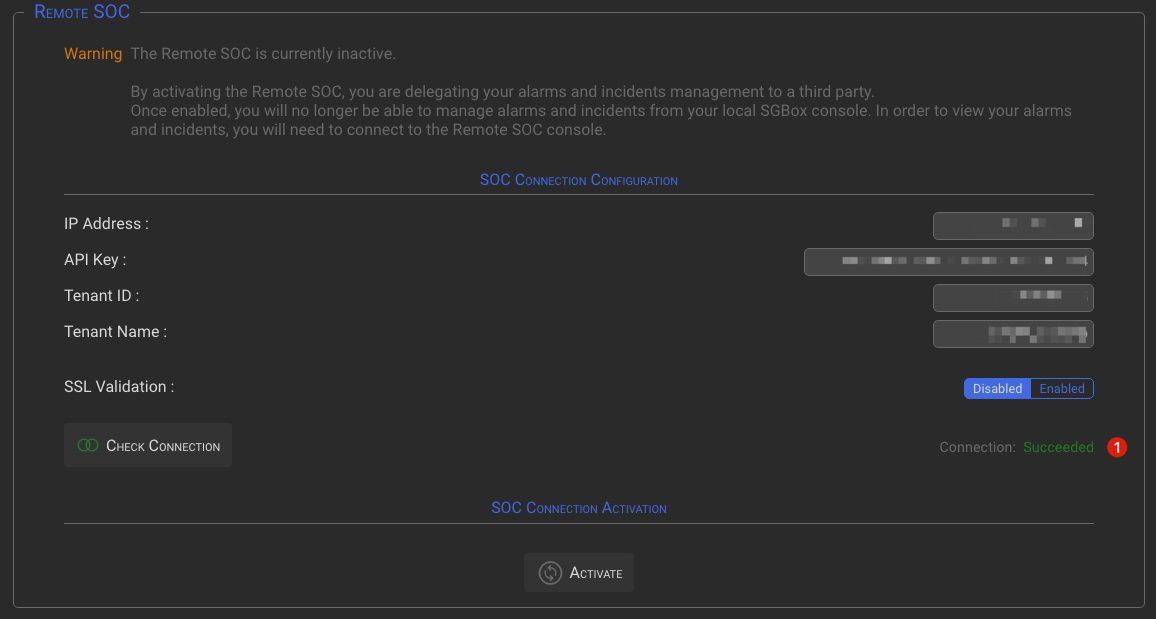
Here we are. Click the Activate button to delegate alarms and incidents management to the Remote SOC.
Once the Remote SOC is active, a new section will appear in the Remote SOC Configuration Panel. This section will allow you to monitor the synchronization status with the SOC.
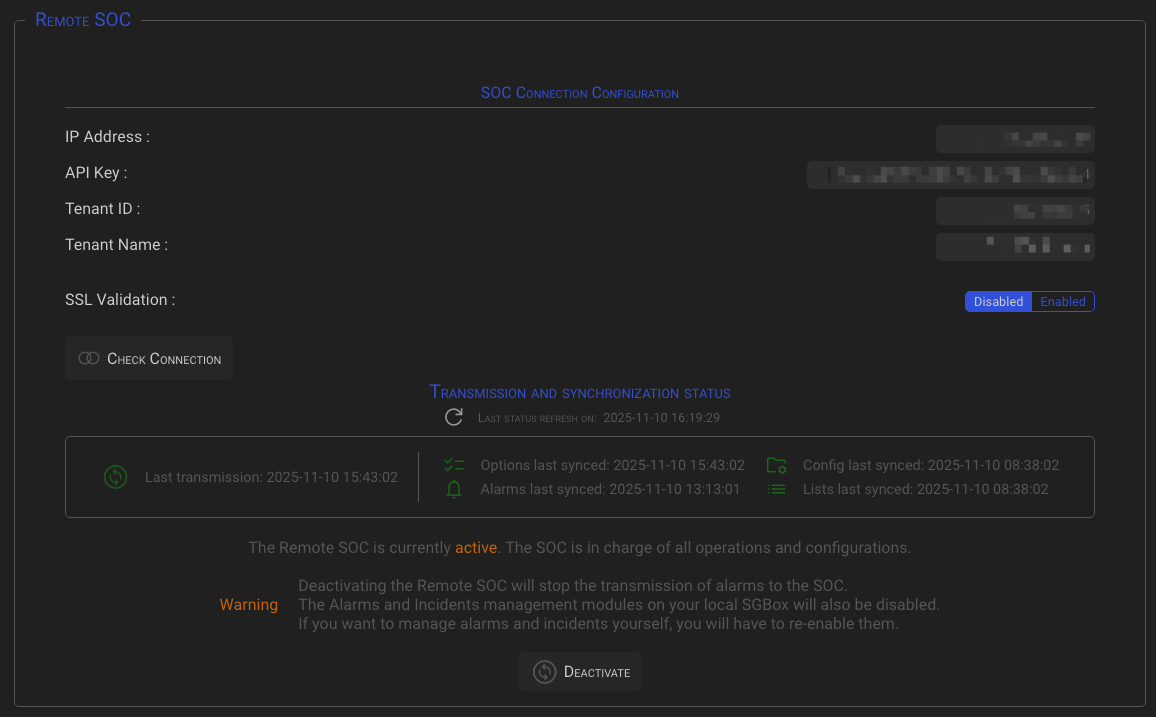
The color and text of the icons reflect the current synchronization status. You can easily update this information by clicking the refresh ![]() icon in the newly displayed section.
icon in the newly displayed section.
8.2 SGBox SOC provider
If you are an SGBox SOC provider, please refer to the How to manage remote customers chapter above to learn how to manage remote customers’ Tenants.