The Alarms Management rely on two dashboards to accomplish Alarms management tasks, the Alarms Dashboard and the Alarms Grouping Dashboard.
Important!
These dashboards are different views of the same Alarms:
- The Alarms Dashboard allows to investigate and act on single Alarms
- The Alarms Grouping Dashboard allows to investigate and act on groups of Alarms
Each of these dashboards has its own specific functions, please refer to the Alarm analysis and actions and to the Alarm Groups analysis and management chapters below for more information:
Additionally, some Alarm management features are shared among the Alarm, Triage, and Incident dashboards. Please refer to the 03 - Alarm Details and Operation chapter for more information.
NOTE
Alarms can be generated in several ways through some SGBox modules, such as the LCE module, or through some SGBox functions, such as the Event and Threat Intelligence queries. Please refer to the proper documentation for more information on generating alarms.
1 Alarm Dashboard
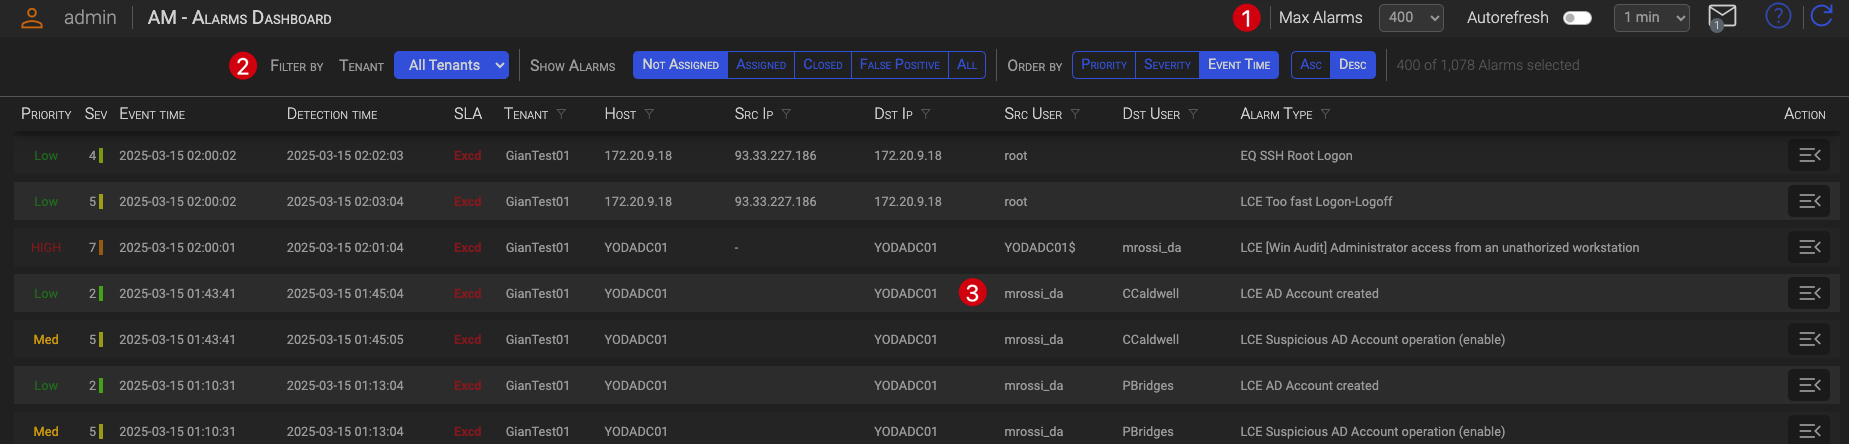
The Alarm Dashboard is split into three main areas:
1.1 The Header section (1)
Here you can set the general dashboard behavior and read your messages.
- Max Alarms Allows you to set the maximum number of alarms you want to see on the dashboard.
- Autorefresh Allows you to turn on the dashboard auto-refresh and set the refresh interval.
- Messages By clicking the envelope icon, you can read messages sent to your account by backend processes, such as SLA expiration or other operational messages.
Tip
Click the envelope icon to toggle messages display.
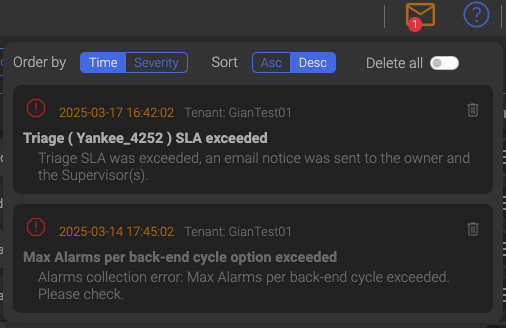
Messages actions
- Order by creation time or message severity (ascending or descending)
- Delete single messages
- Delete all messages
The number on the envelope icon represent the number of unread messages, when red, and the number of read messages when grey.
TIP
The backend processes automatically remove already read messages that are older than one day and unread messages that are older than three days, since the information contained in messages is closely related to the time of their creation.
1.2 The Filters section (2)
In the Filter section, you can select which alarms you want to see and the order in which they are displayed.

1.2.1 General Filters (1)
- Tenant You can choose which Tenant’s alarms you want to see.
1.2.2 Show Alarms (2)
You can switch the following Alarms views
-
Not Assigned Only new and opened Alarms, those not yet assigned to a Triage, will be displayed.
-
Assigned Only alarms that are open and assigned to a Triage will be displayed.
-
Closed Only closed Alarms will be displayed.
-
False Positive Only Alarms closed as False Positive will be displayed.
-
All All Alarm will be displayed
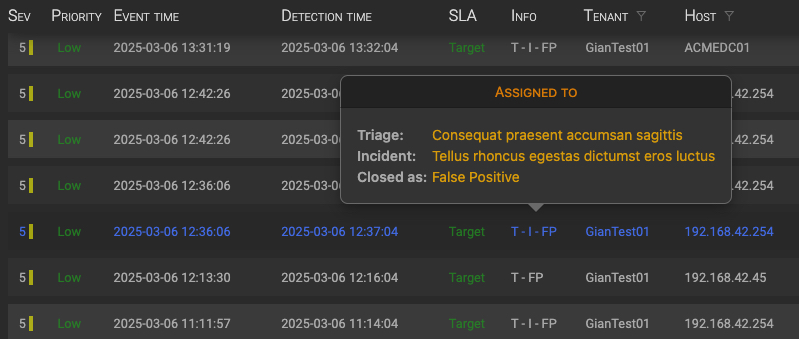
In all these views, with the exception of the Not Assigned one, under the Info column you can see the following info:
| Type | Description |
|---|---|
| T | Assigned to a Triage |
| I | Assigned to an Incident |
| T-FP | Assigned to a Triage closed as False Positive |
| T-I | Assigned to a Triage that has been assigned to an Incident |
| T-I-FP | Assigned to a Triage that has been assigned to an Incident that was closed as False Positive |
| FP | Closed as a False Positive |
| FPR | Closed as a False Positive by a False Positive Rule |
Hovering your mouse over one of these acronyms will display details about the Triage, Incident, or Rule.
1.2.3 Order by (2)
Here you can select how to order the current Alarm view.
- Priority Alarms will be ordered by Priority
- Severity Alarms will be ordered by Severity
- Event Time Alarms will be ordered by Event Time
1.2.4 Selected Alarms (4)
Here you can see how many alarms are matching your selection criteria.
The first number is the number of displayed messages, the second is the total number of Alarms matching you selection.
1.3 The Alarms section (3)
The Alarms section contains the list of the Alarms matching your selection.

| Column | Description |
|---|---|
| Priority | Alarm Priority |
| Sev | Alarm severity |
| Event Time | The original event time |
| Detection time | The time the event was detected as an Alarm |
| SLA | The remaining SLA time, or target or excd, depending on whether the SLA was met or not. |
| Tenant | The reference Tenant |
| Host | The event associated host |
| Src Ip | The event Source IP |
| Dst Ip | The event Destination IP |
| Src User | The event Source user |
| Dst User | The event Destination user |
| Alarm Type | The event name assigned when creating the Alarm |
| Action | Opens the Alarm detail view (see the 03 - copiata - Alarm Dashboard Operation chapter.) |
1.4 Alarm analysis and management
Through the Alarm Dashboard you can analyze each alarm individually and take action on any of them. You can also aggregate alarms based on your own criteria to identify specific patterns.
![]()
Clicking the Open Details button in the Action column of an alarm, will toggle the Alarm Management panel. By default, the panel will open with the Alarm Details section displayed.
The Alarm Management panel consist of following three sections:
- Alarm Management
- Alarm Details
- Events that generated the alarm
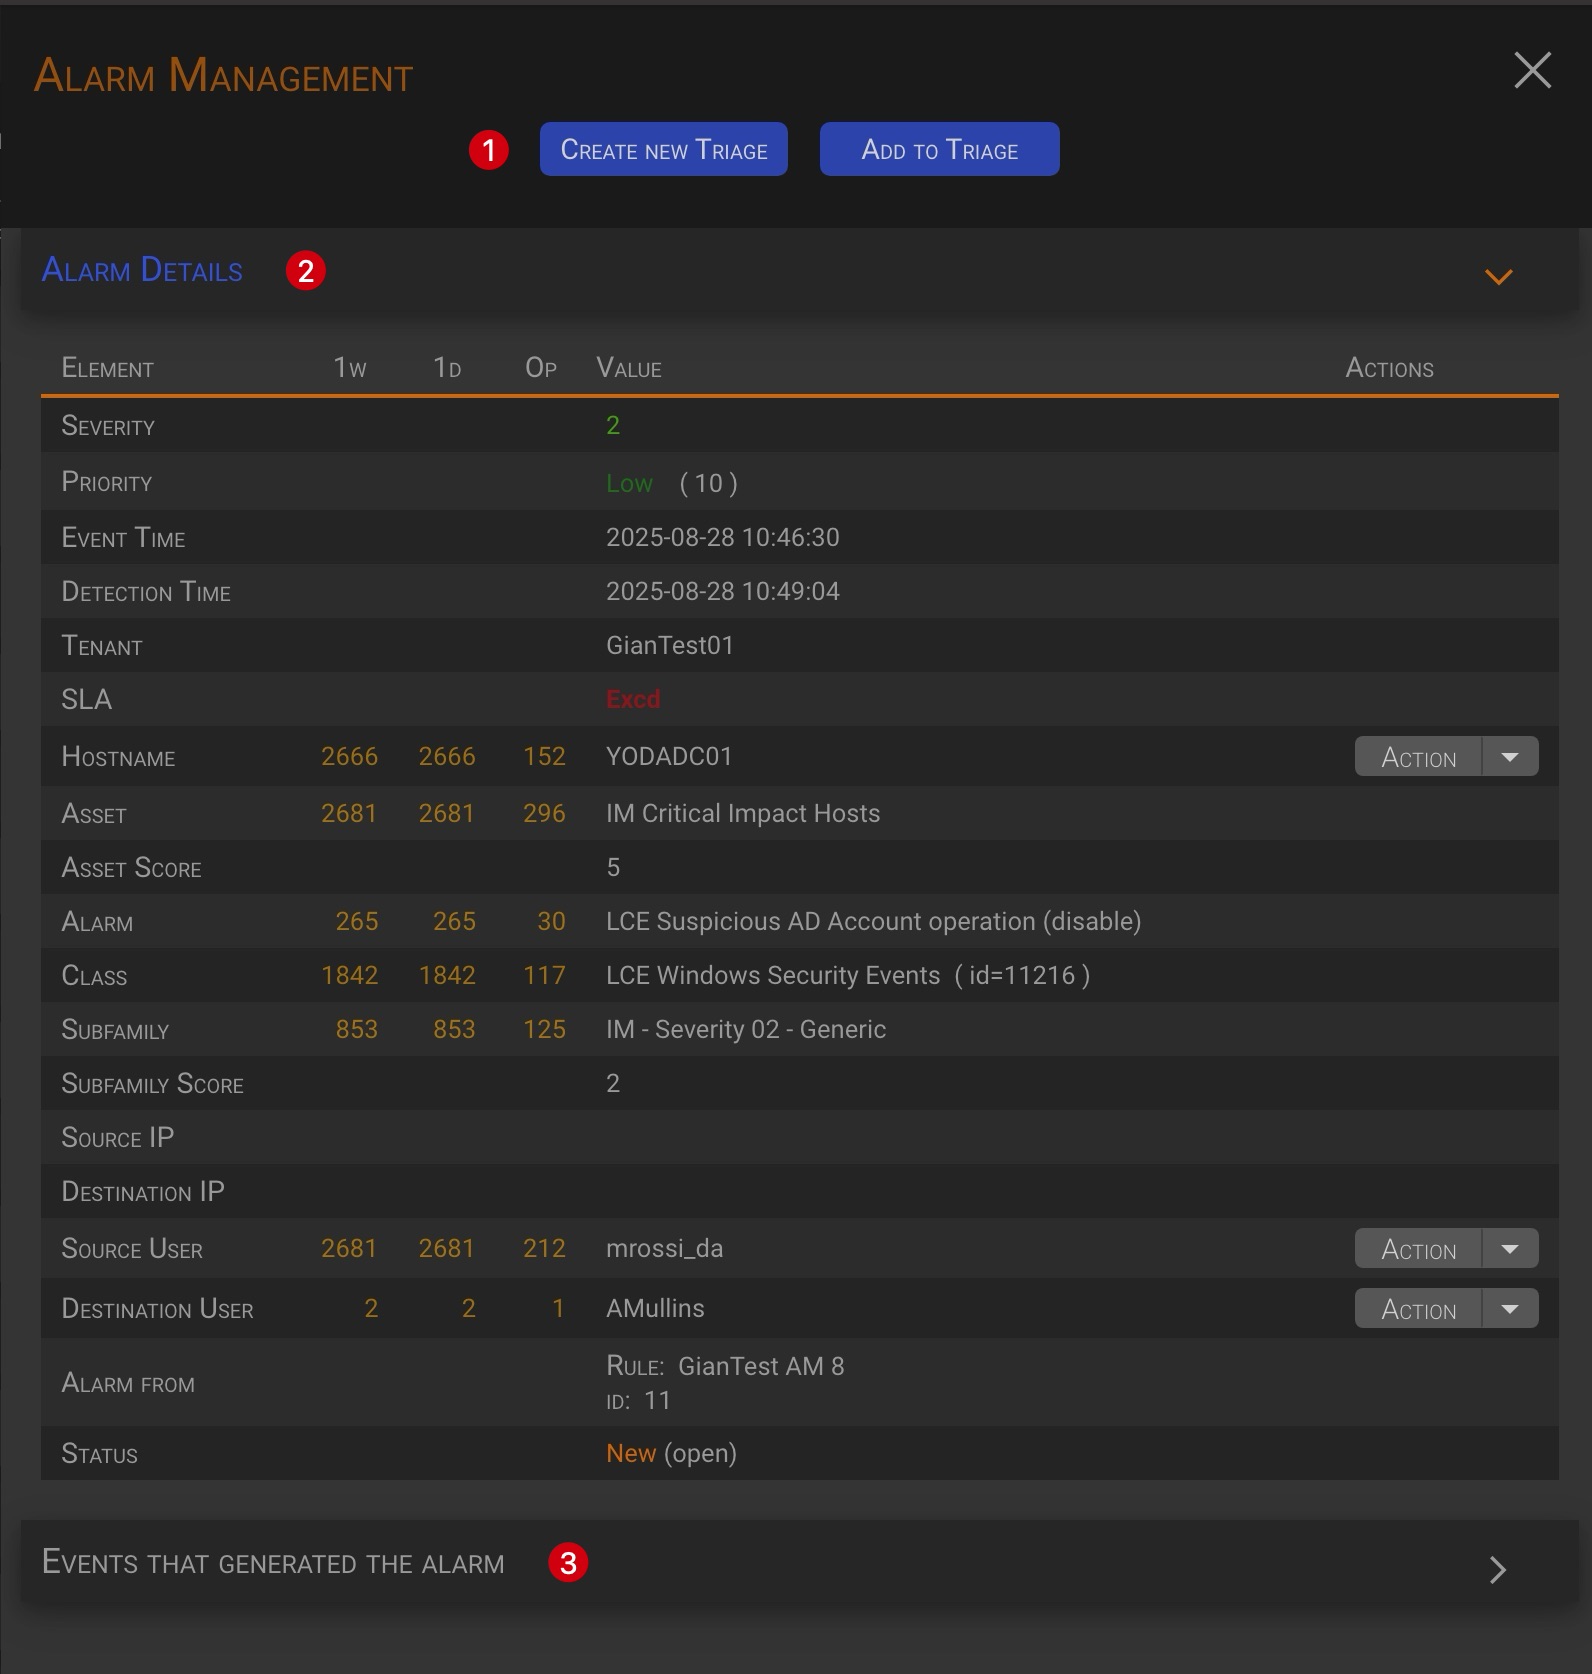
Let’s see each section in detail.
1.4.1 Alarm Management (Section 1)
This section lists the alarm management actions available in the current context.
When in the Alarm Dashboard context, the following actions are available:
- Create new Triage
- Add to Triage
1.4.1.1 Create new Triage
TIP
This management action creates a new triage and assigns the current alarm to it.
By clicking the Create new Triage button (1), an hidden section will appear below the management actions button.
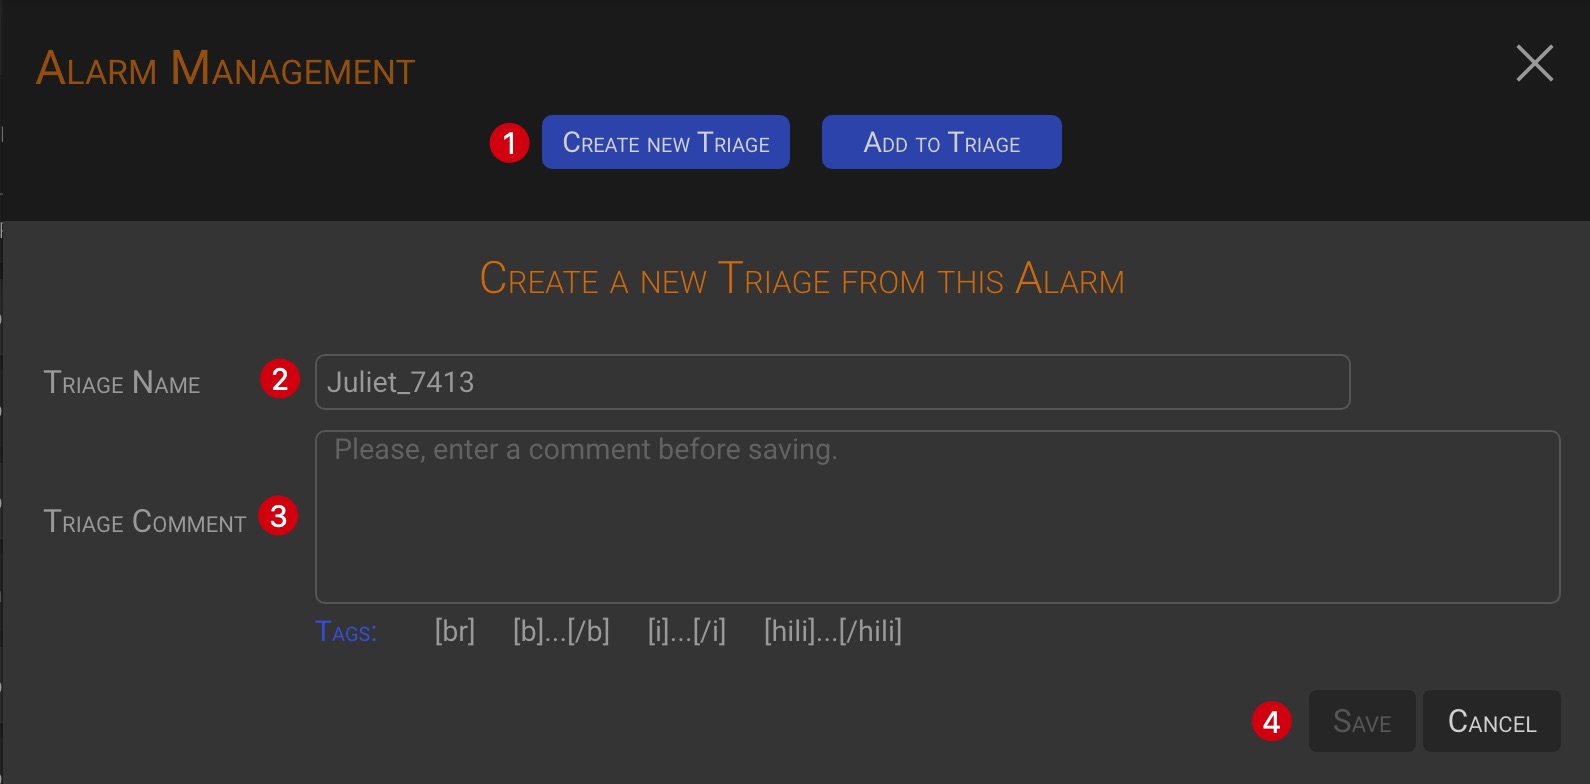
The system generates a unique Triage Name, but you can change it to your own text. After entering a Triage Comment, the Save button will be enabled, allowing you to save the triage.
1.4.1.2 Add to Triage
TIP
This management action adds the current alarm to an already existing triage.
By clicking the Add to Triage button (1), an hidden section will appear below the management actions button.
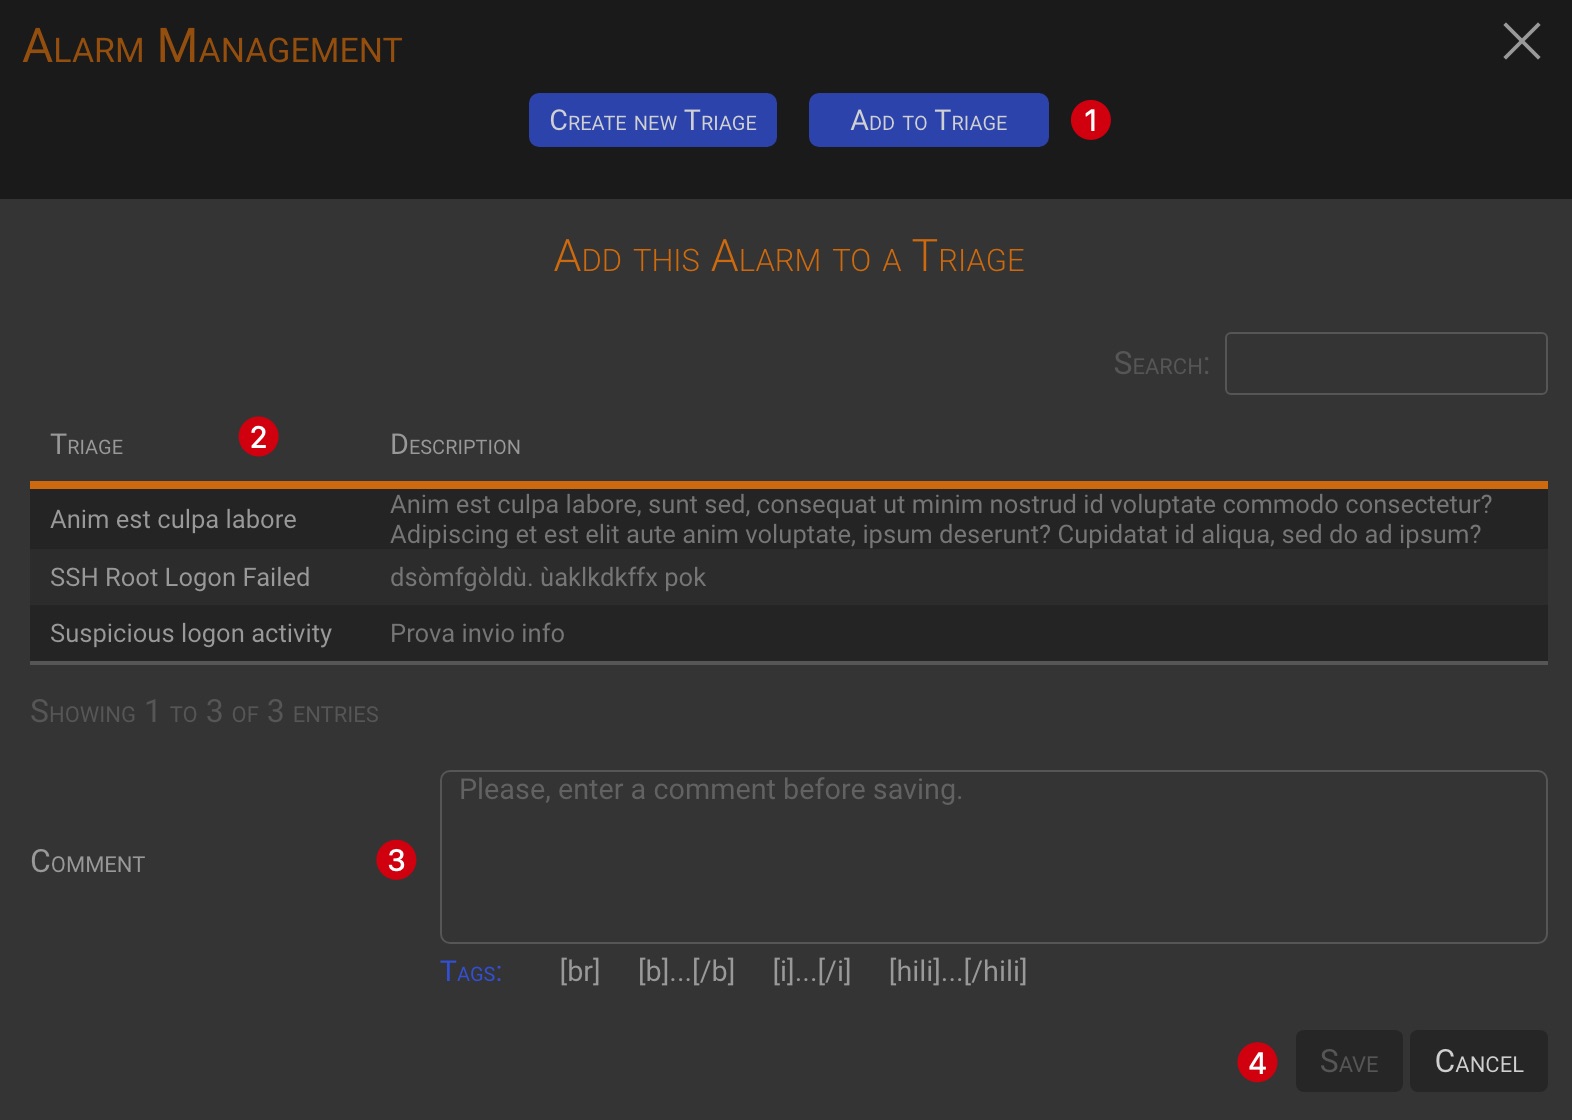
Select the triage to which you want to add the alarm to by clicking on the triage line in the triage table (the line will turn green). After entering a Comment, the Save button will be enabled, allowing you to add the current alarm to the selected triage.
1.4.2 Alarm Details (Section 2)
TIP
Please refer to the 03 - Alarm Details and Operation chapter.
1.5 Alarm Aggregation
The Alarms dashboard allows users to manually aggregate alarms in order to identify any potential correlations.

By clicking on one ore more values (1)(2), having the funnel icon in their column header, you can aggregate selected alarms by your own criteria.
Once one or more values have been selected, an hidden section will appear at the top of the page, enabling you to run the aggregation.

Select whether to aggregate the selected values with an and or an or logic and click the Aggregate button to apply the aggregation.
You can remove single selected values by clicking the x button 
Clicking the Clear button will reset to the initial Alarms view.
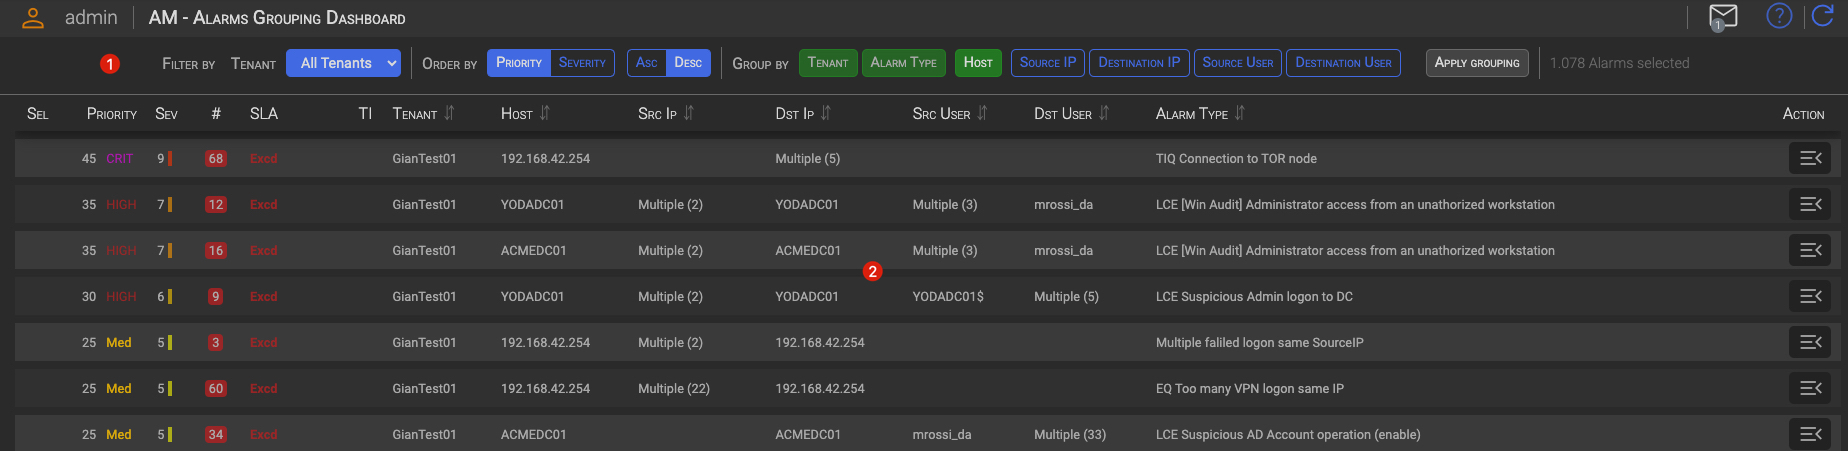
2 Alarm Grouping Dashboard
The Alarm Grouping Dashboard is split into two main areas and looks immediately different form the Alarm Dashboard. It starts with an pre-aggregated Alarms view.
2.1 The Filter section (1)
In the Filter section, you can select which alarms you want to see and the order in which they are displayed.

2.1.1 General Filters (1)
- Tenant You can choose which Tenant’s alarms you want to see.
2.1.2 Order by (2)
Here you can select how to order the current Alarm view.
- Priority Alarm will be ordered by Priority
- Severity Alarm will be ordered by Severity
2.1.3 Group By (3)
The Group By options allow you to aggregate alarms in different ways. This makes it easier to group them in a Triage creation logic.
Alarms aggregation rules:
- By default, Alarms are aggregated by Tenant, Alarm Type and Host.
- The Tenant and Alarm Type aggregations cannot be turned of.
- The Host aggregation can be turned on or off, as well as the Source IP, Destination IP, Source User and Destination User aggregations.
- The Host aggregation can be combined with other aggregation.
- Only one of the Source IP, Destination IP, Source User and Destination User aggregations can be selected at time.
TIP
Alarms are always aggregated at least by Tenant, Alarm Type
Pratically, Alarms can be aggregated by:
- Tenant + Alarm Type
- Tenant + Alarm Type + Host
- Tenant + Alarm Type + Host + any of the other possible aggregations
- Tenant + Alarm Type + any of the other possible aggregations
2.1.4 Alarm selected (4)
Here you can see the total number of open Alarms that are grouped in the view.
2.2 The Grouped Alarms list (2)
The Grouped Alarms list contains the Alarms groups resulting by the selected aggregation.

| Column | Description |
|---|---|
| Sel | A check icon when the Group has been selected (see the below 03 - copiata - Alarm Dashboard Operation chapter) |
| Priority | The highest priority among the alarms belonging to the group. |
| Sev | The highest severity among the alarms belonging to the group. |
| # | The number of alarms in the group |
| SLA | The lowest remaining SLA time, or target or excd, among the alarms belonging to the group. |
| Tenant | The reference Tenant |
| Host | Alarms host. The value will be Multiple (n), if alarms in the group are coming from more than one hosts |
| Src Ip | Alarms Source IP. The value will be Multiple (n), if alarms in the group are coming from more than one Source IPs |
| Dst Ip | Events Destination IP. The value will be Multiple (n), if alarms in the group are targeting more than one Destination IPs |
| Src User | Events Source user. The value will be Multiple (n), if alarms in the group are coming from more than one Users |
| Dst User | Events Destination user. The value will be Multiple (n), if alarms in the group are targeting more than one Users |
| Alarm Type | The event name assigned when creating the Alarm |
| Action | Opens the Alarm Group detail view (see the 04 - copiato - Alarm Grouping Dashboard Operation chapter.) |
2.3 Alarm Groups analysis and management
Through the Alarm Dashboard you can analyze groups of alarms and take action on any of them.
![]()
Once the alarms have been grouped according to your preferences, you may proceed with the relevant actions by clicking the Open Details button under the Action column.
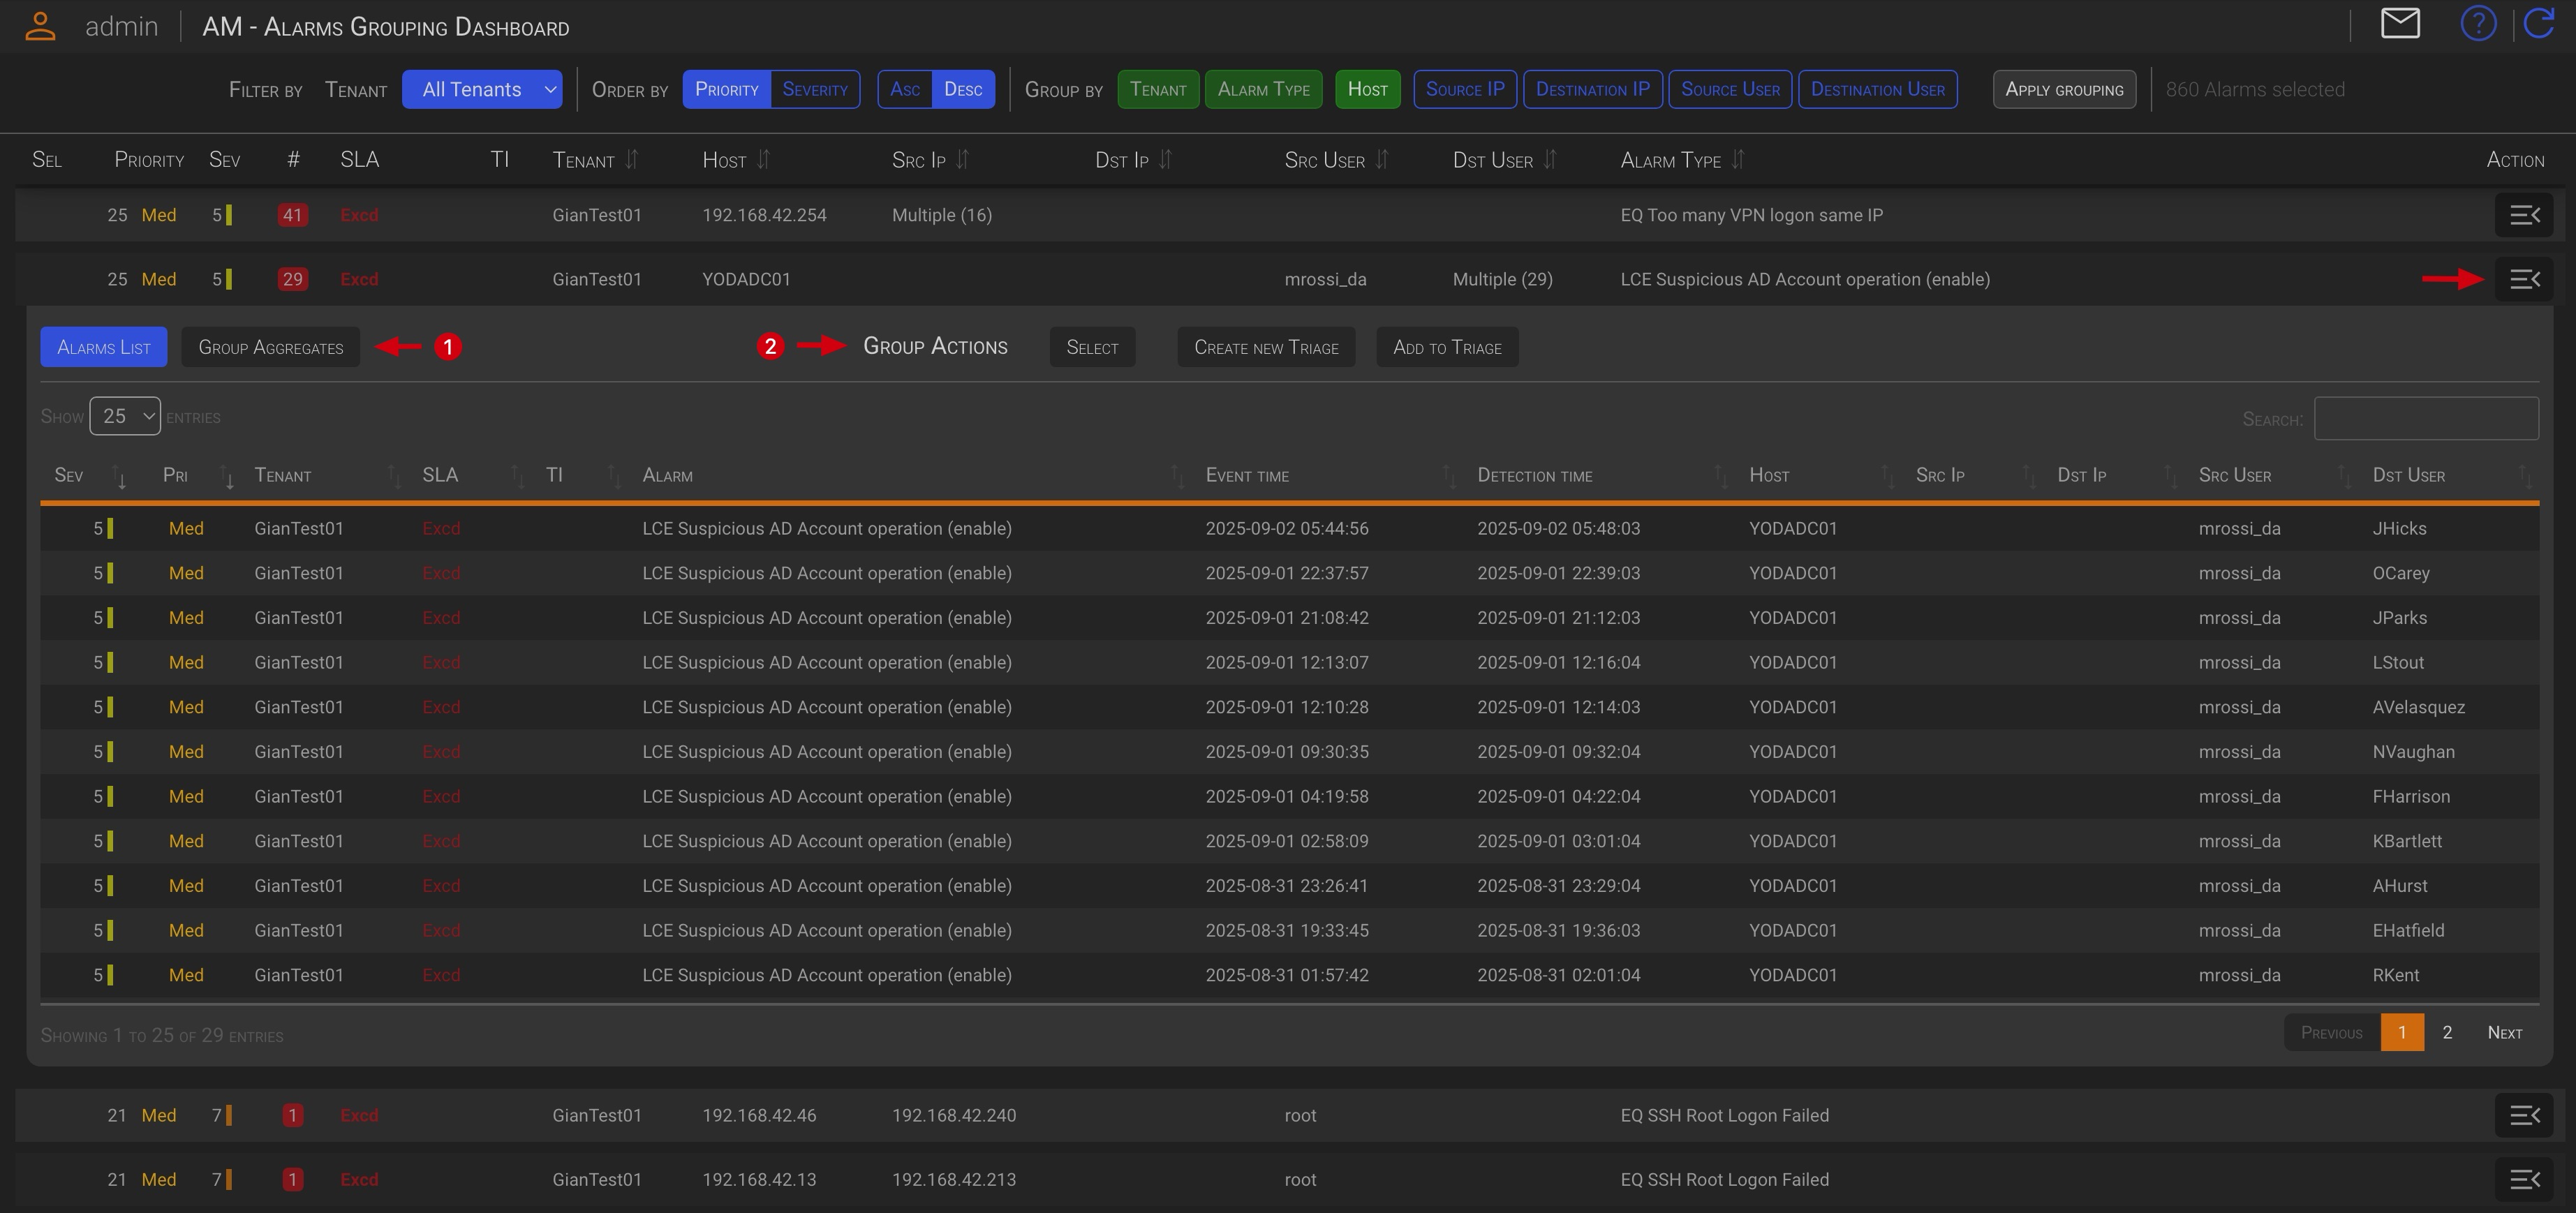
The grouped alarms management panel header is split in two sections:
- The group analysis
- The group management actions
Let’s take a closer look to the functions of each section.
2.3.1 Group Analysis
The group management panel opens and displays the list of alarms currently assigned to the group by default.
2.3.1.1 Alarm List
In the Alarm List tab you will see the list of all the alarms within the group.
Clicking on an Alarm line, will open the Alarm Management panel. The available management actions are the same as those in the Alarm Dashboard. Please refer to the previous Alarm Management (Section 1) chapter for more information.
Alarm Details
Please see the 03 - Alarm Details and Operation chapter for more details.
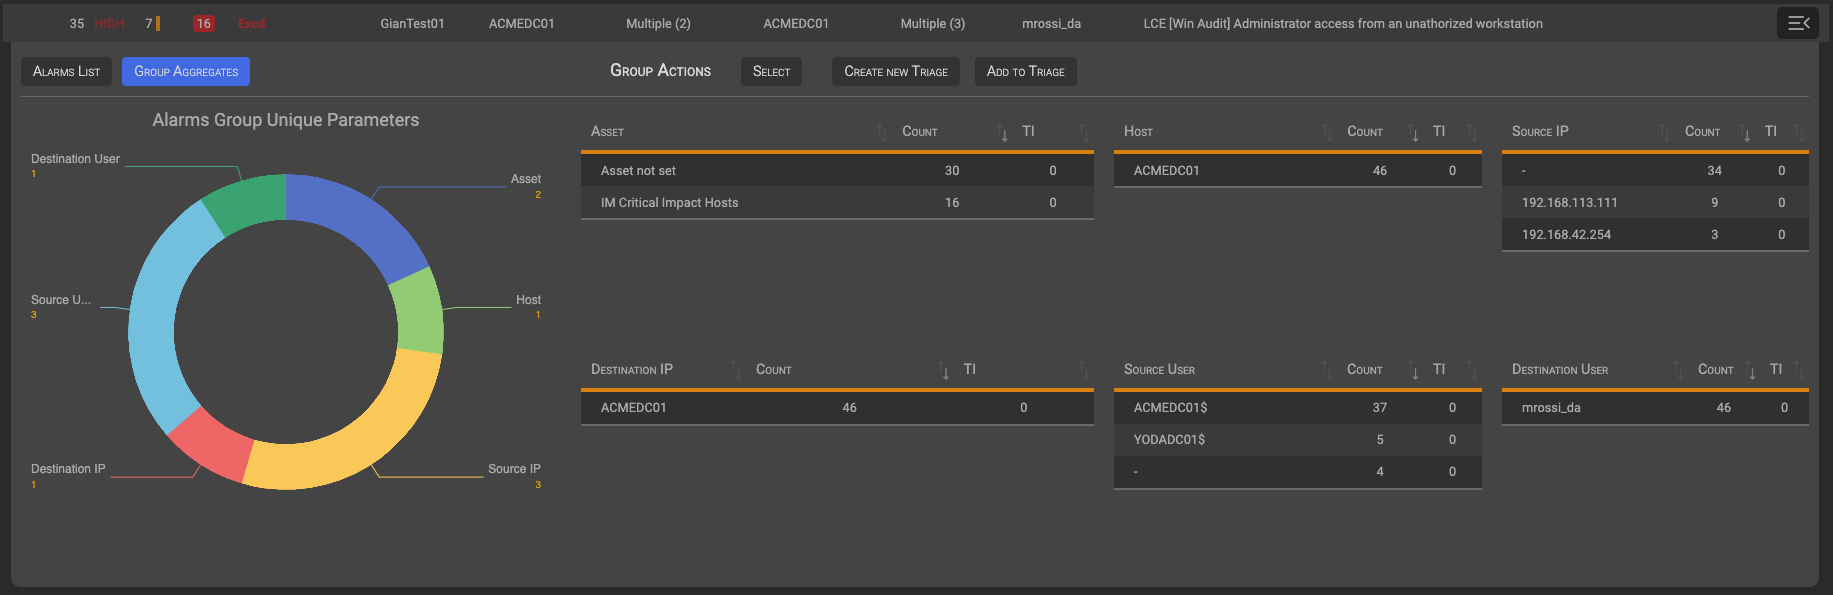
2.3.1.2 Group Aggregates
In the Group Aggregate tab you will see an aggregate overview of the events’ parameters within the group.
2.3.2 Group Actions
2.3.2.1 Select
The Select function allows you to group two or more alarms groups, coming from the same Tenant, and take one of the available actions against them.

To select the current alarm group for bulk processing, click on the Select button in the Grouped Alarms management panel.
To individually deselect previously selected alarms groups, open the management panel of the alarm group you want to deselect and click the Deselect button.
When you select a group, the Grouped Alarms management panel will close and a green check icon will appear in the first group column.

Once two or more alarms groups has been selected the hidden section Multiple Groups Actions section will appear under the Filter section.
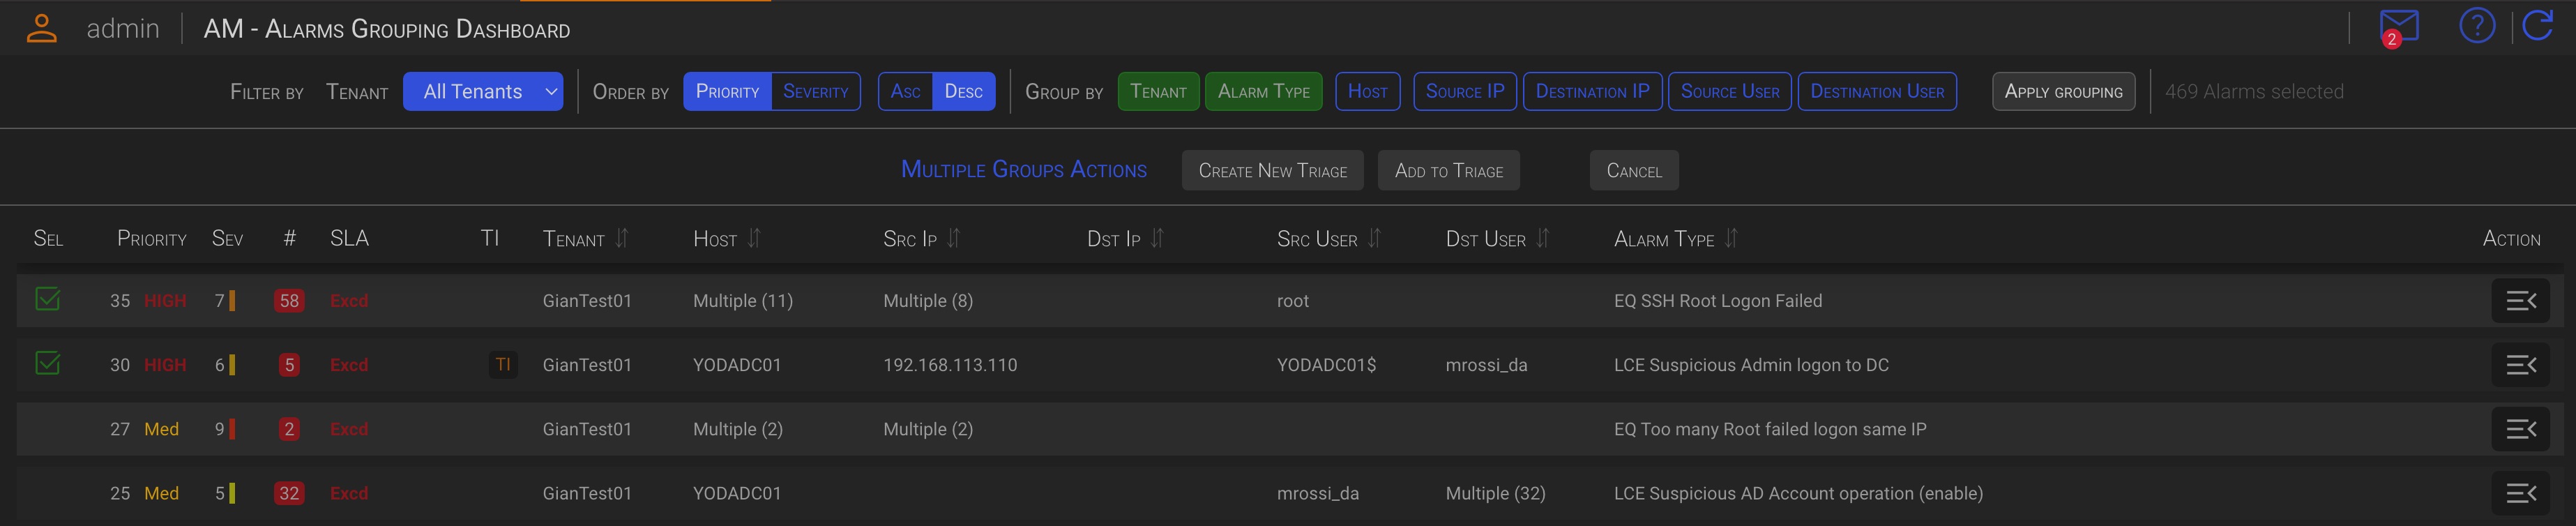
Clicking one of the buttons in this section will perform the corresponding action on all of the selected alarms groups. Available actions are:
- Create new Triage
- Add to Triage
You can cancel the operation by clicking the Cancel button.
Since collective actions are performed in the same way as individual actions, please see the next chapters for details on how to perform these actions.
Tip
Bulk groups operations are only possible between groups from the same tenant.
2.3.2.2 Create new Triage
TIP
- This management action creates a new triage.
- All alarms within the current or selected alarms groups will be associated with the new triage.
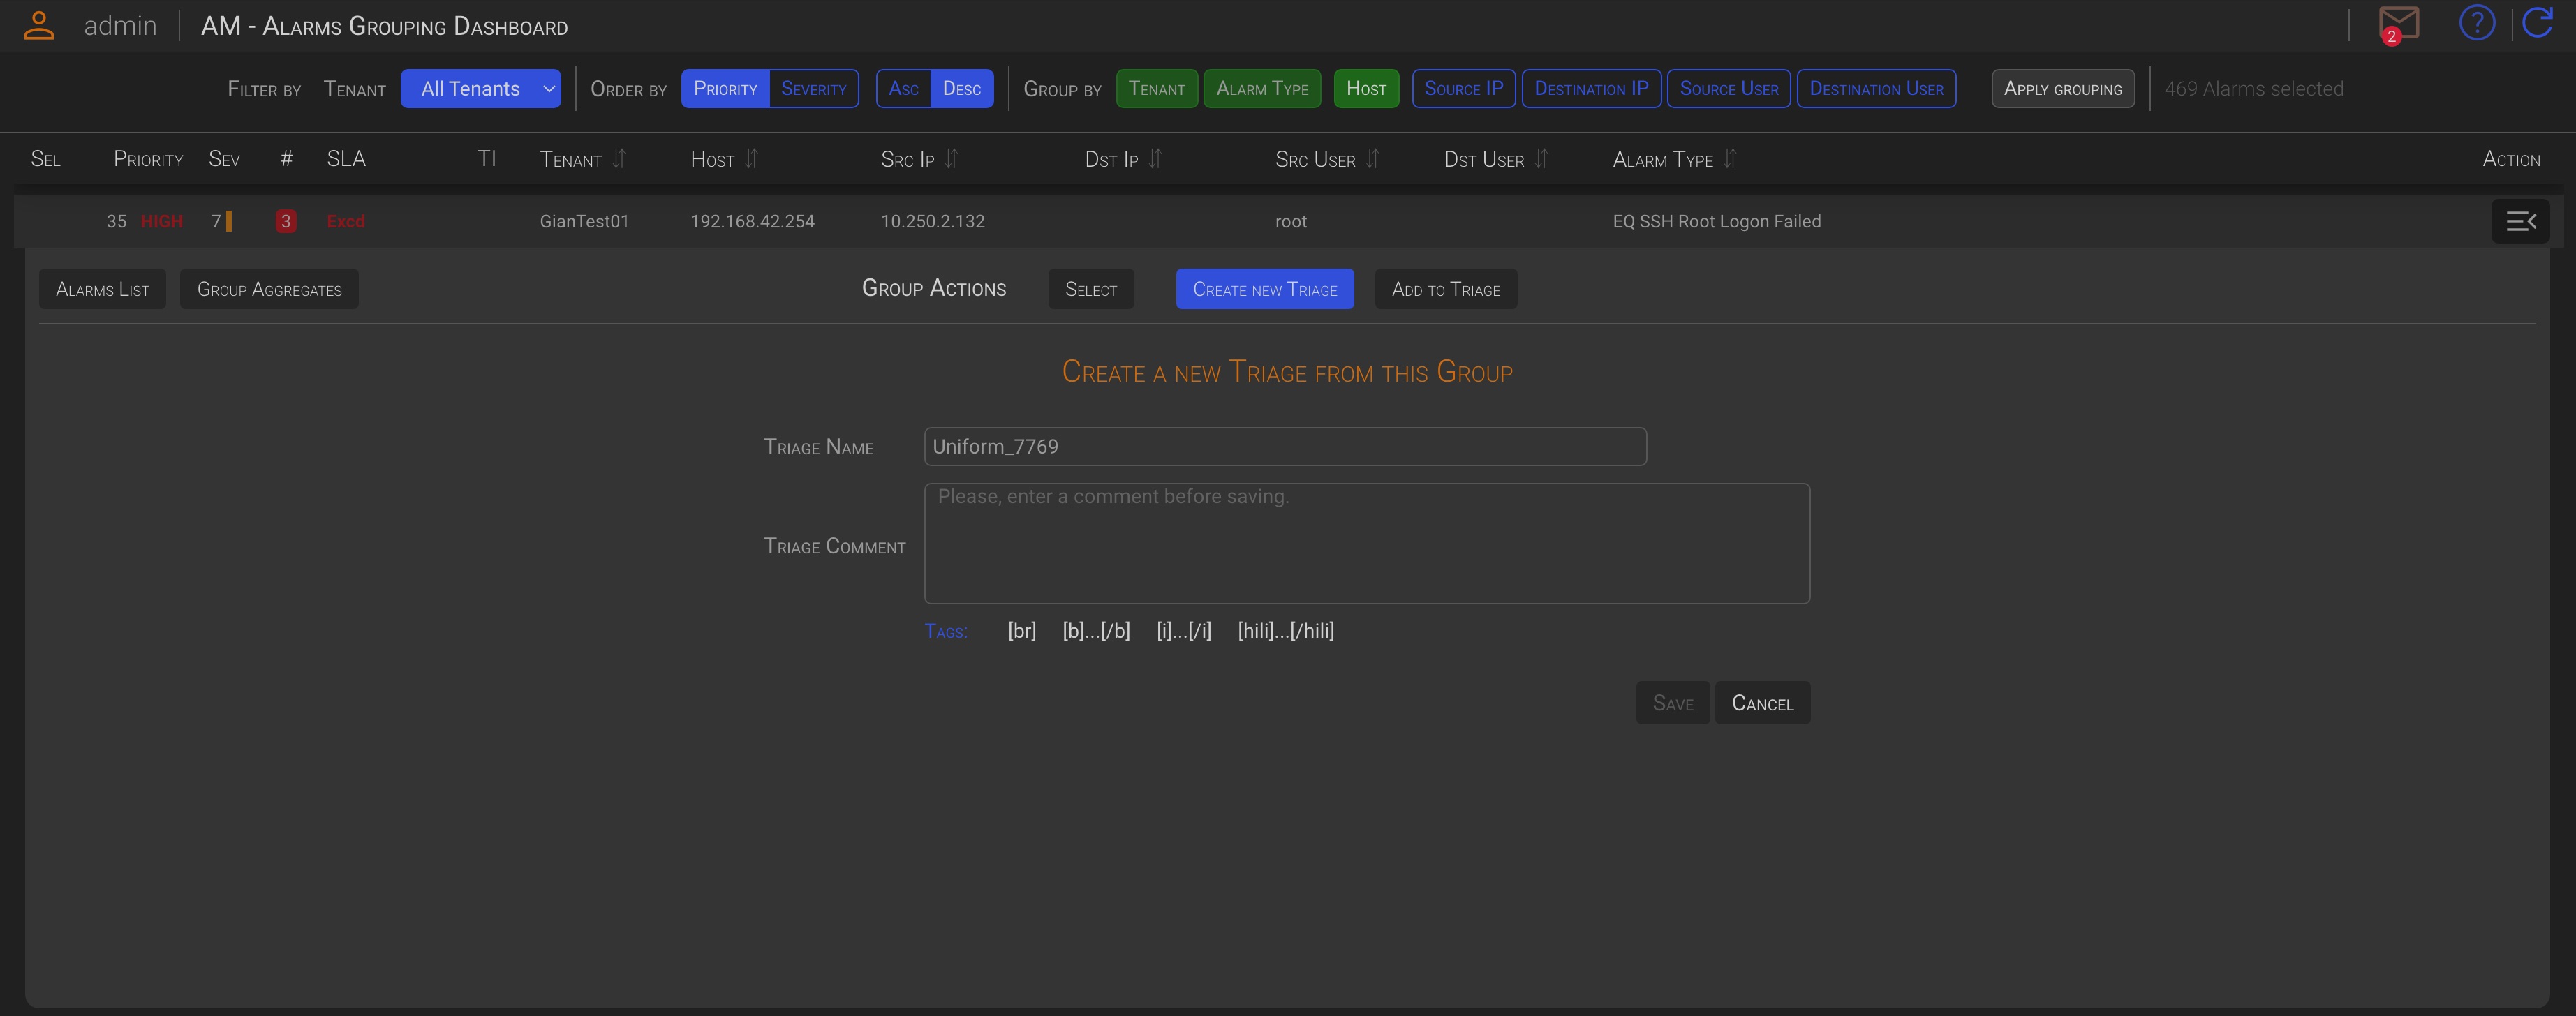
By clicking on the Create new Triage button, in the Group Management panel or in the Multiple Groups Actions, an hidden section will appear.
The system generates a unique Triage Name, but you can change it to your own text.
After entering a Comment, the Save button will be enabled, allowing you to create a new triage containing the current alarm group, or the selected alarms groups, alarms.
2.3.2.3 Add to Triage
TIP
- This management action adds all alarms within the current or selected alarms groups to the selected triage.
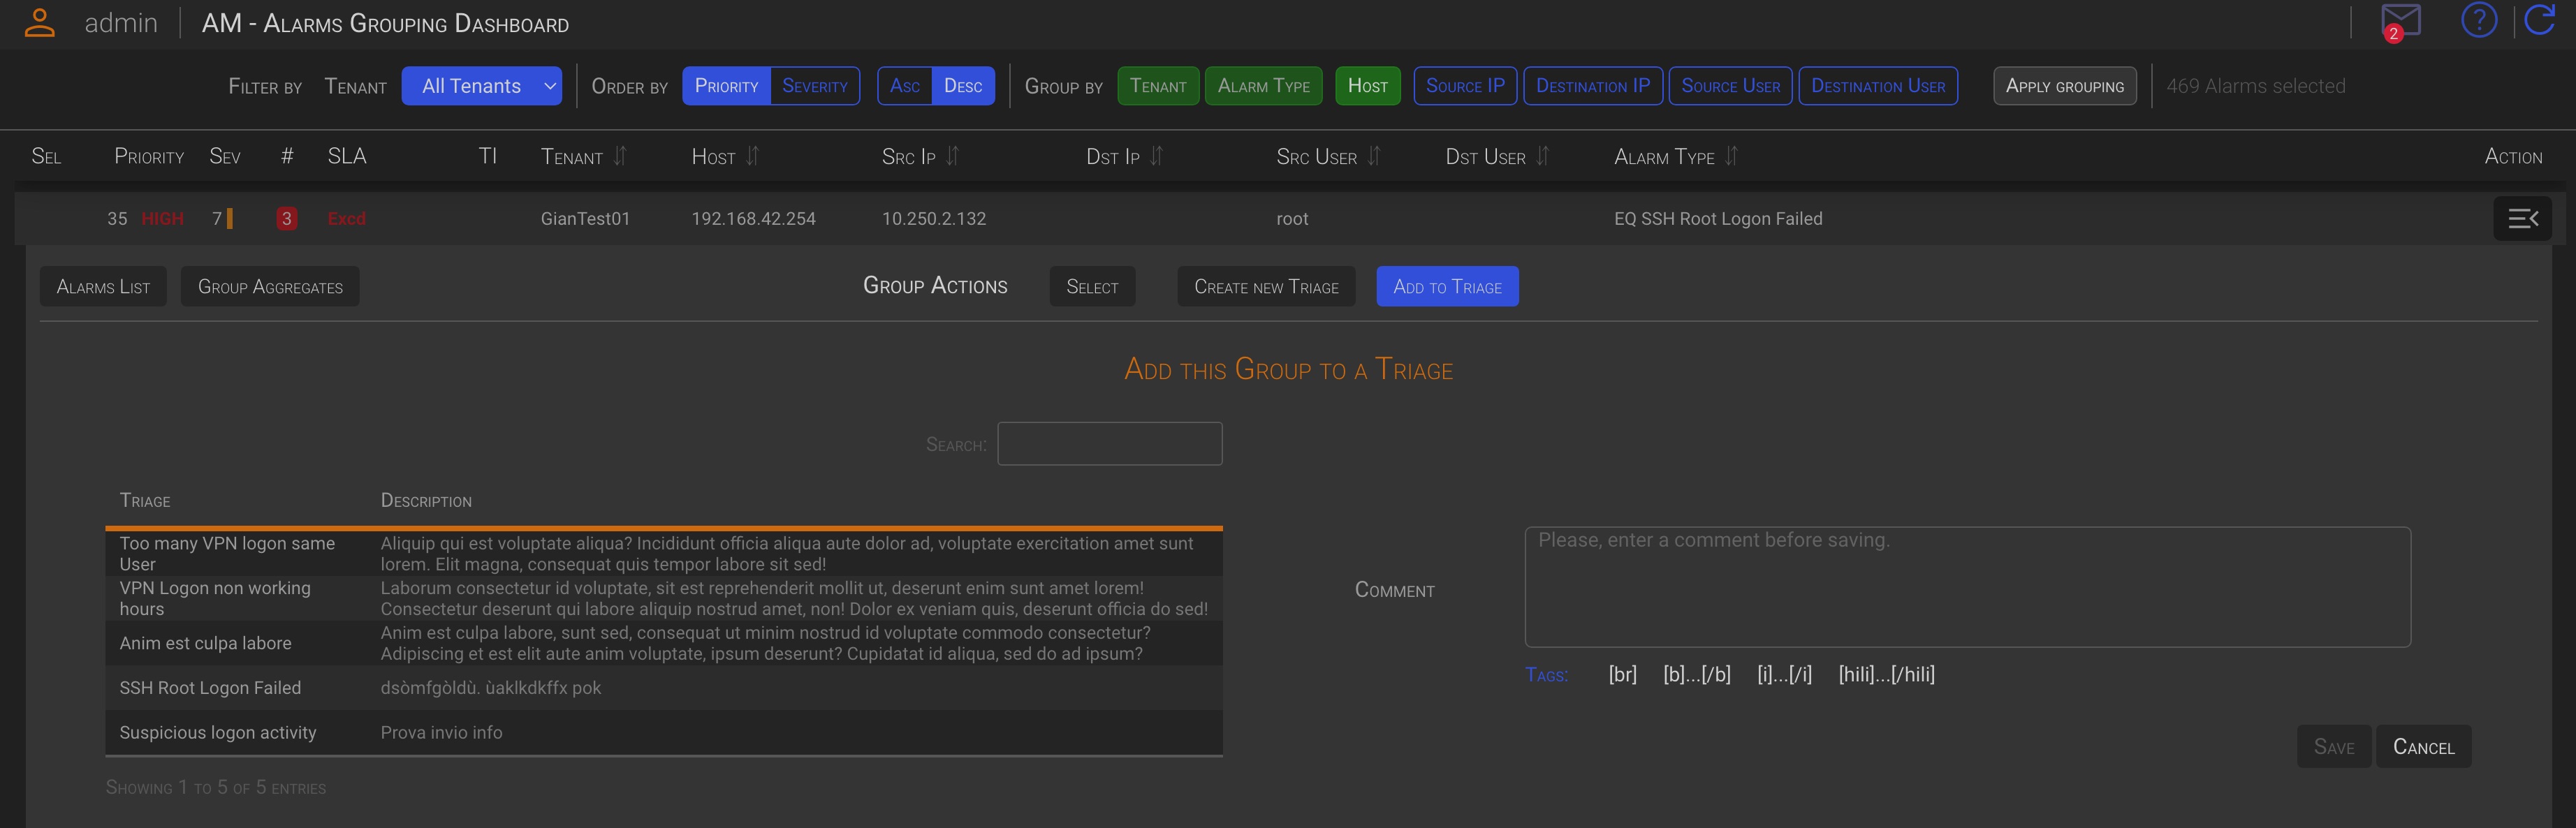
The dialog window will display a list of the open triage for the same Tenant as the selected groups. Choose the Triage you want to add the current, or the selected alarms groups, to by clicking on the desired Triage row (it will turn green). Then, add a comment to explain the context.
Click the Save button to add the group to the selected Triage.